Table of Contents
- General overview of the migration process
- Help for Windows users
- Help for Mac users
- If you want to use Thunderbird, you must migrate to Gmail, since the ACCC has not enabled the Outlook IMAP or POP3 servers.
Overview of the Migration Process
The ACCC plans to end Webmail and Mailserv (as well as any holdouts still using Tigger to receive their email). service this December 15th. If you are not either using a UIC GoogleApps/Gmail or a UIC Exchange account to receive your email then you must take action before December 15th.
You must do 2 things:
- Sign up for a new campus mail service either:
- Download copies of your mail stored on Mailserv
Most Mailserv users will have enough mail stored on the server that they will have to wait sometime for their mail client to download it all. You many need to leave your computer on overnight downloading your messages. Of course, if you already read your email with a desktop mail client like Microsoft Outlook, Thunderbird, or Apple's Mail.app you probably already have local copies of your mail stored on whatever computer you use to run that mail client.
Optionally, after downloading your old mail from Mailserv or Tigger, you may also upload your old email to your new mail service so that your old email will be available through the web-interface to the new service. Keep in mind before you start uploading your old mail to your new mail server, you should make sure your old mail server is not receiving new messages.. This will prevent you from having to migrate messages received during or after the time period you are uploading them to your new mail server. The ACCC has a tool to view/change your mail routing.
While it is easy and quick to begin uploading your mail, the upload process will likely take a long time to complete. If you copy all your mail at once, you will likely have to leave your computer on overnight for the copy to complete.
The ACCC's administrative head wants all the faculty and staff to sign up for the exchange service, but they have also stated that they will, at least for now, continue to allow faculty not covered by HIPPA regulations to use the UIC Gmail accounts.
Help for Windows Users
The ACCC provides good documentation for configuring Microsoft Outlook on Windows, which is the only client the officially supported desktop mail client for the service. If you are a Windows user, I recommend using Outlook to migrate your mail from Mailserv to Exchange.
Connect Microsoft Outlook to your old Mailserv account.
Connect Microsoft Outlook to your new Exchange account.
You may now drag and drop or copy & paste either individual emails or entire folders from one account to the other.Help for Mac Users
Because I have only so much time on my hands, I will write instructions for Microsoft Outlook 2016 for MacOS. You may be able to migrate your mail using Apple's Mail.app as well, but as Outlook is the official client, that will be what I document and support.
Note: Microsoft Outlook 2016 does not run on the latest version of MacOS (10.13 "High Sierra") out-of-the box. At least, not the version distributed by the webstore to campus IT Professionals. You must run Microsoft's update utility first, which can be triggered by opening Microsoft Word or Excel, which do run MacOS 10.13 after a fresh install of Microsoft Office 2016.
Connect Microsoft Outlook 2016 to Exchange
-
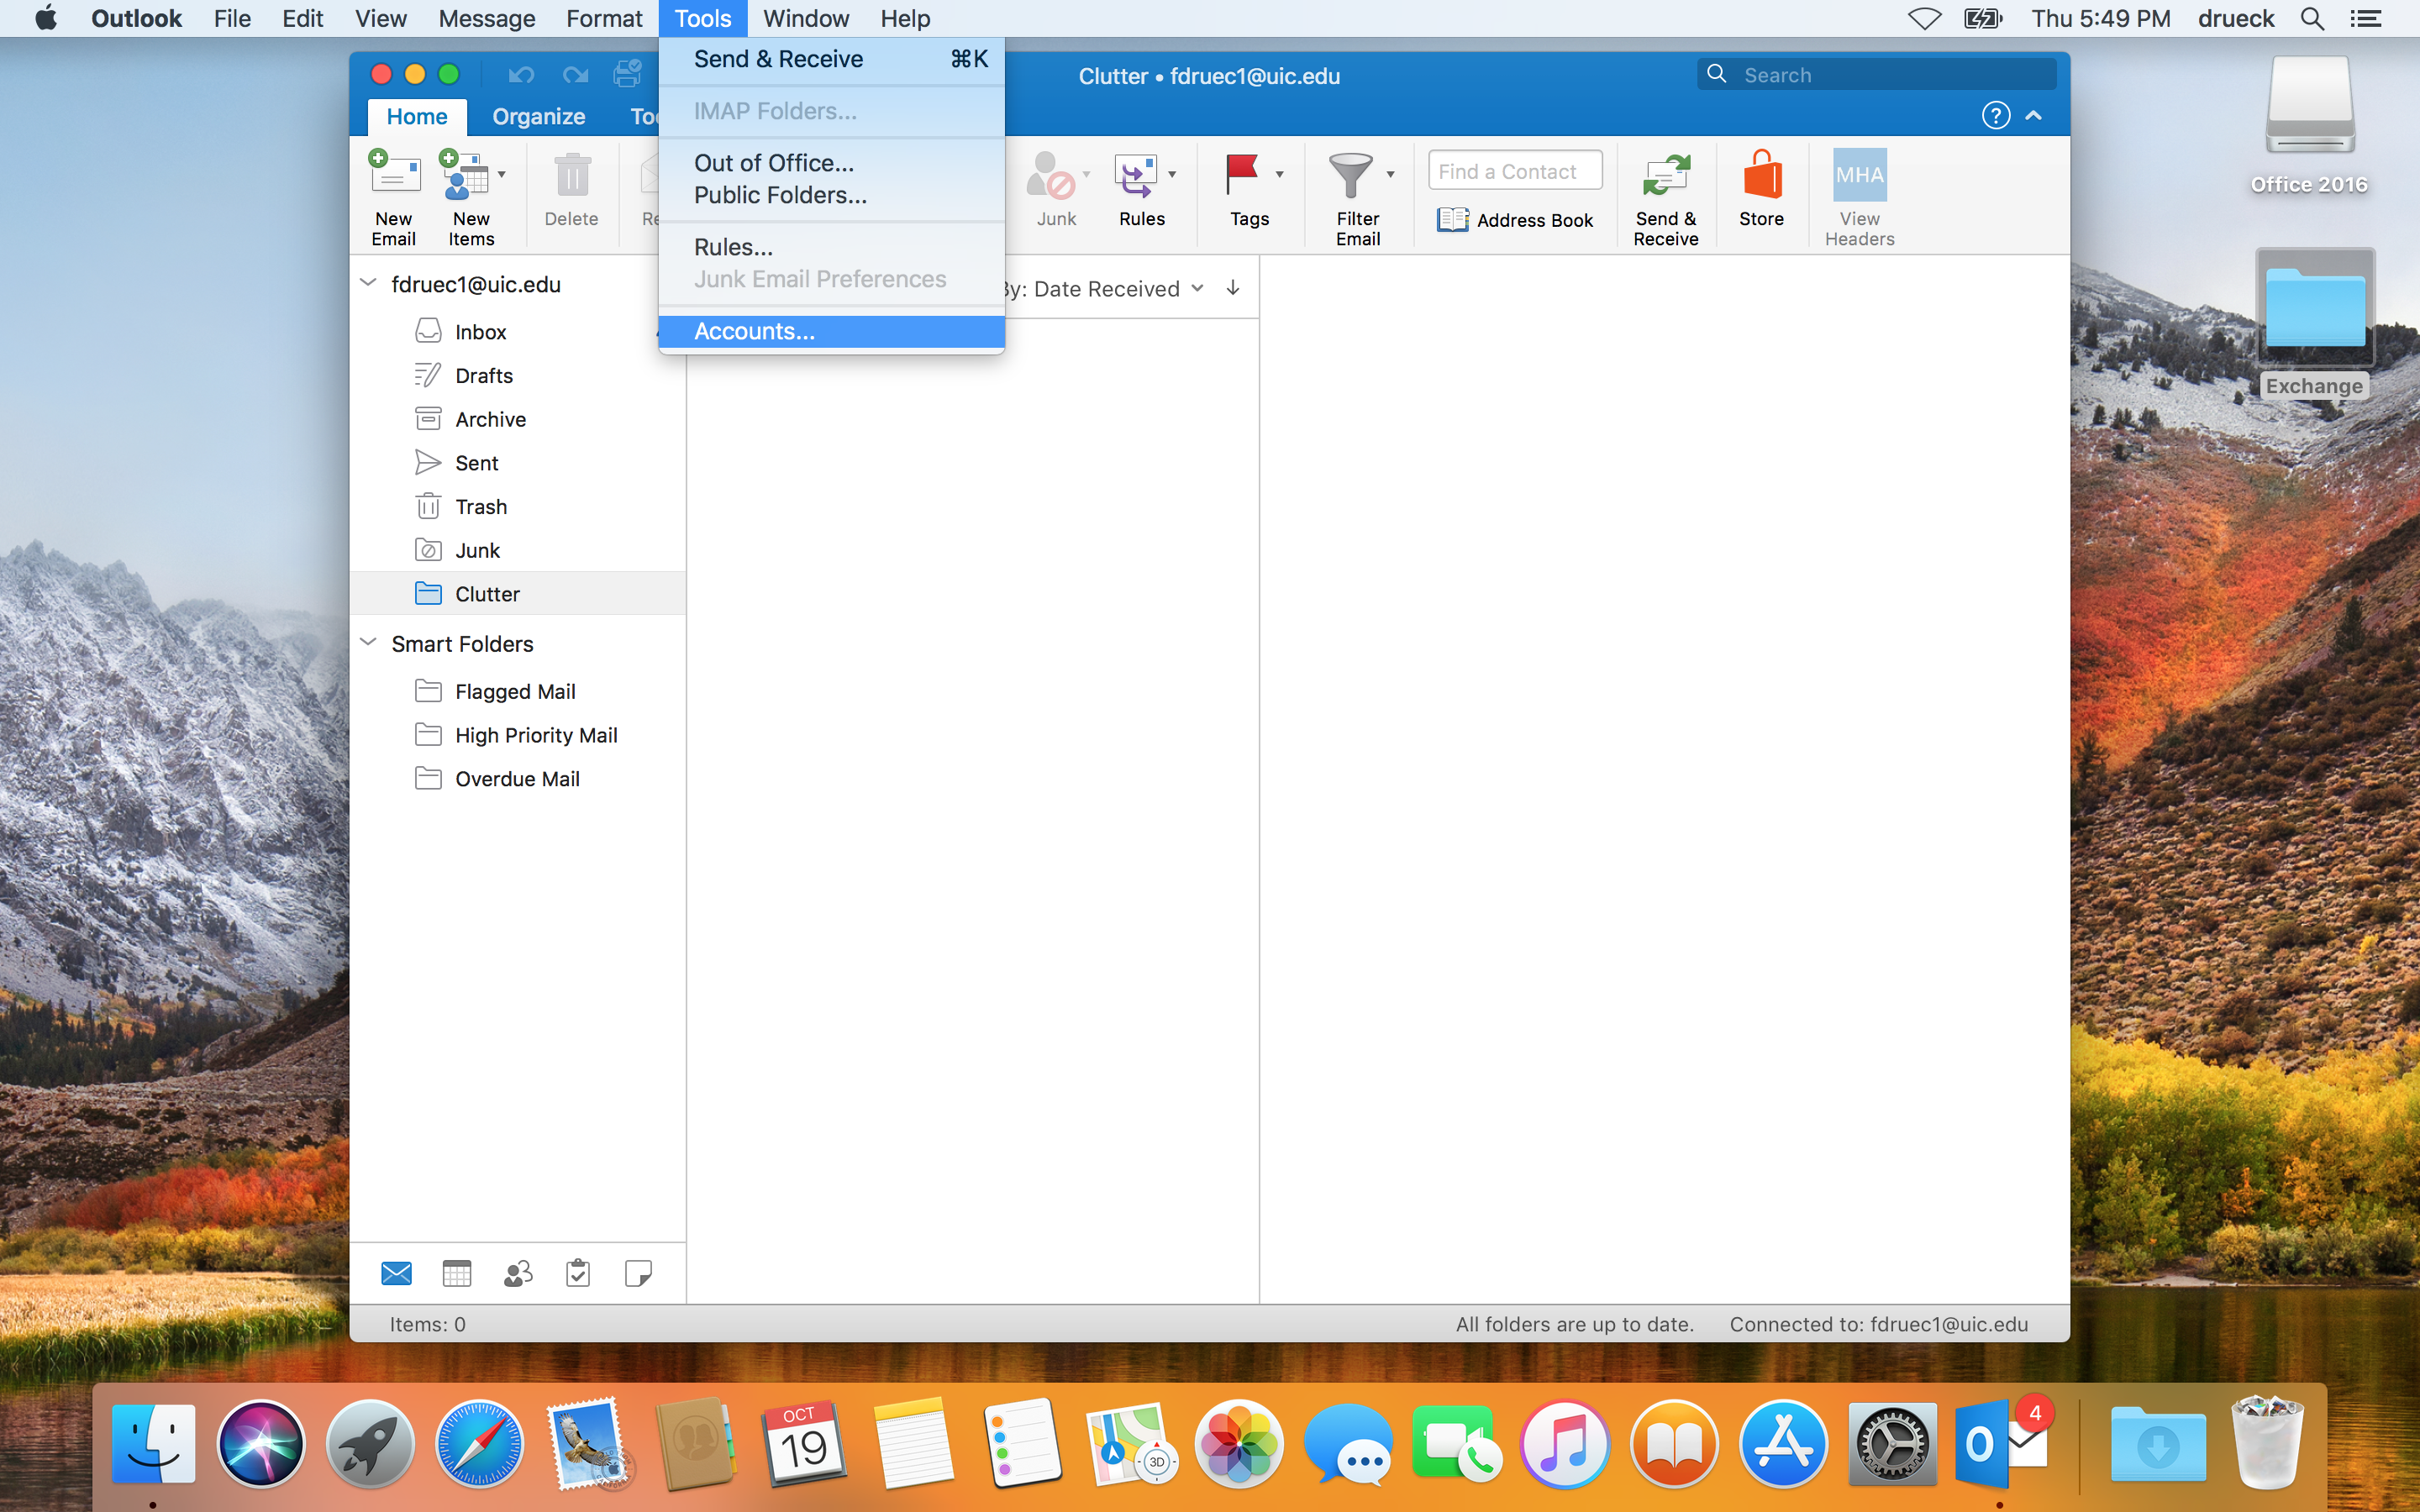
Open Microsoft Outlook 2016. Go to the global menu and select Tools > Accounts.
-
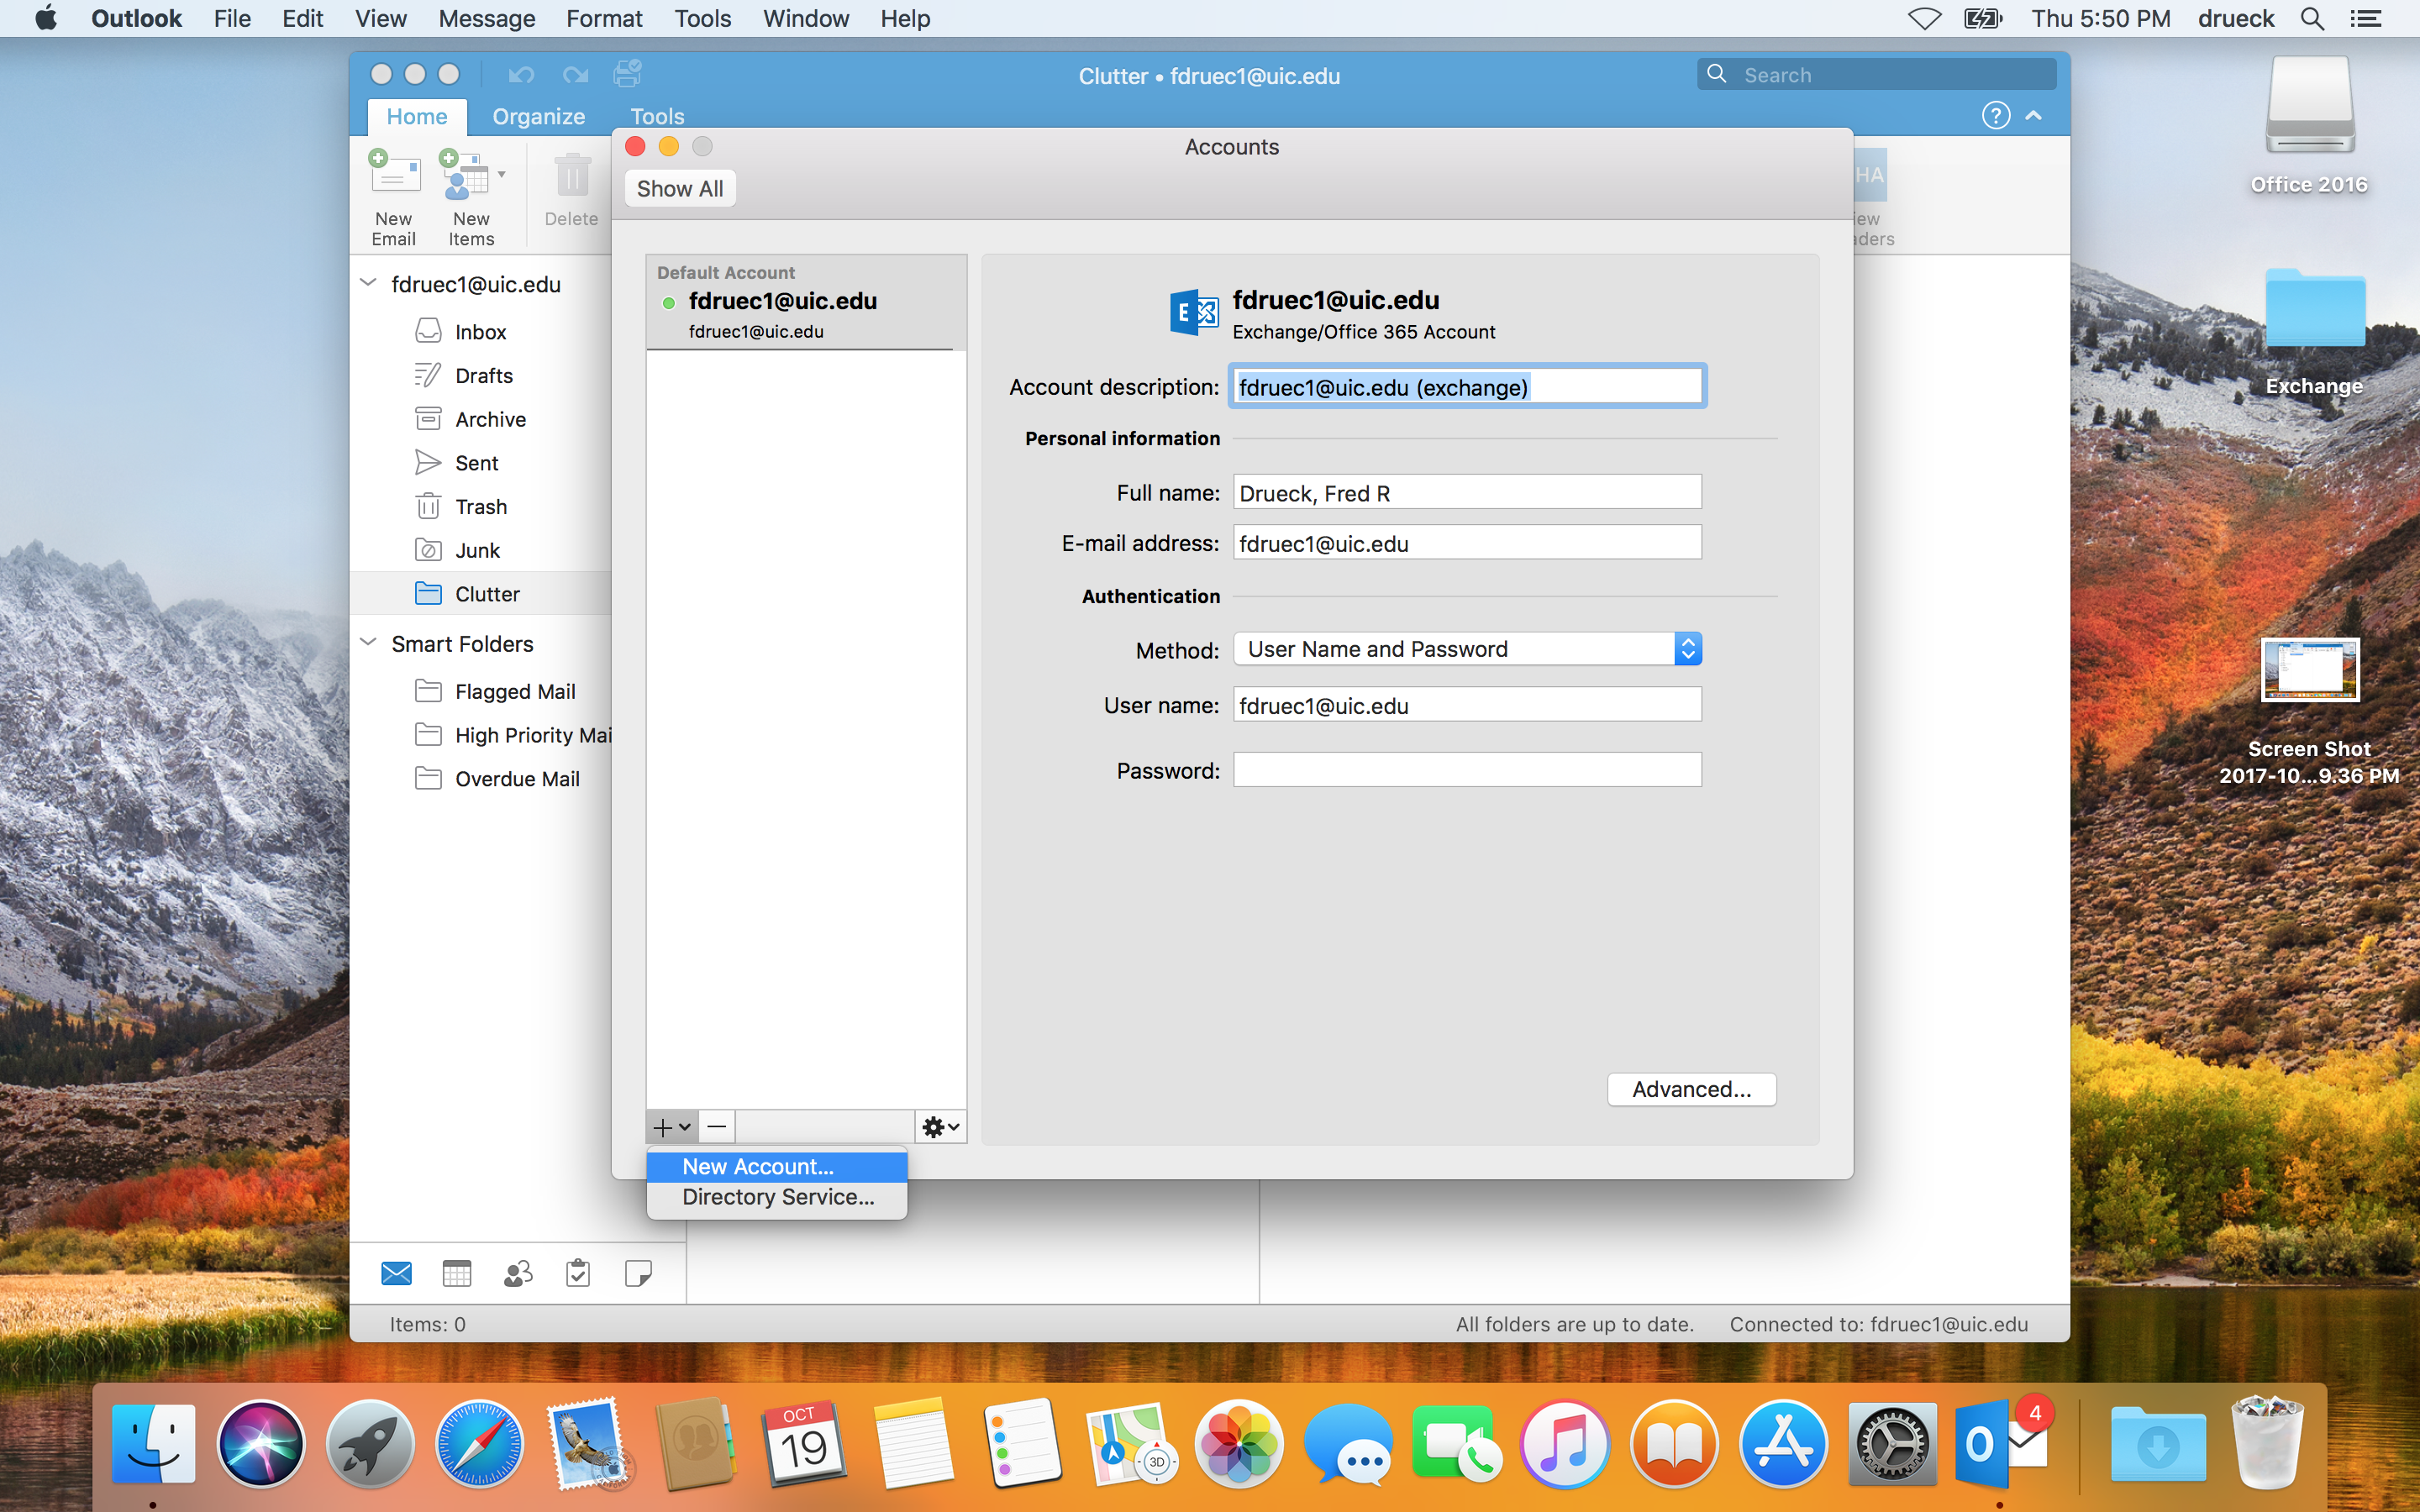
Click the + sign and choose New Account.
-
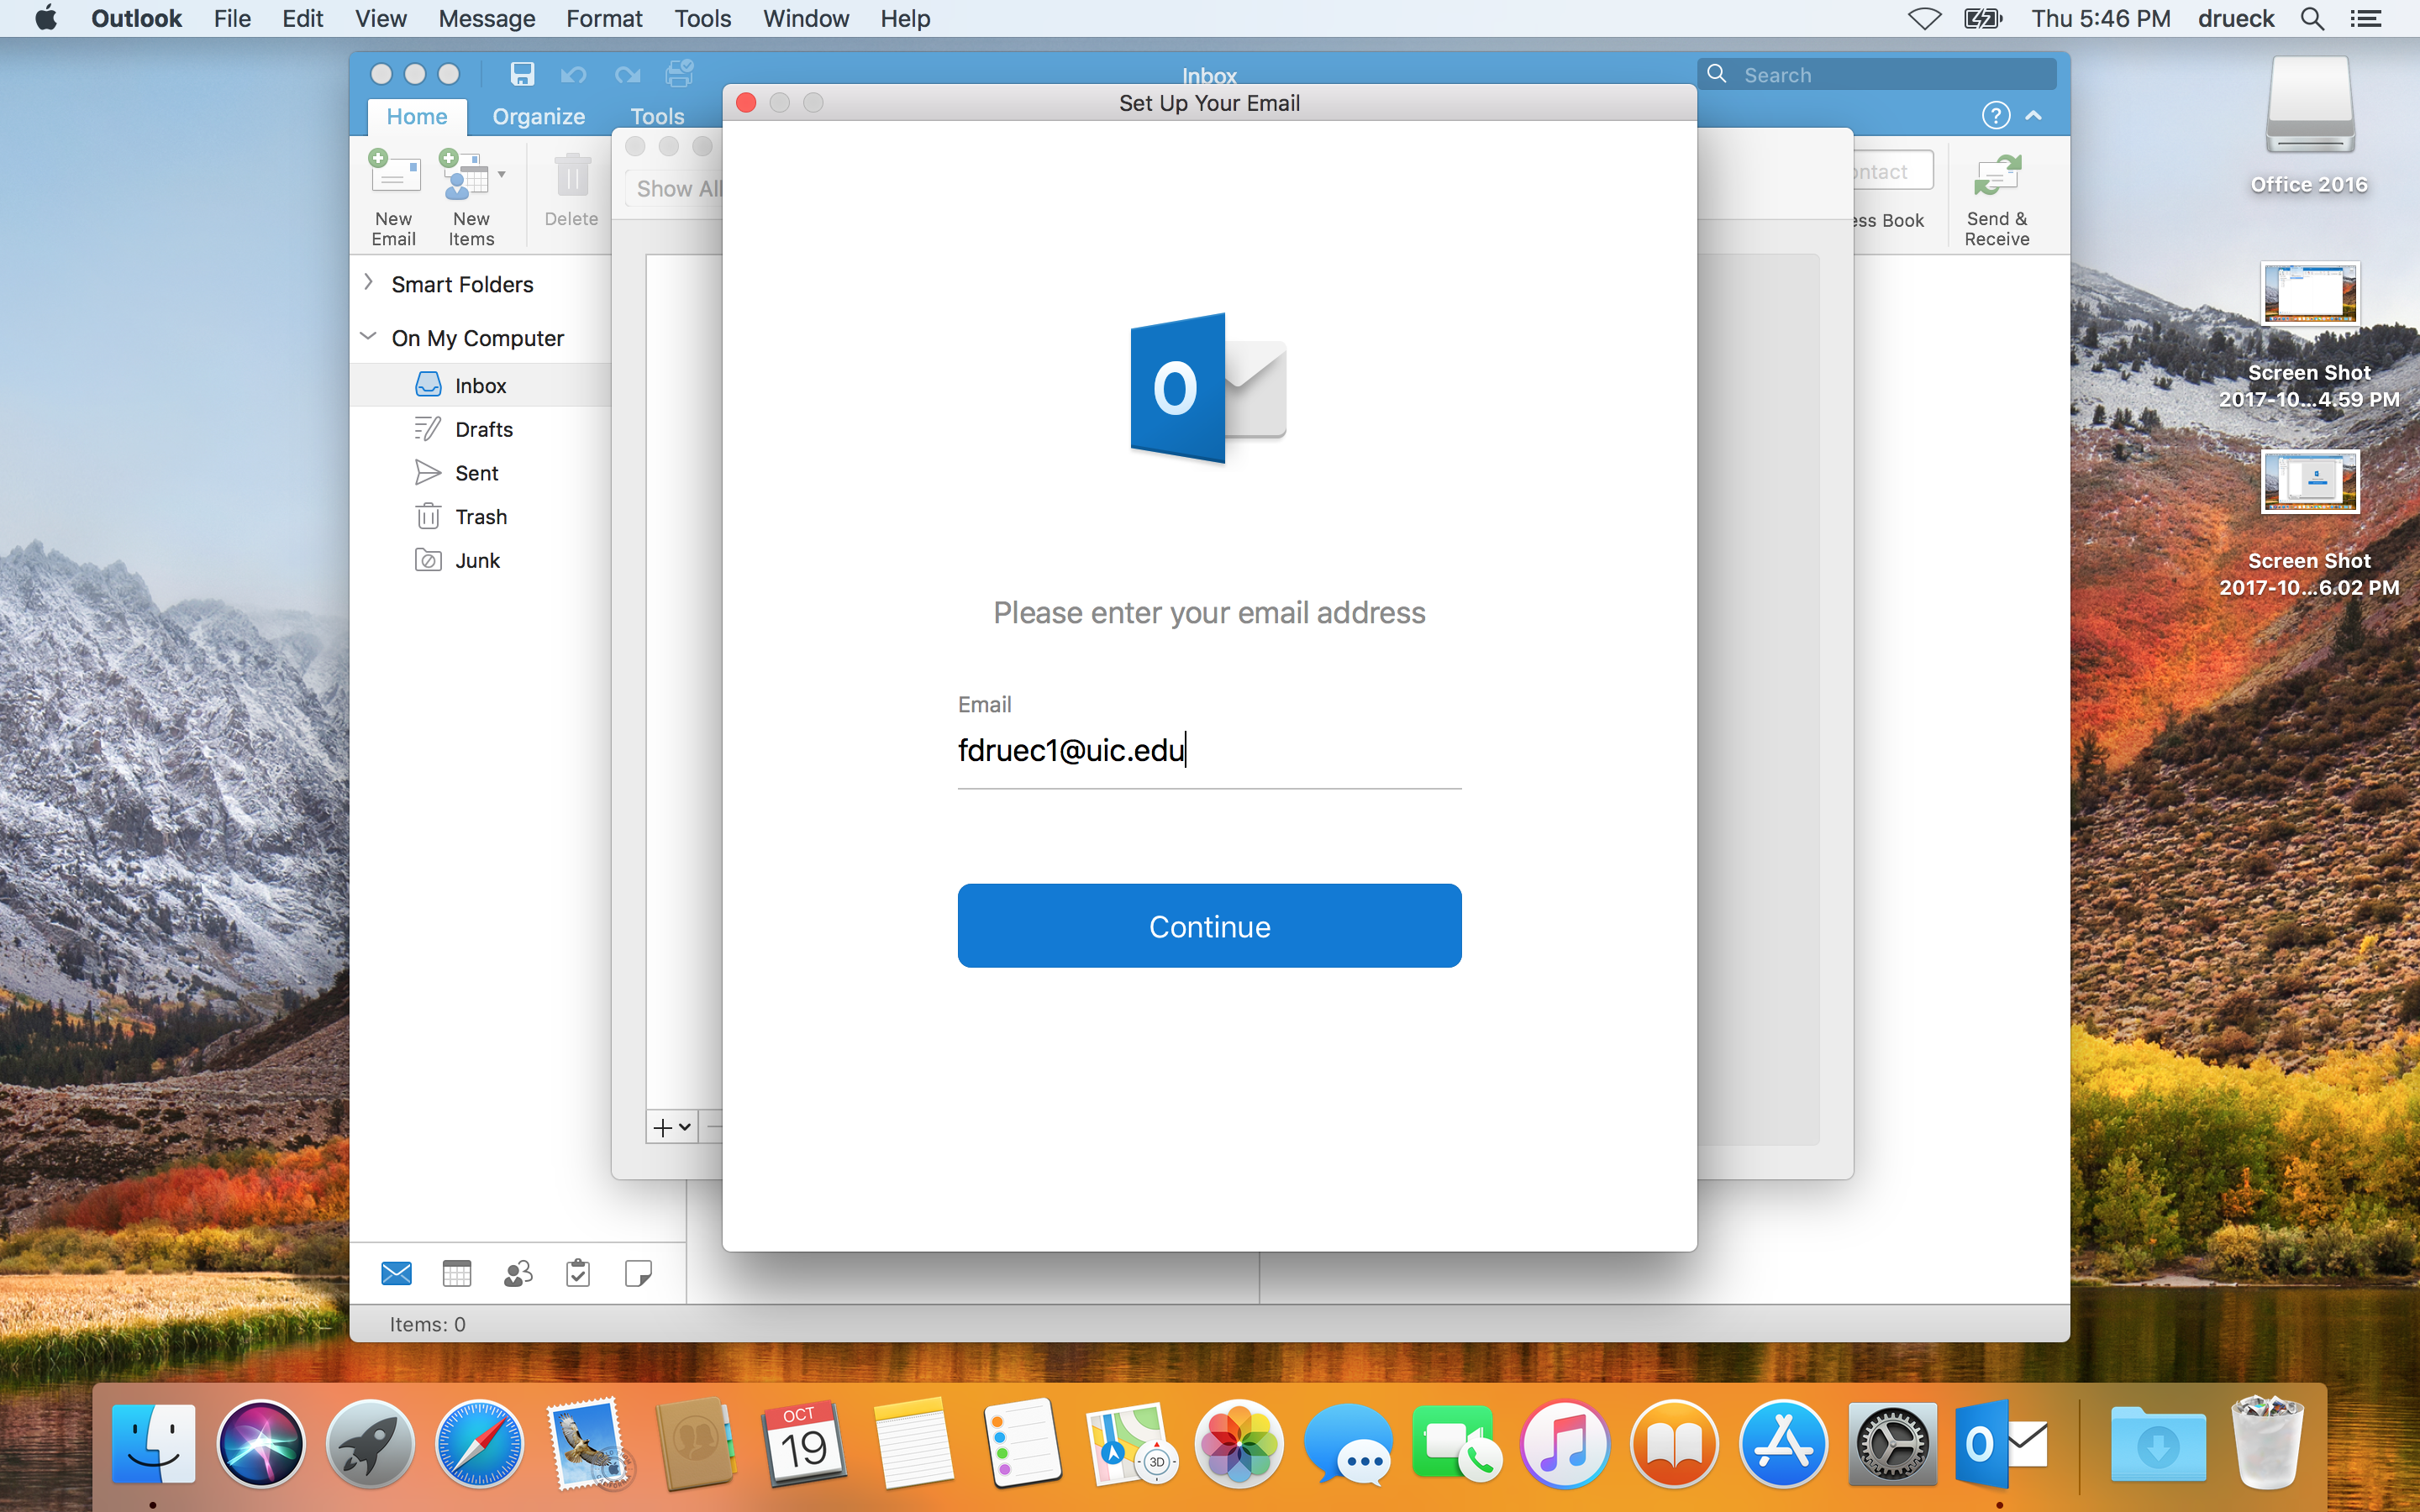
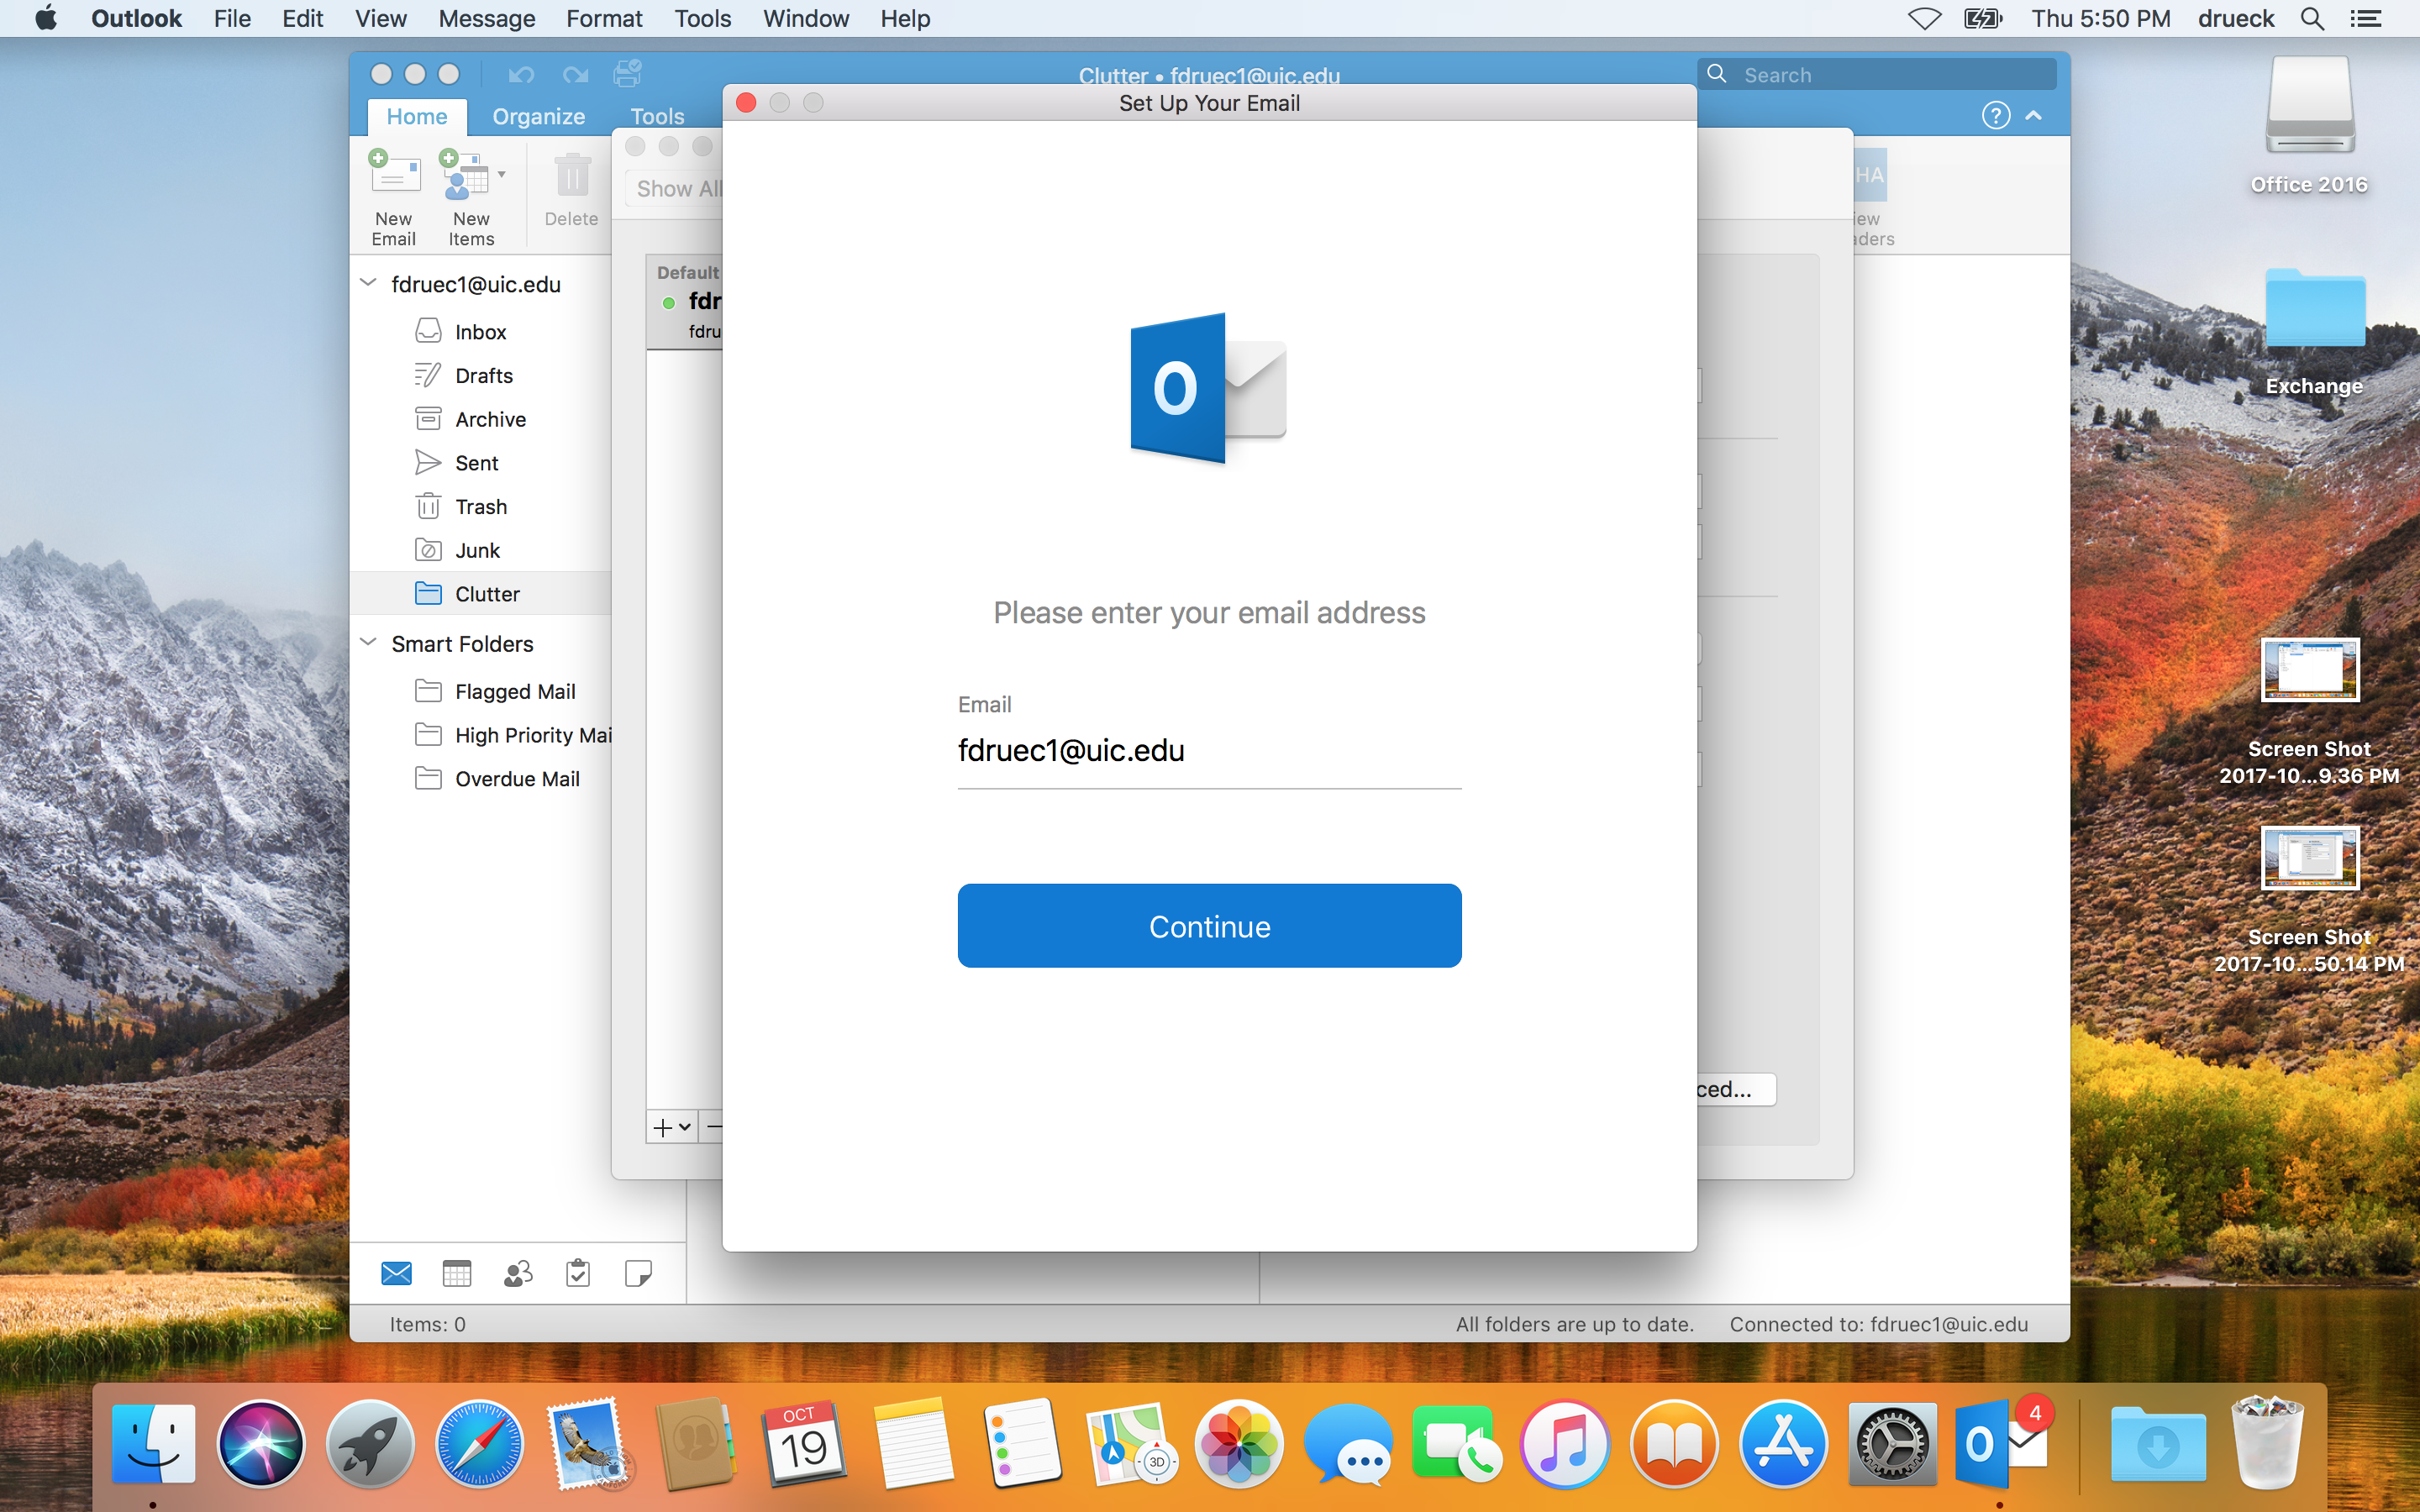
Enter your email address (netid@uic.edu) and click continue.
-
Assuming your exchange account exists you will automatically be connected to Office 365.
-
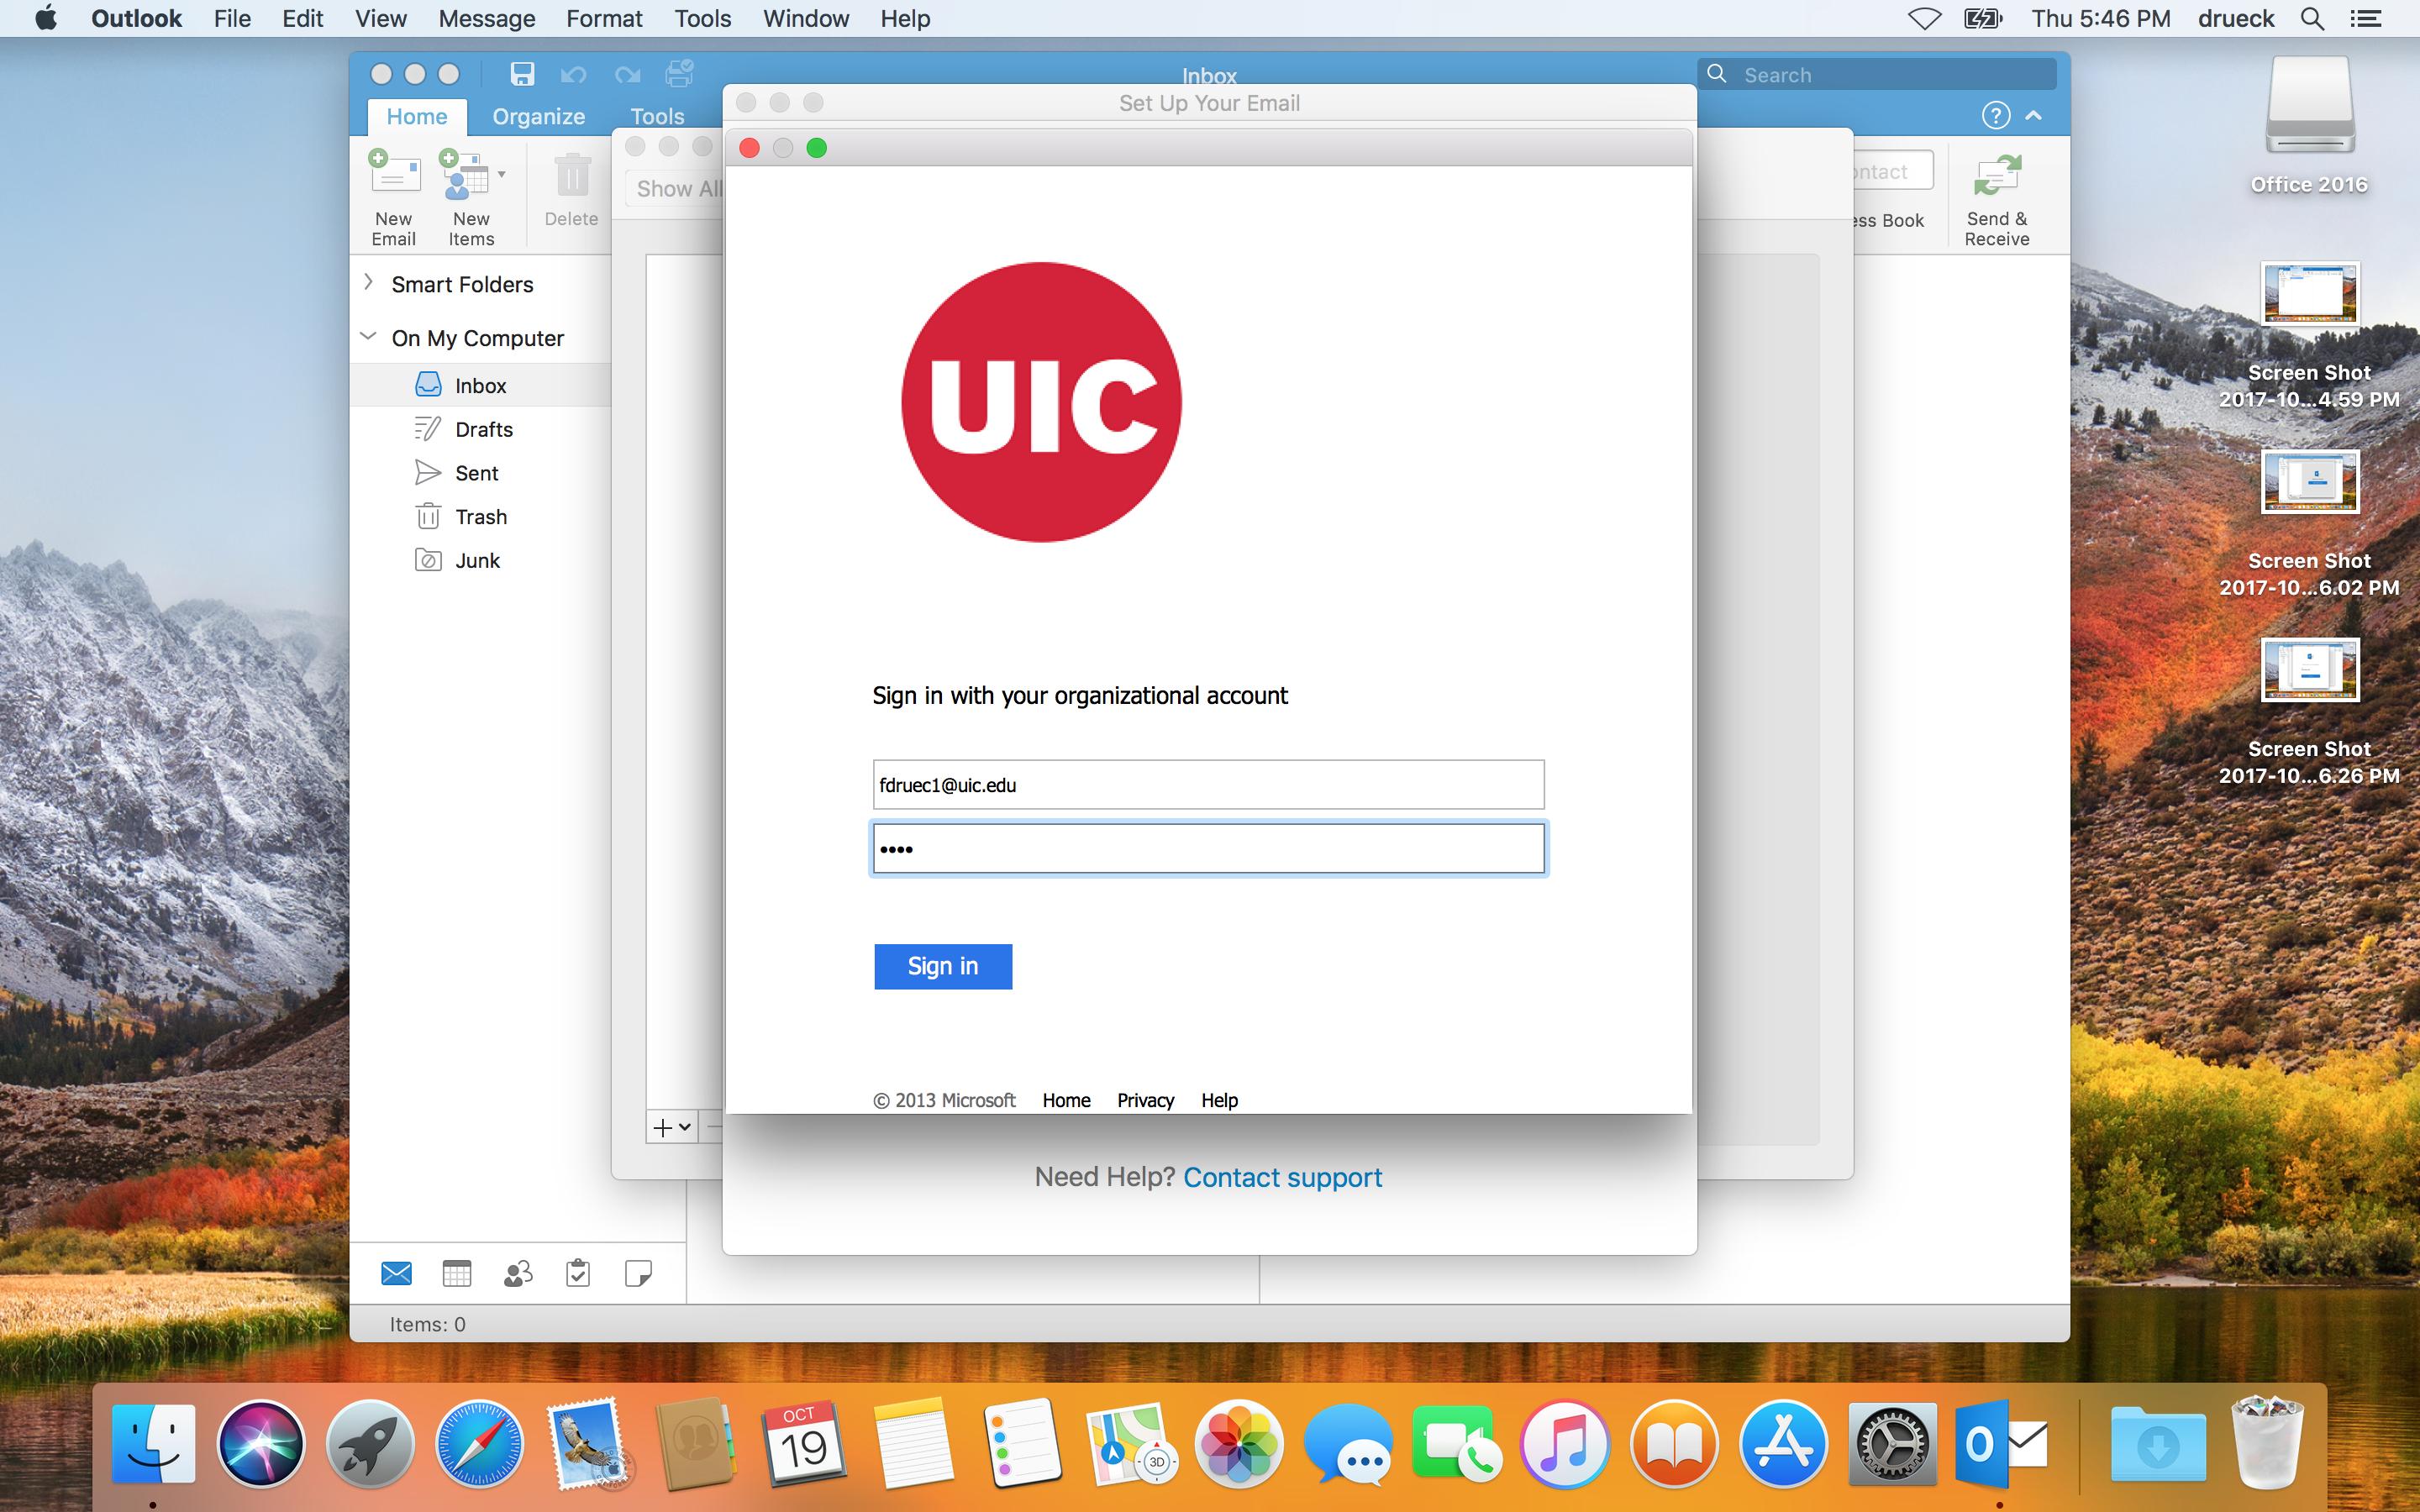
Next you will be prompted to sign in with your email and password.
Make sure to use your full netid@uic.edu email
address as your username.
-
After you add the account, you may want to visit Tools
> Accounts and change the text field Account
description. This will default to "yournetid@uic.edu"
but it may be useful to rename it to "yournetid@uic.edu
(exchange)" so as to make it easy to identify which mail account
is your exchange account if you are also adding your Mailserv or
Tigger accounts.

Connect Microsoft Outlook 2016 to Mailserv
To archive or move your old emails on Mailserv you must also connect Outlook to Mailserv. Since the ACCC only provides instructions for connecting Outlook on Windows to Mailserv, I have written my own.
-
Open Microsoft Outlook 2016. Go to the global menu and select Tools > Accounts.
-
Click the + sign and choose New Account.
-
Enter your email address (netid@uic.edu), but read the next step before you click continue.
-
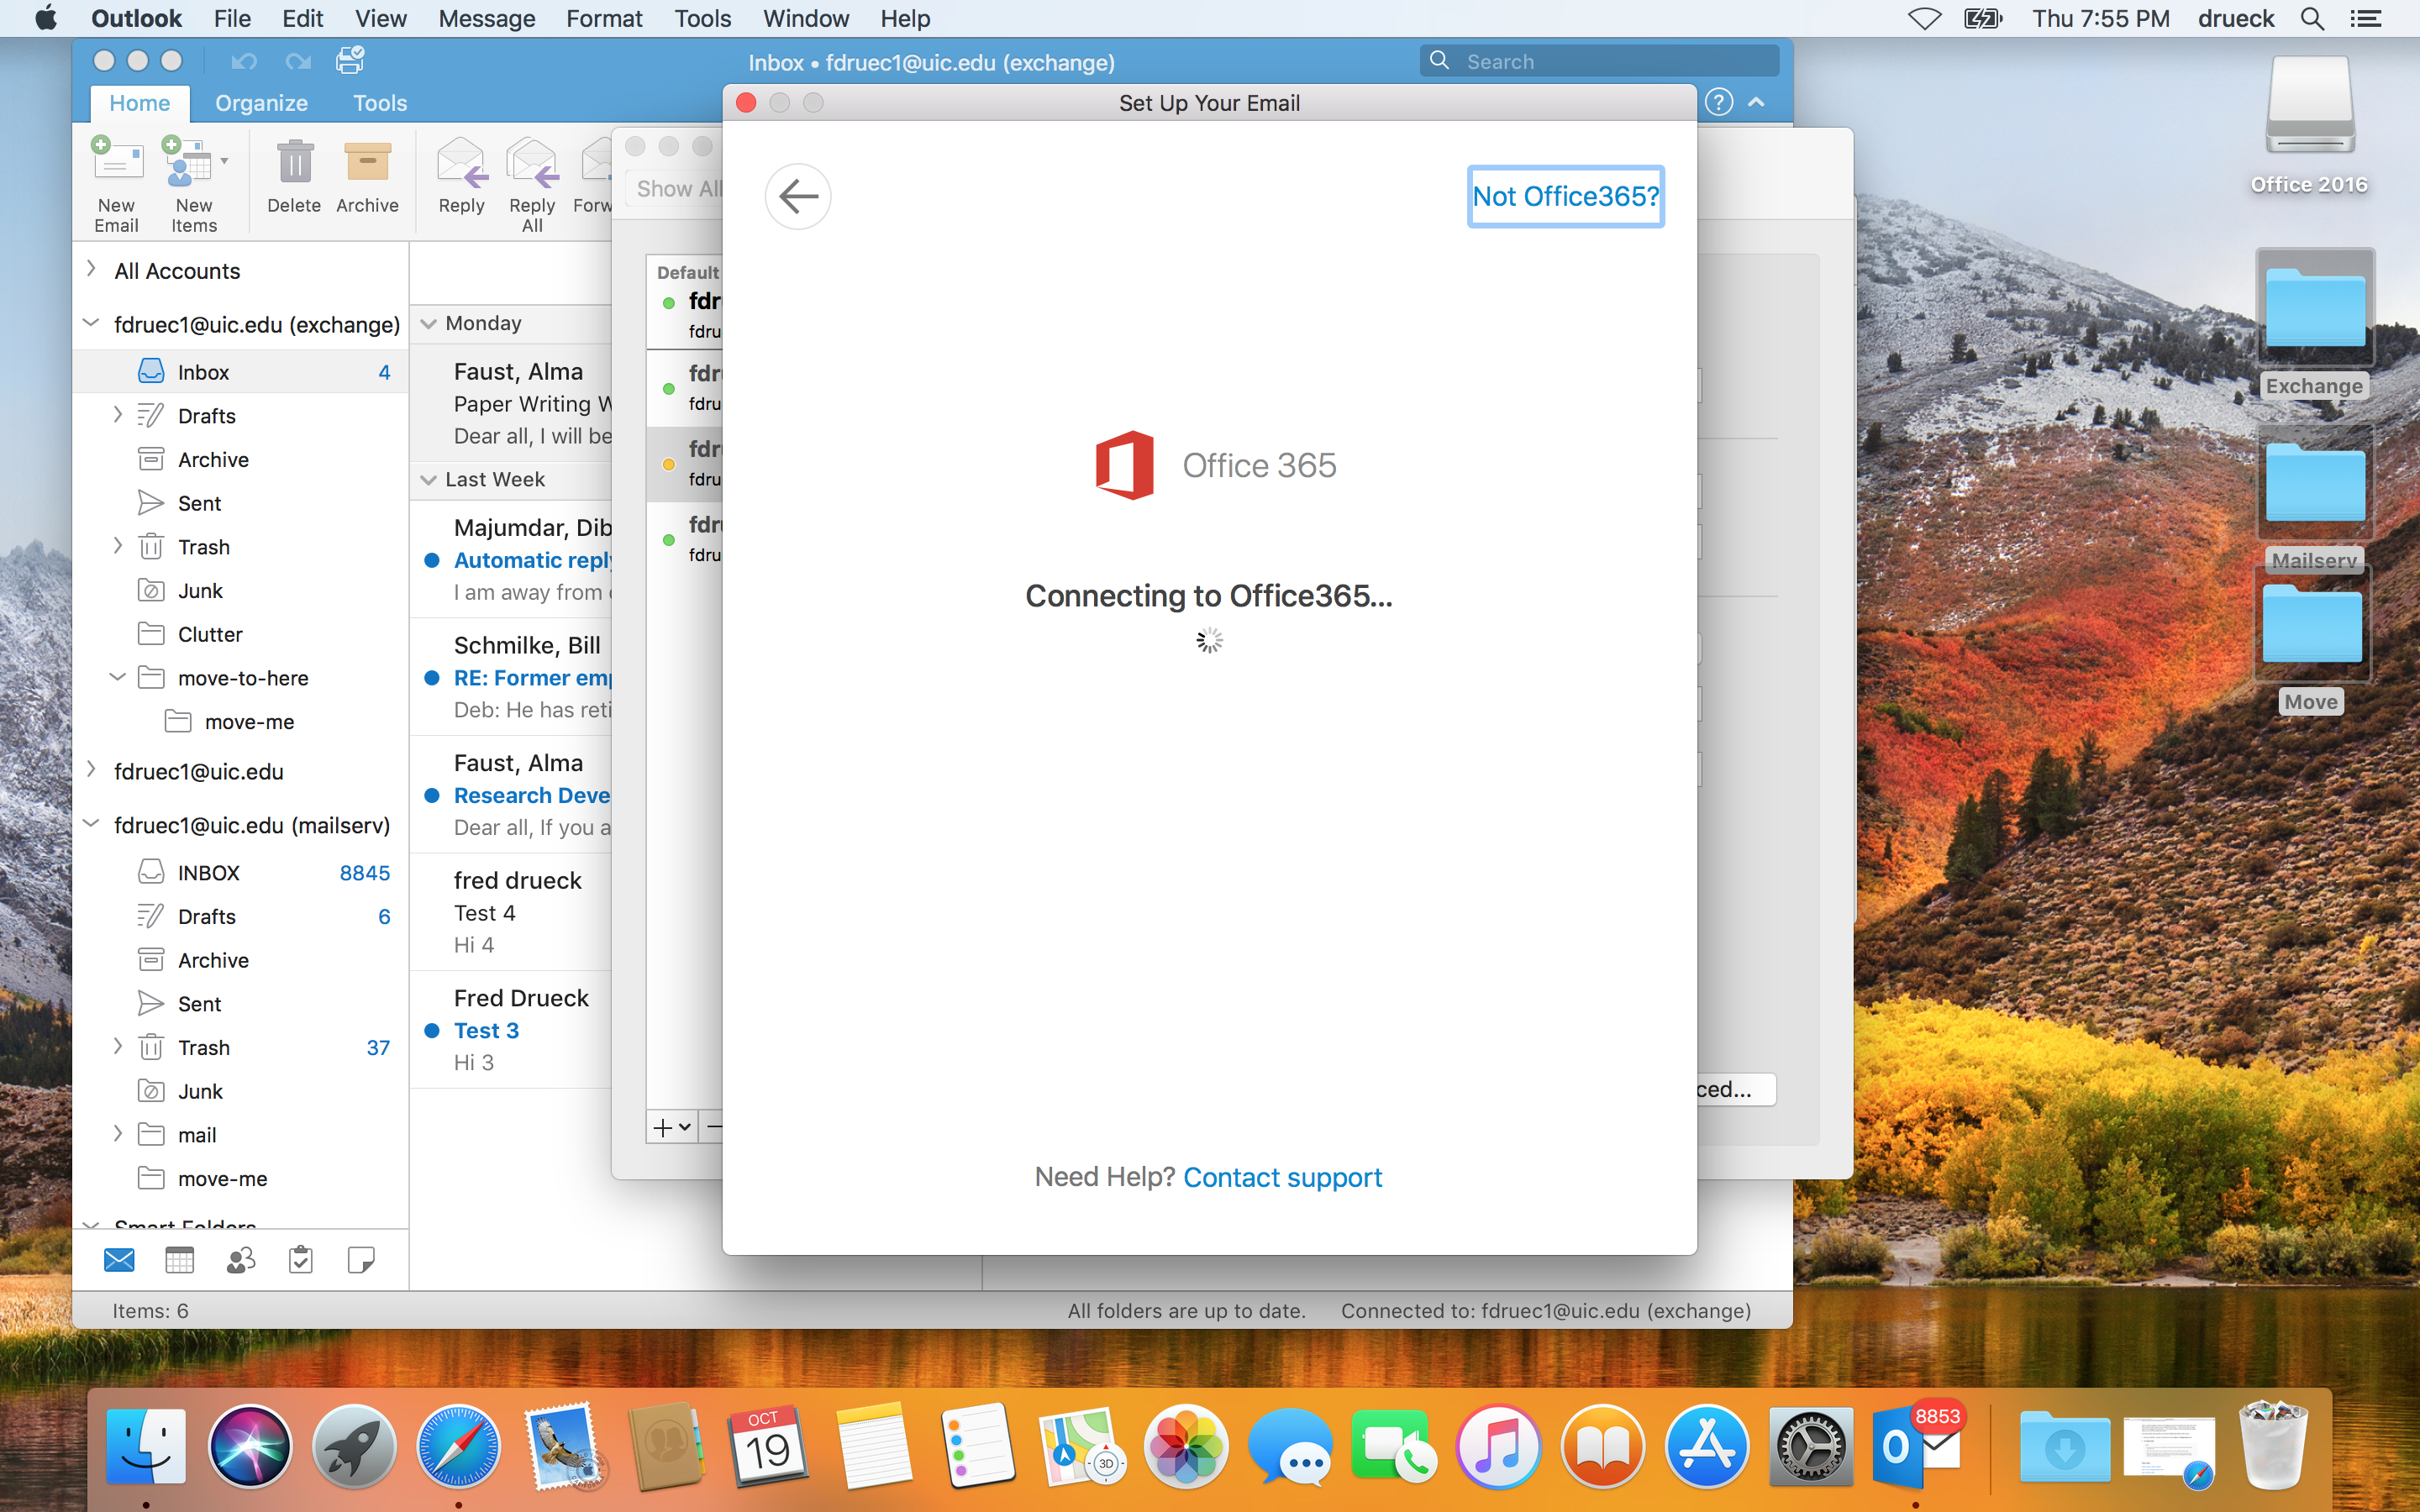
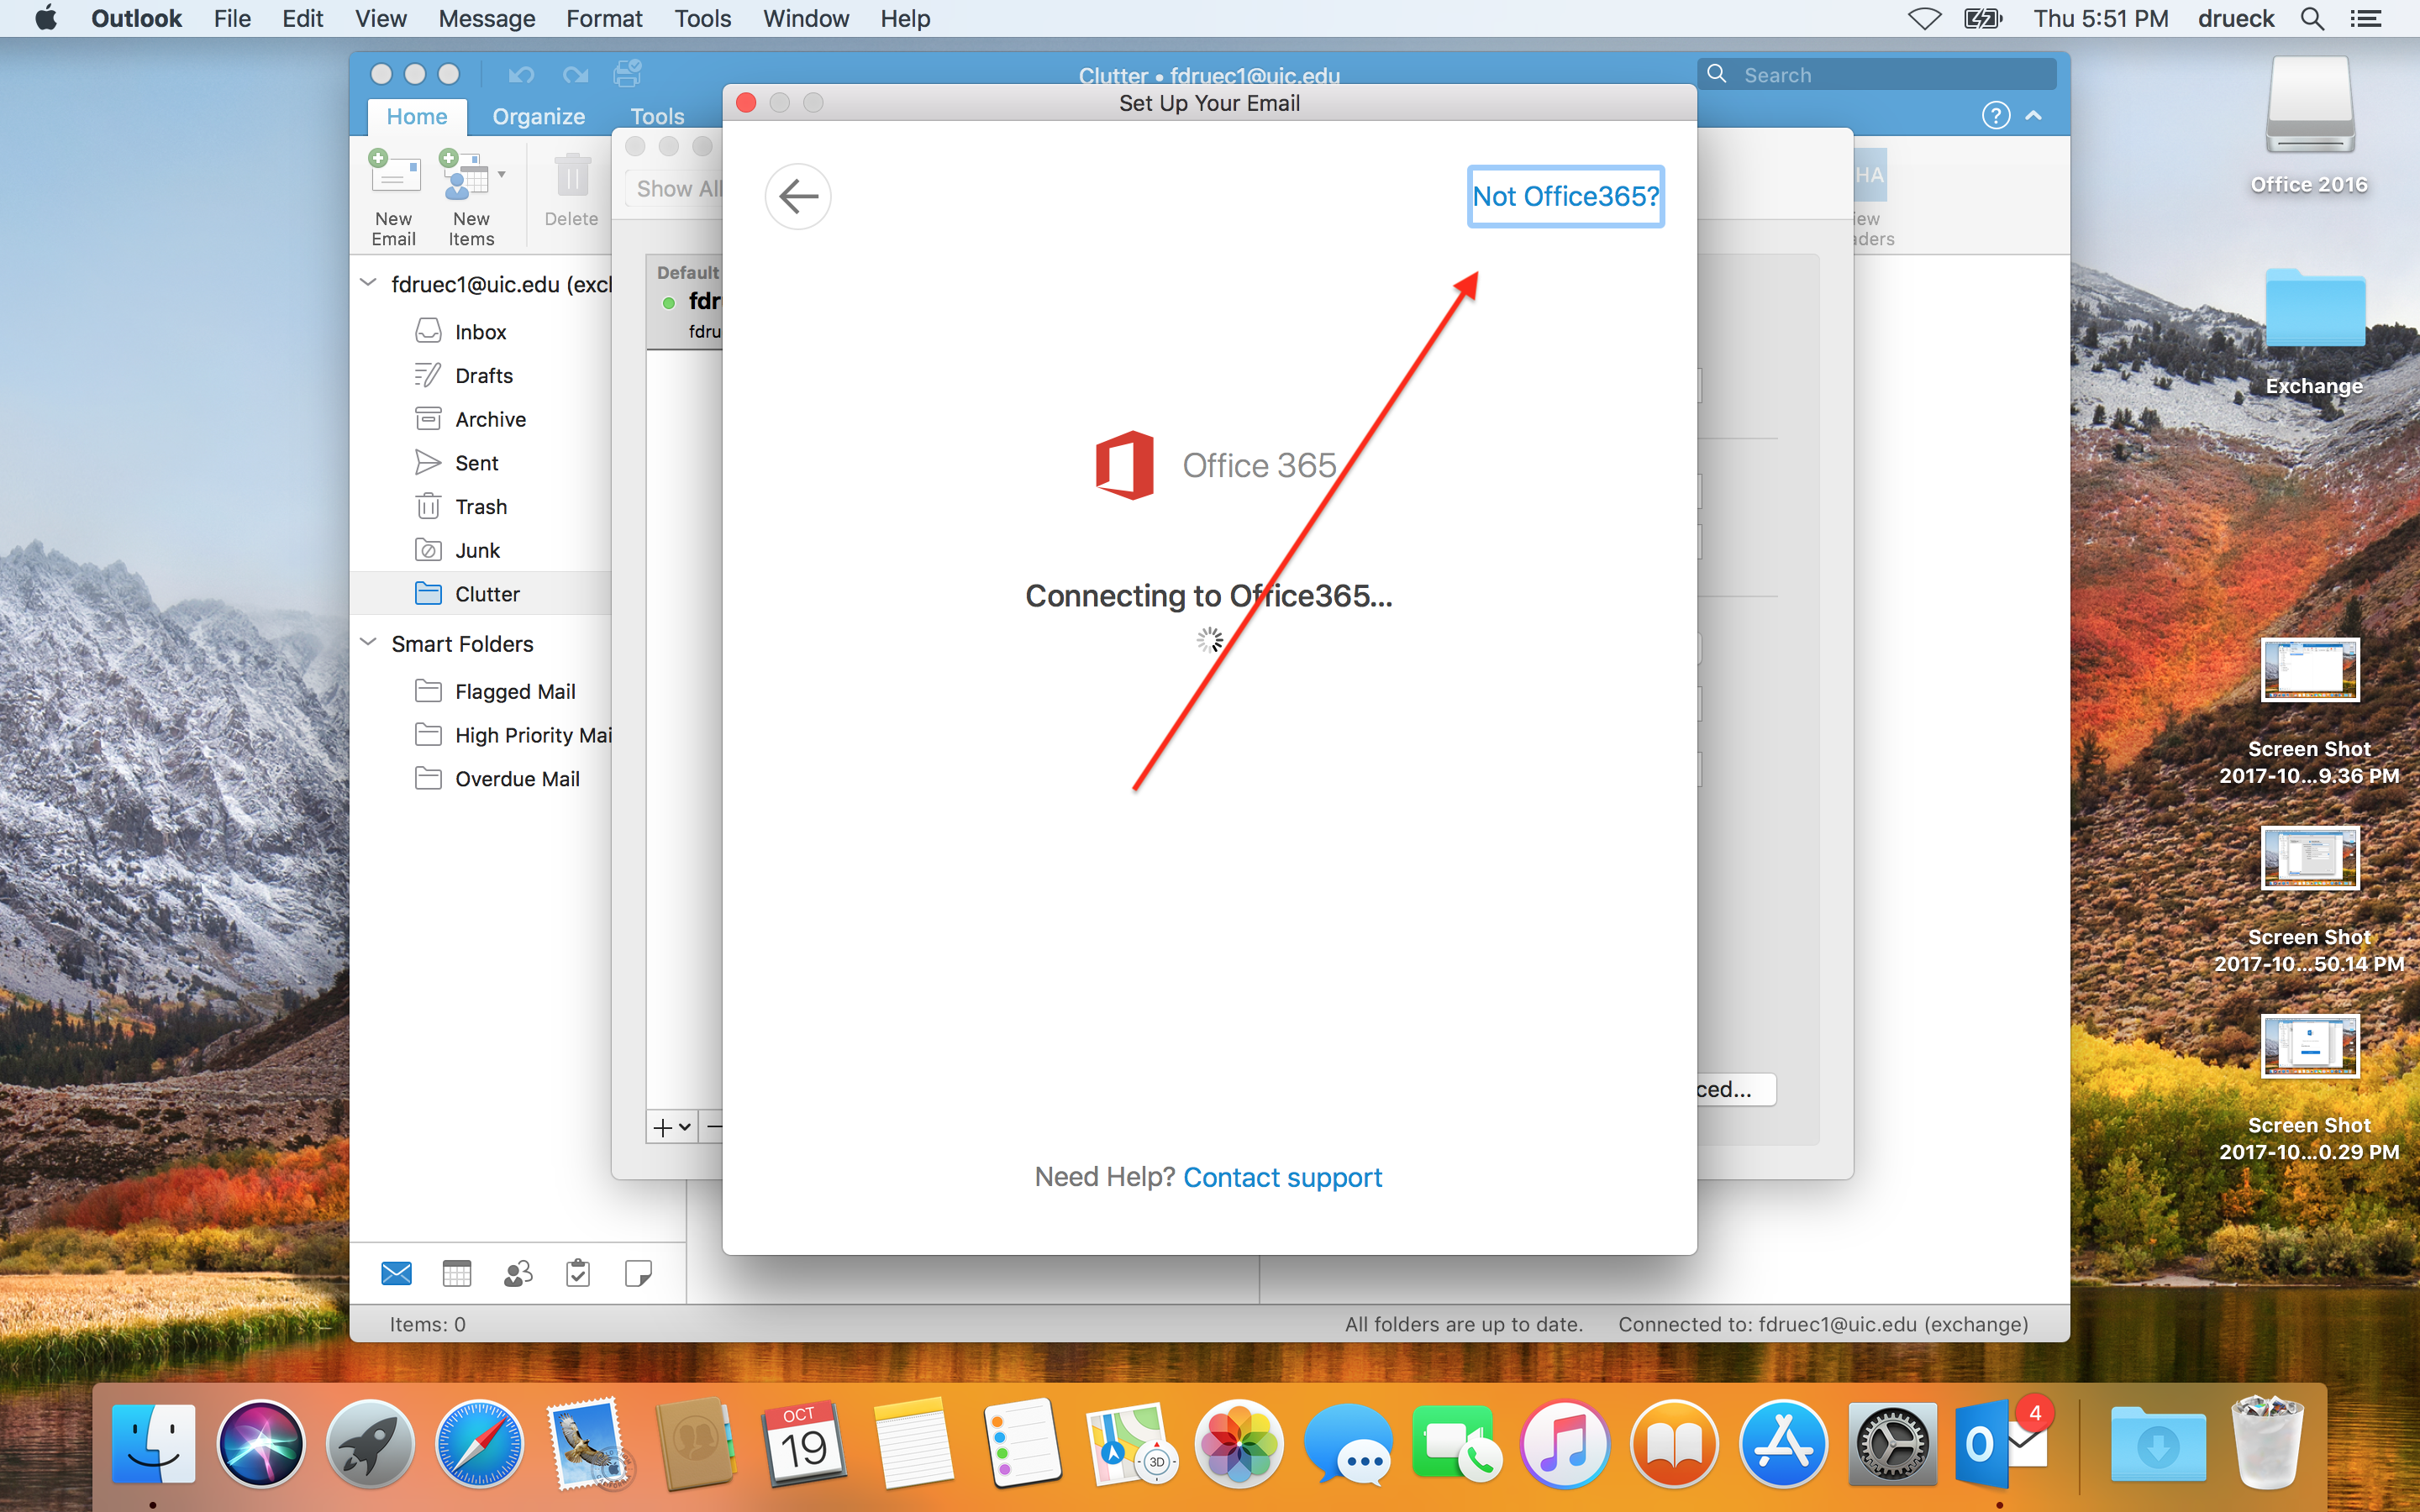
If you have already created an exchange online account, Outlook
will want to automatically connect to it. To connect to your old
Mailserv account you will have about 5 seconds to
click Not Office 365? instead. If you do not
click this link in time, you will have to quit the Add
Account dialog and start over.
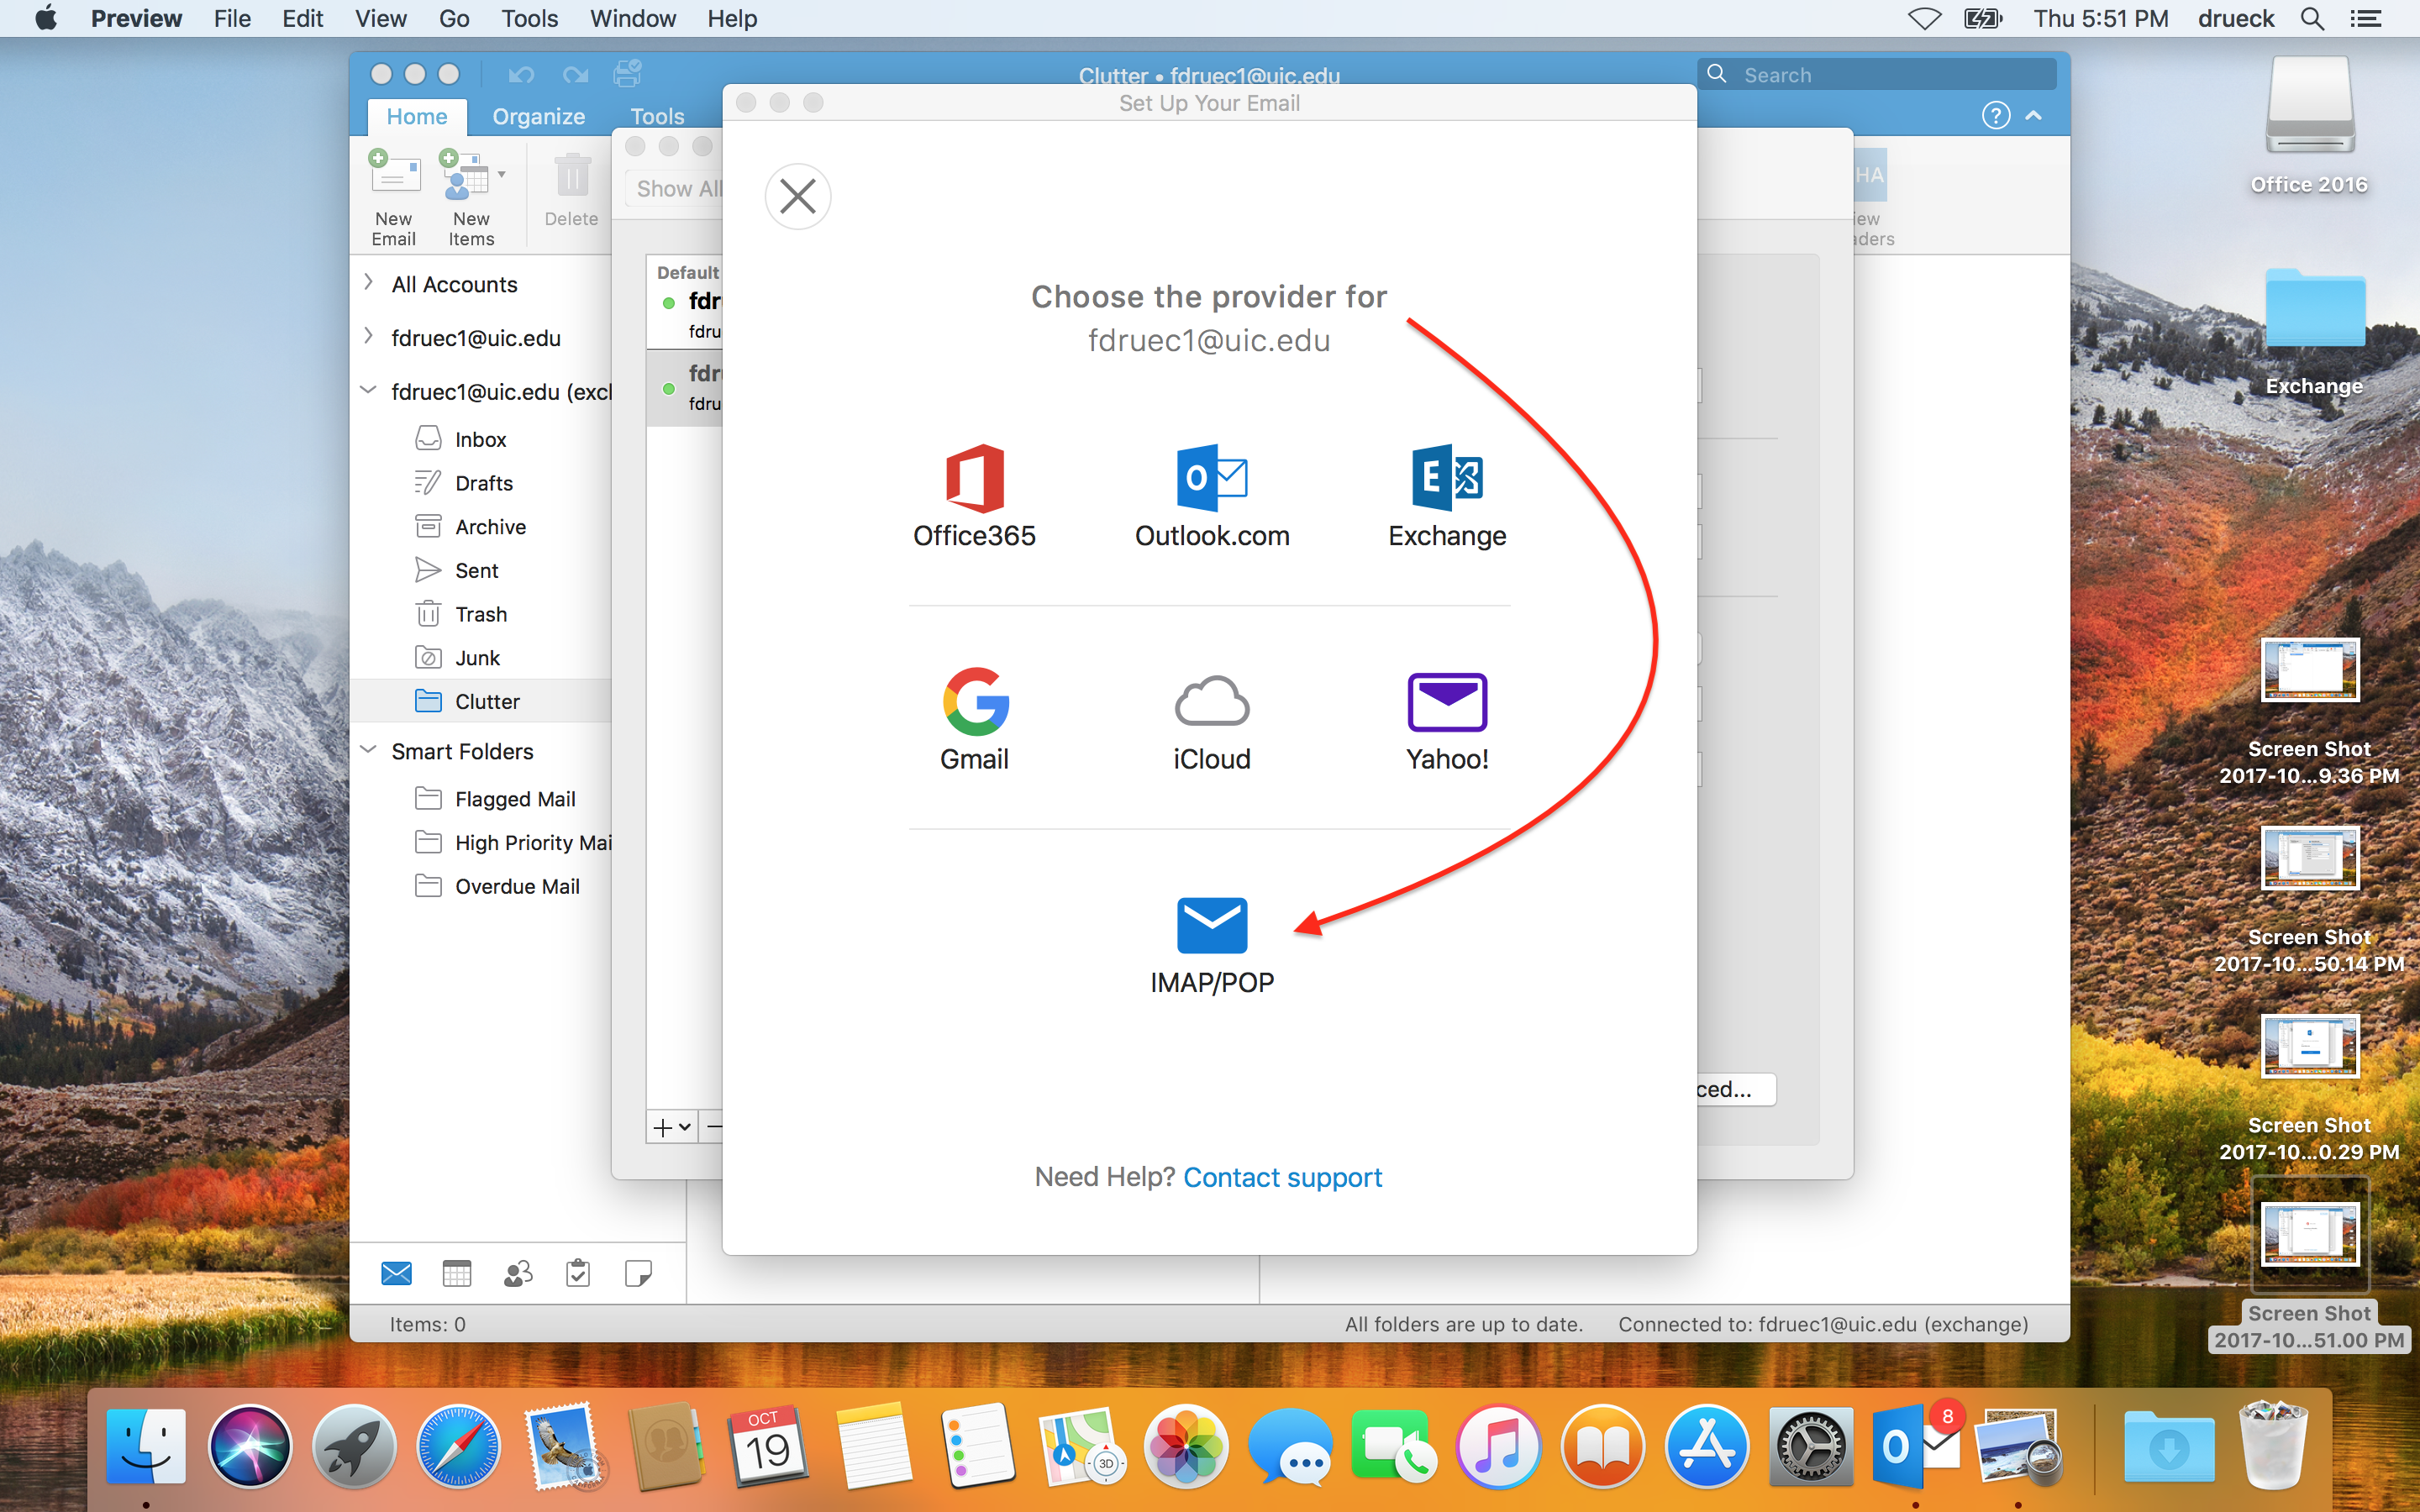
-
If you succeeded in clicking Not Office 365? fast
enough, you will be able to choose the account type.
It's IMAP/POP.
-
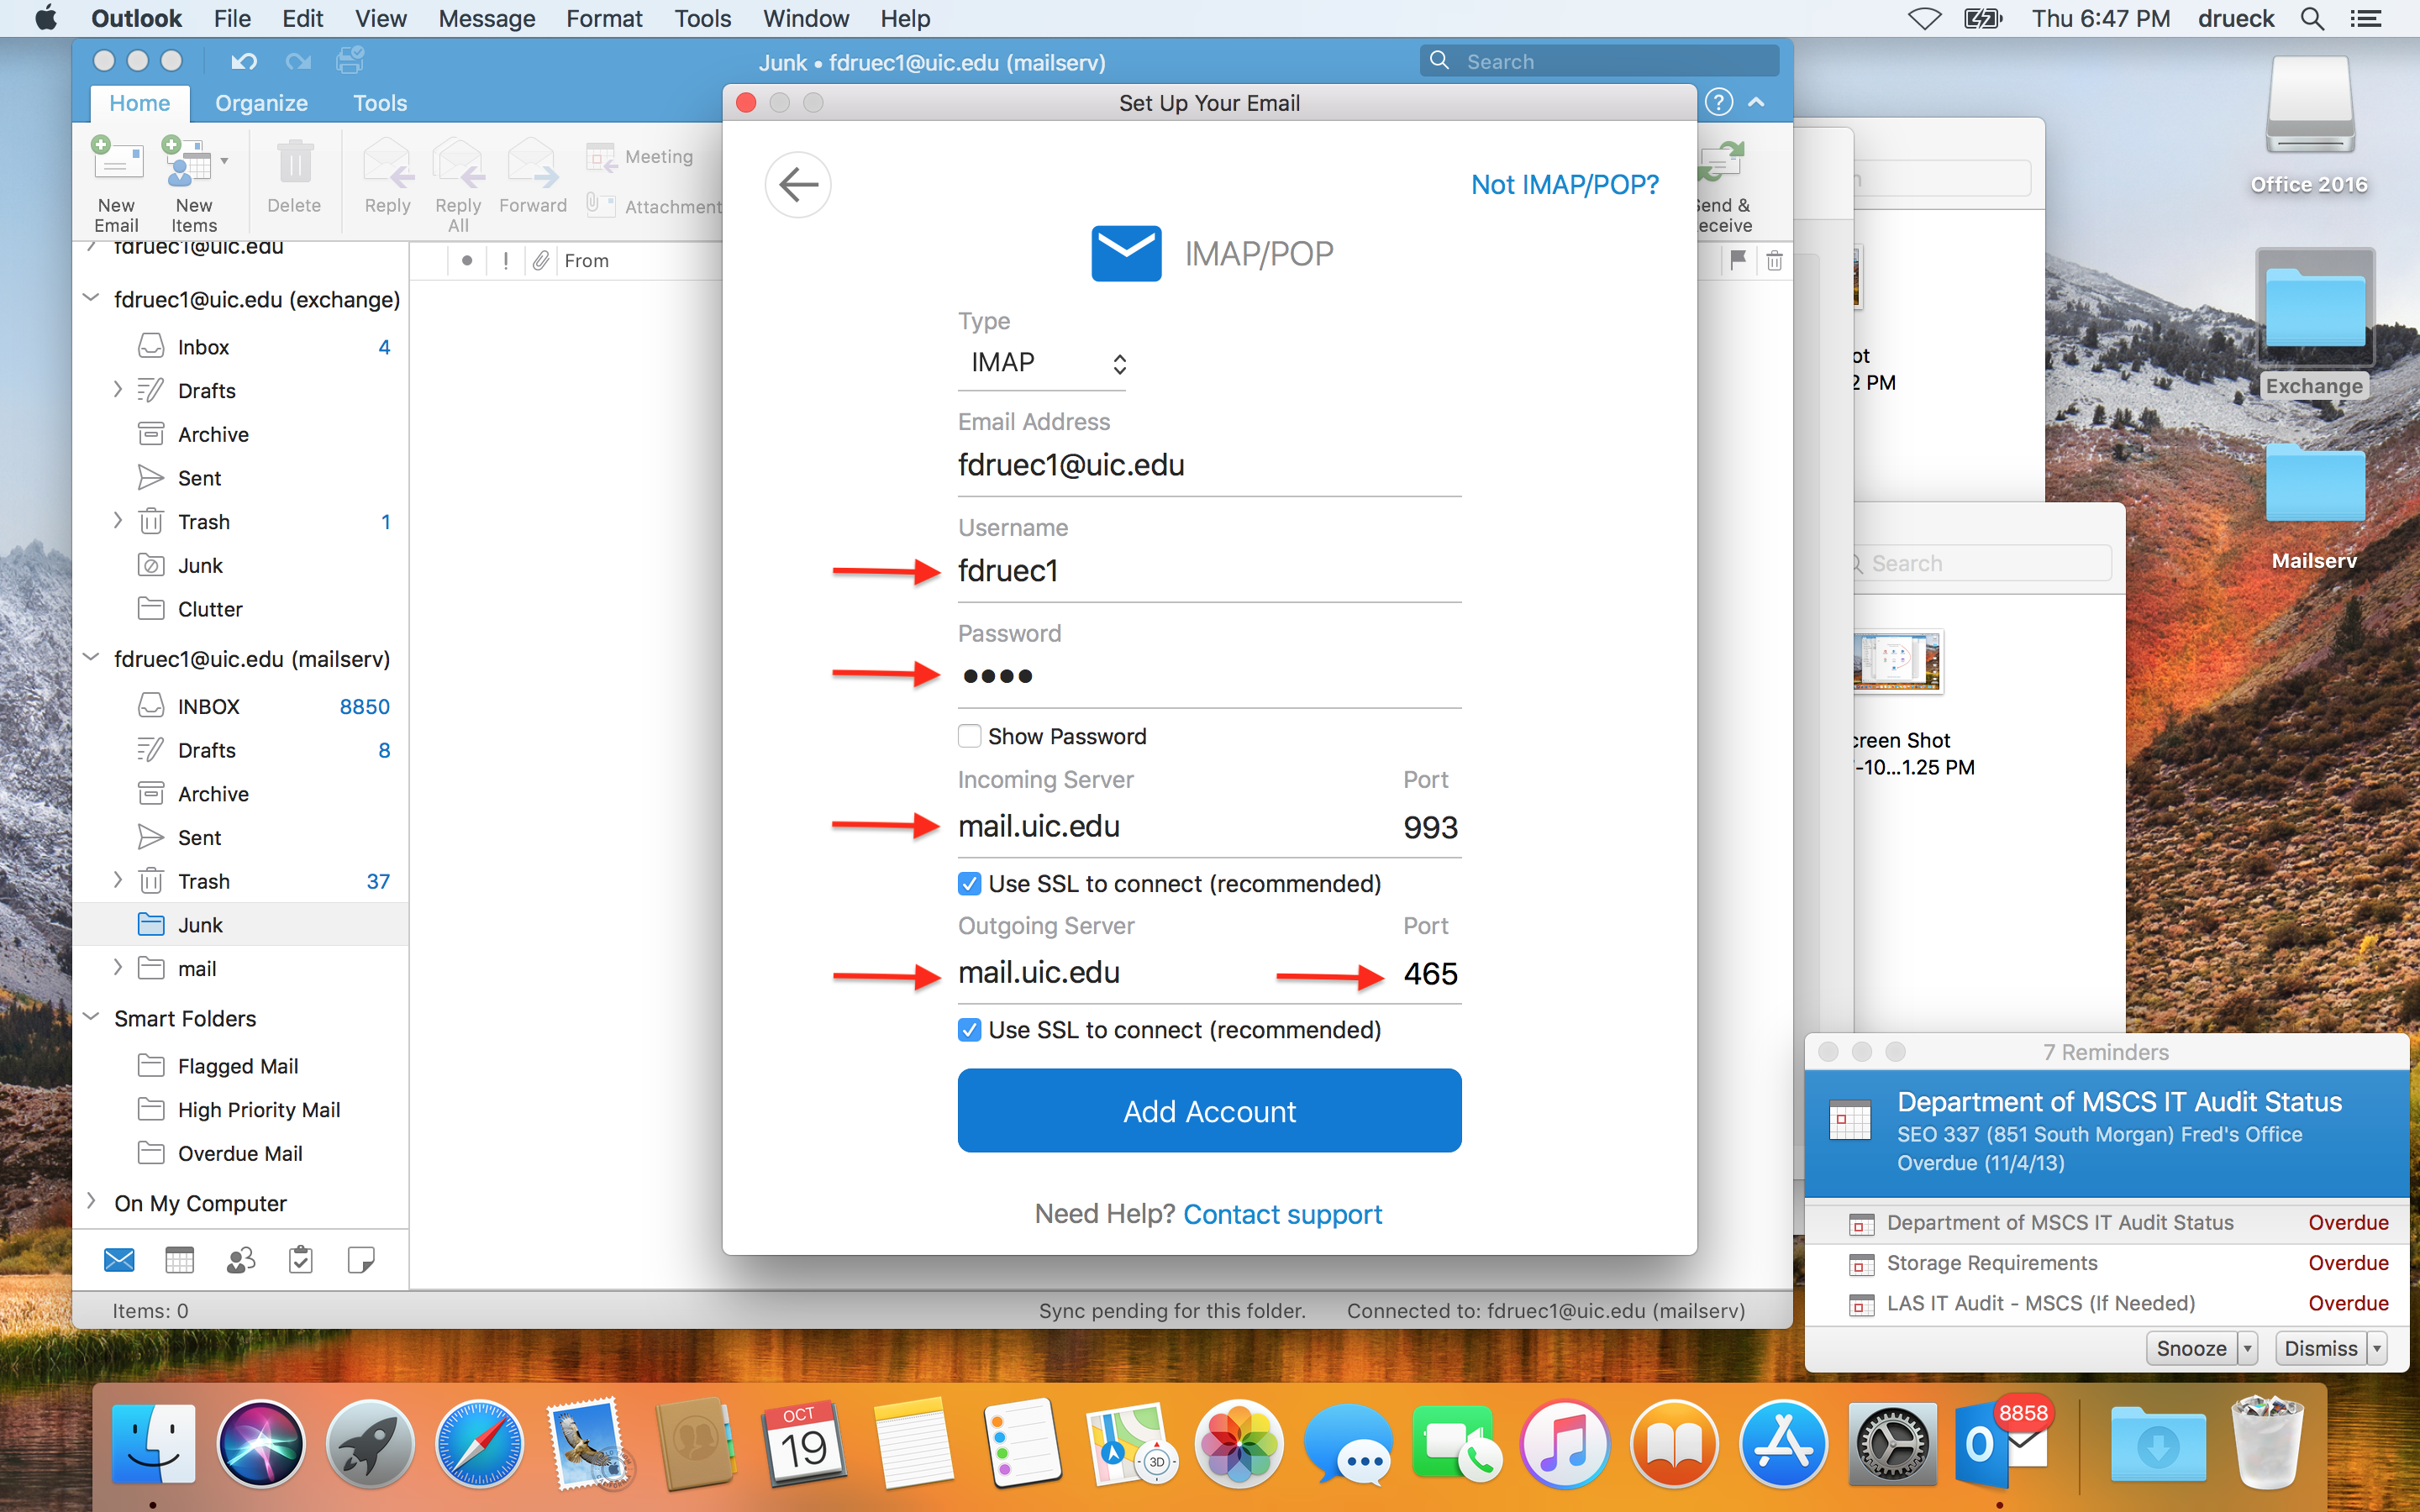
Now you need fill in the server settings. You should fill in the
follow settings. Settings with * next to them
(or a red arrow in the picture) have an incorrect default value:
If you fill in this much information and hit the Re-test button, the rest of the settings should be automatically detected.Type: IMAP Email Address: yournetid@uic.edu Username*: yournetid (not yournetid@uic.edu) Incoming Server*: mail.uic.edu Incoming Server Port: 993 Use SSL to connected (recommended): checked Outgoing Server*: mail.uic.edu Outgoing Server Port*: 465 Use SSL to connected (recommended): checked Type: IMAP Email Address: yournetid@uic.edu Username*: yournetid (not yournetid@uic.edu) Incoming Server*: mail.uic.edu Incoming Server Port: 993 Use SSL to connected (recommended): checked Outgoing Server*: mail.uic.edu Outgoing Server Port*: 465 Use SSL to connected (recommended): checked
-
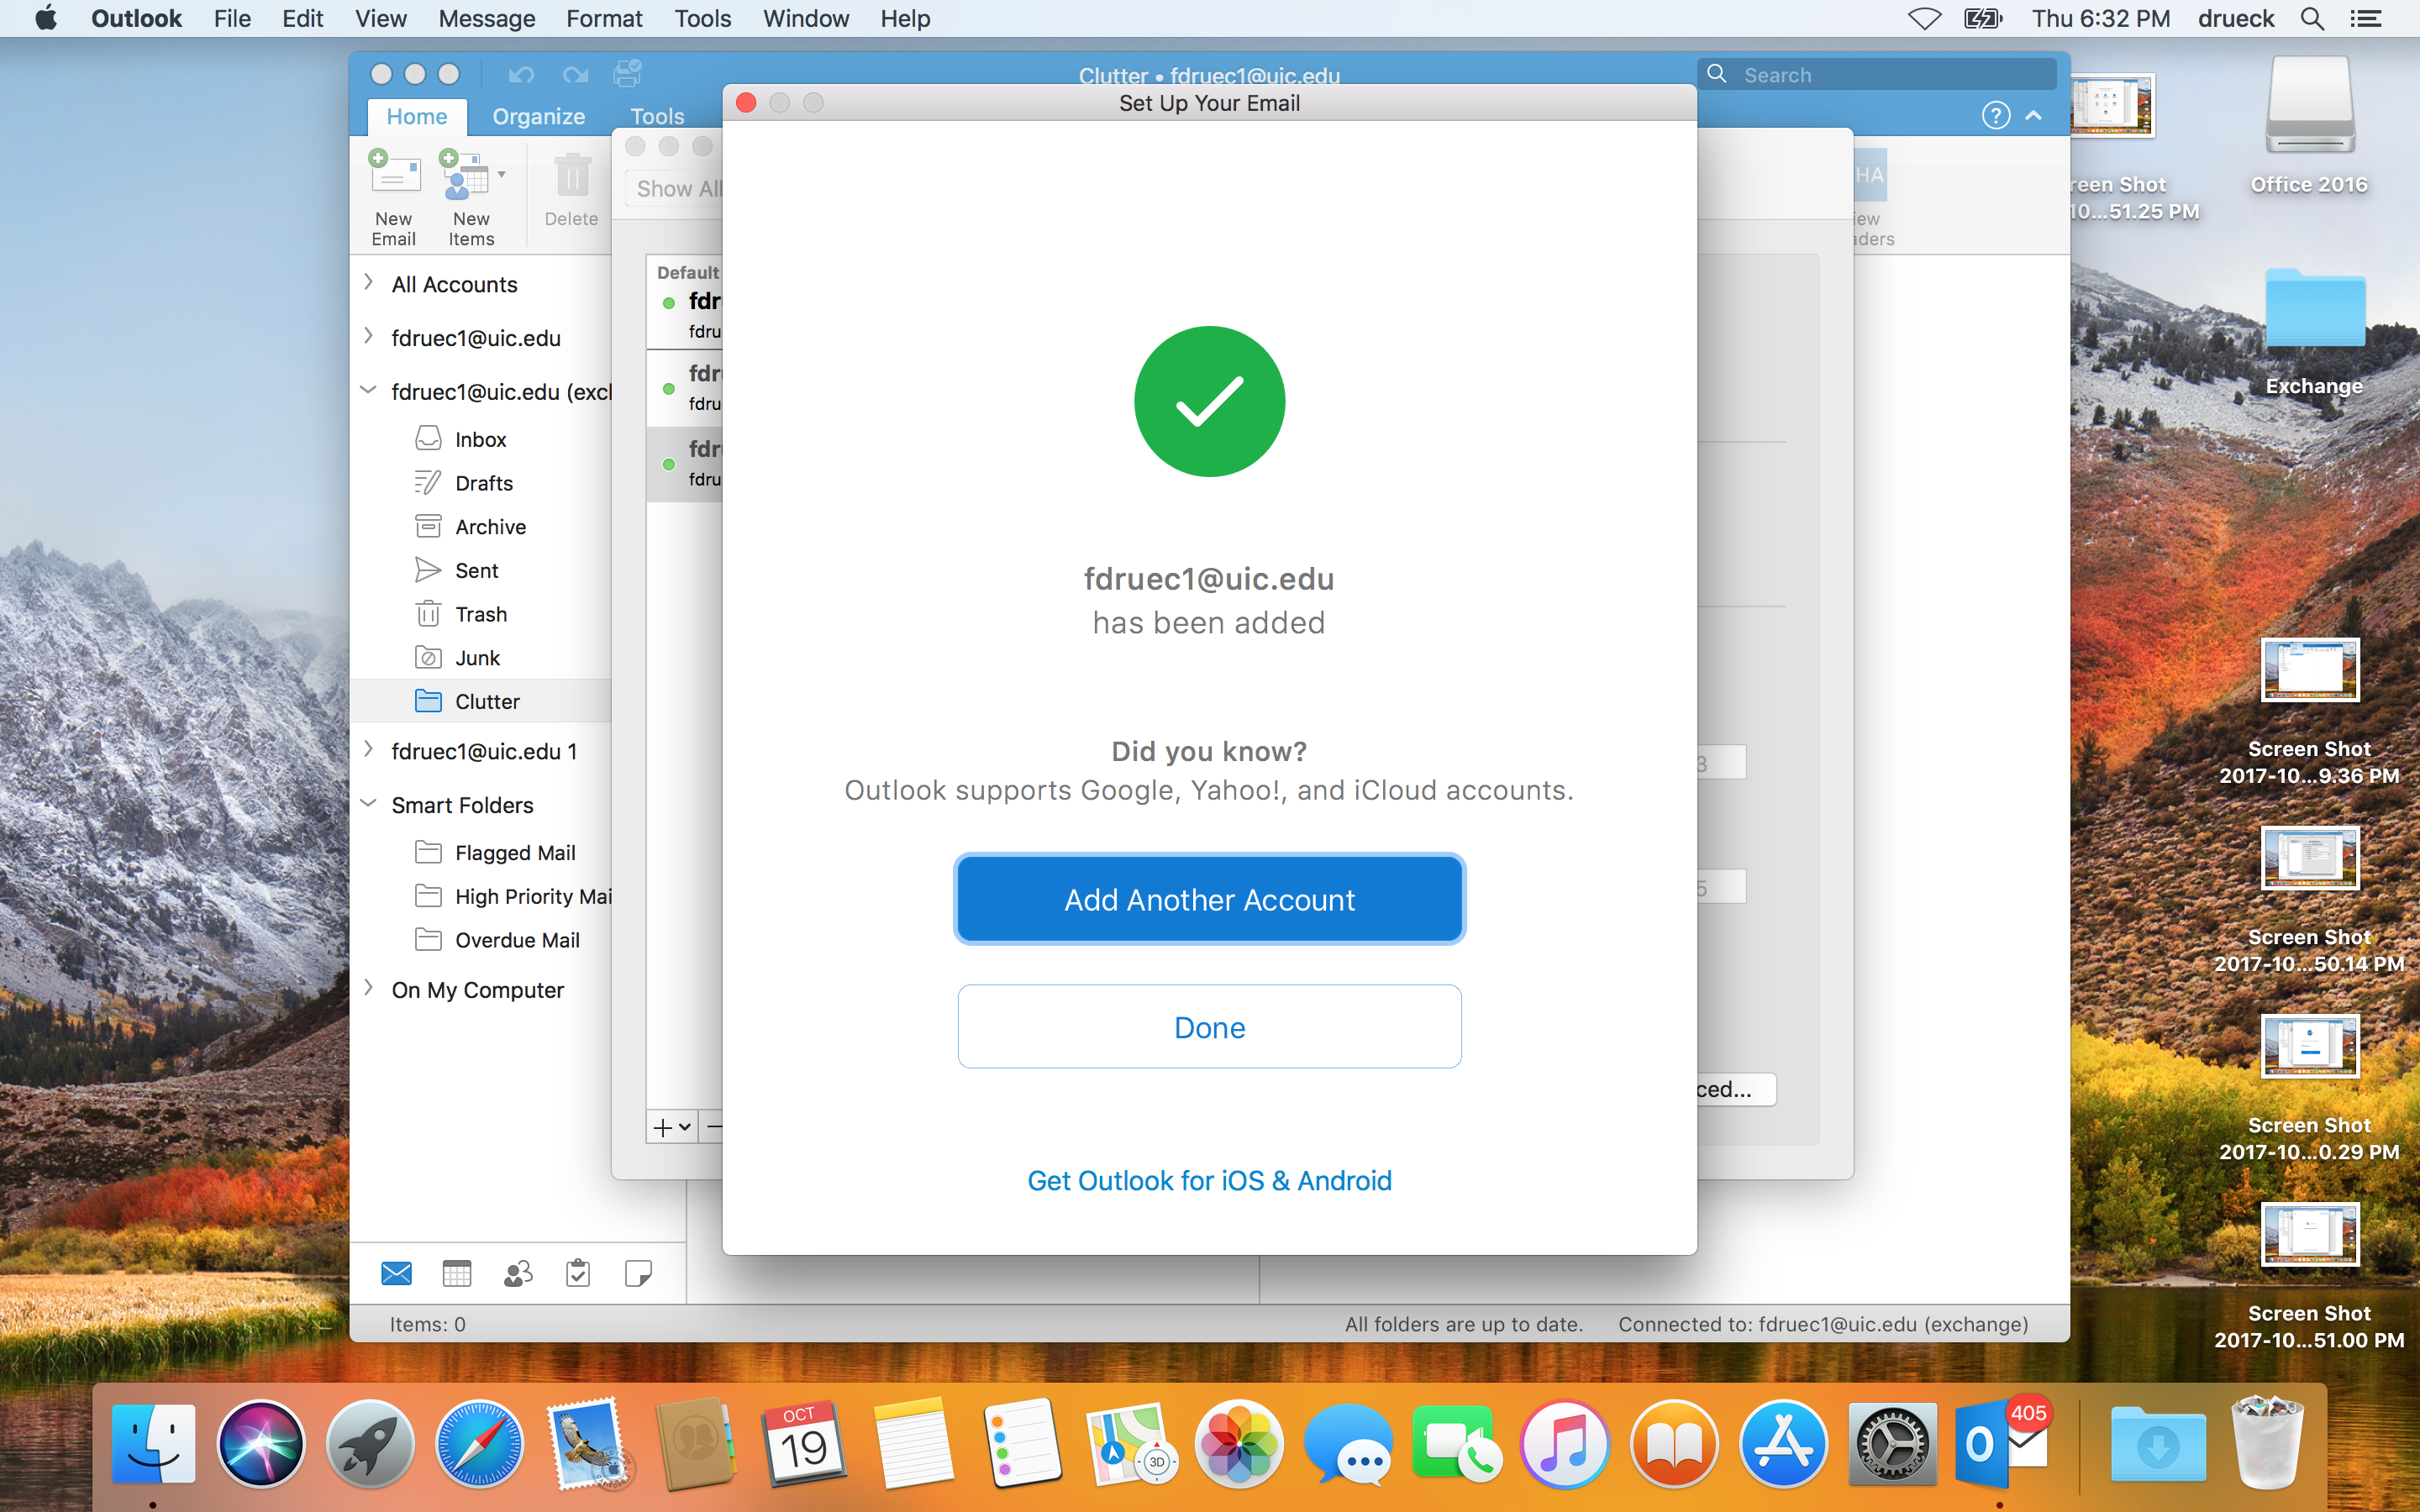
You should now be done adding your account.
-
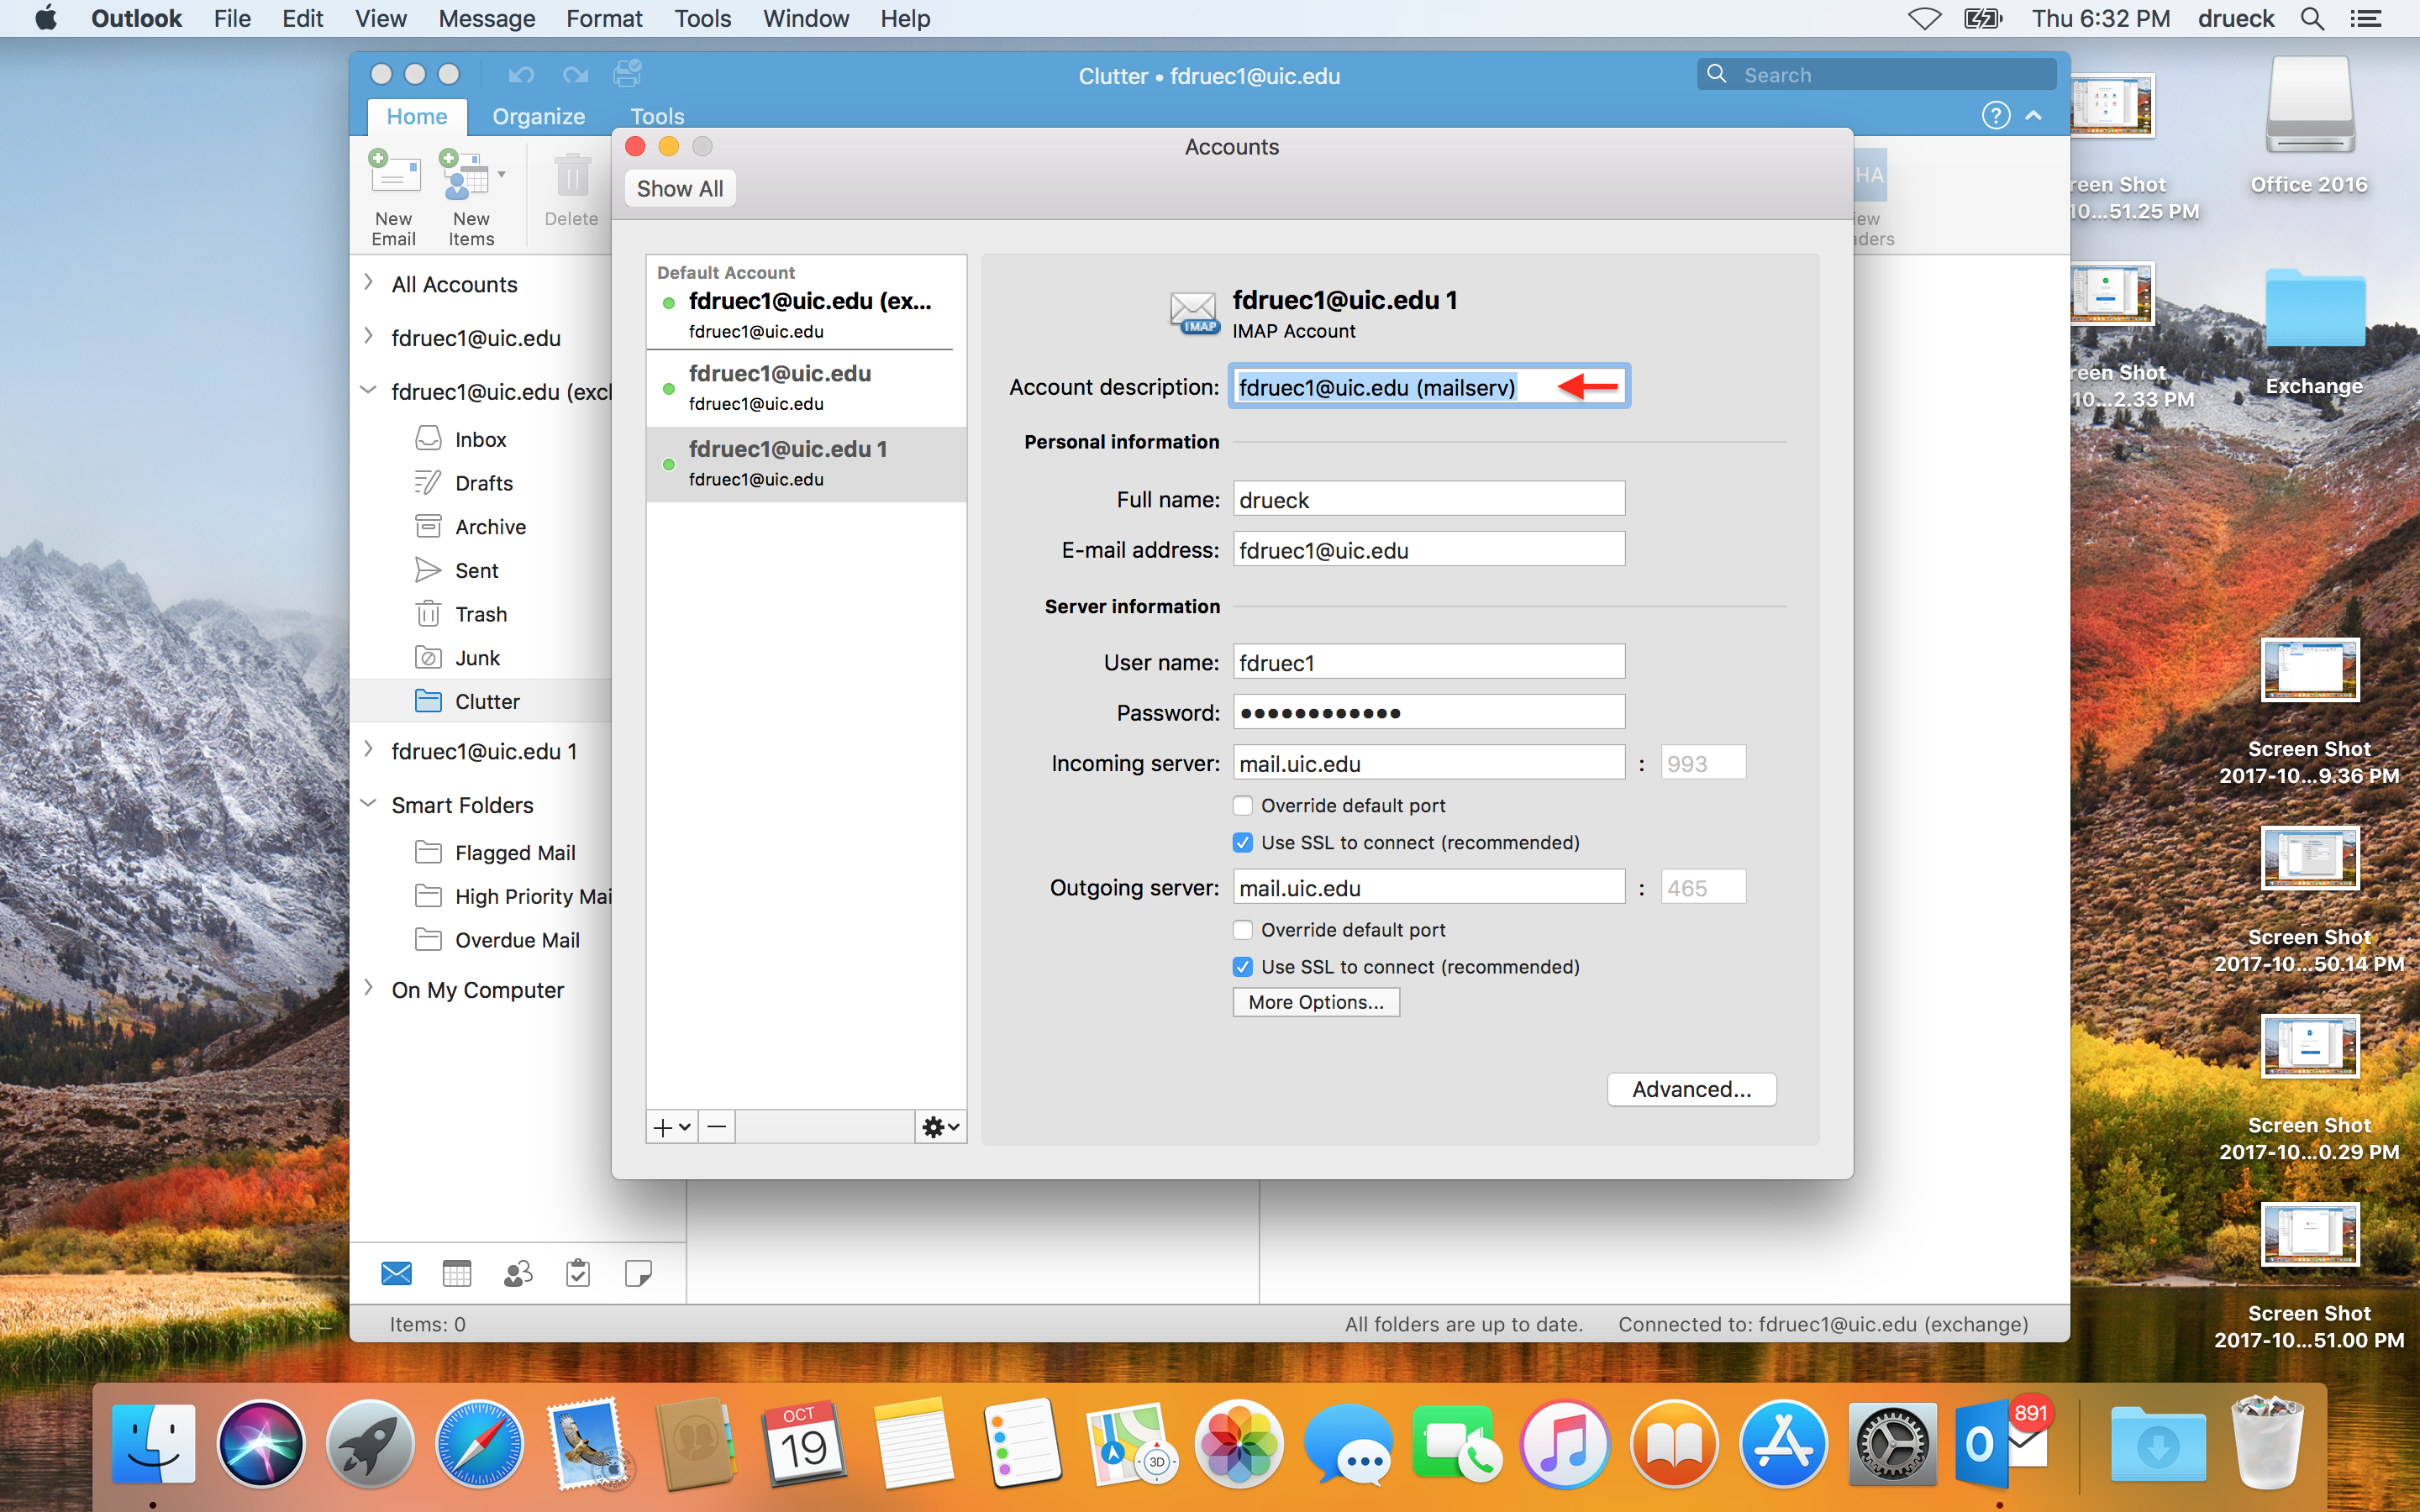
After you add the account, you may want to visit Tools
> Accounts and change the text field Account
description. This will default to "yournetid@uic.edu"
but it may be useful to rename it to "yournetid@uic.edu
(Mailserv)" so as to make it easy to identify which mail account
is your exchange account and which account is your Mailserv account.
Move your mail
>Move mail by drag and drop
-
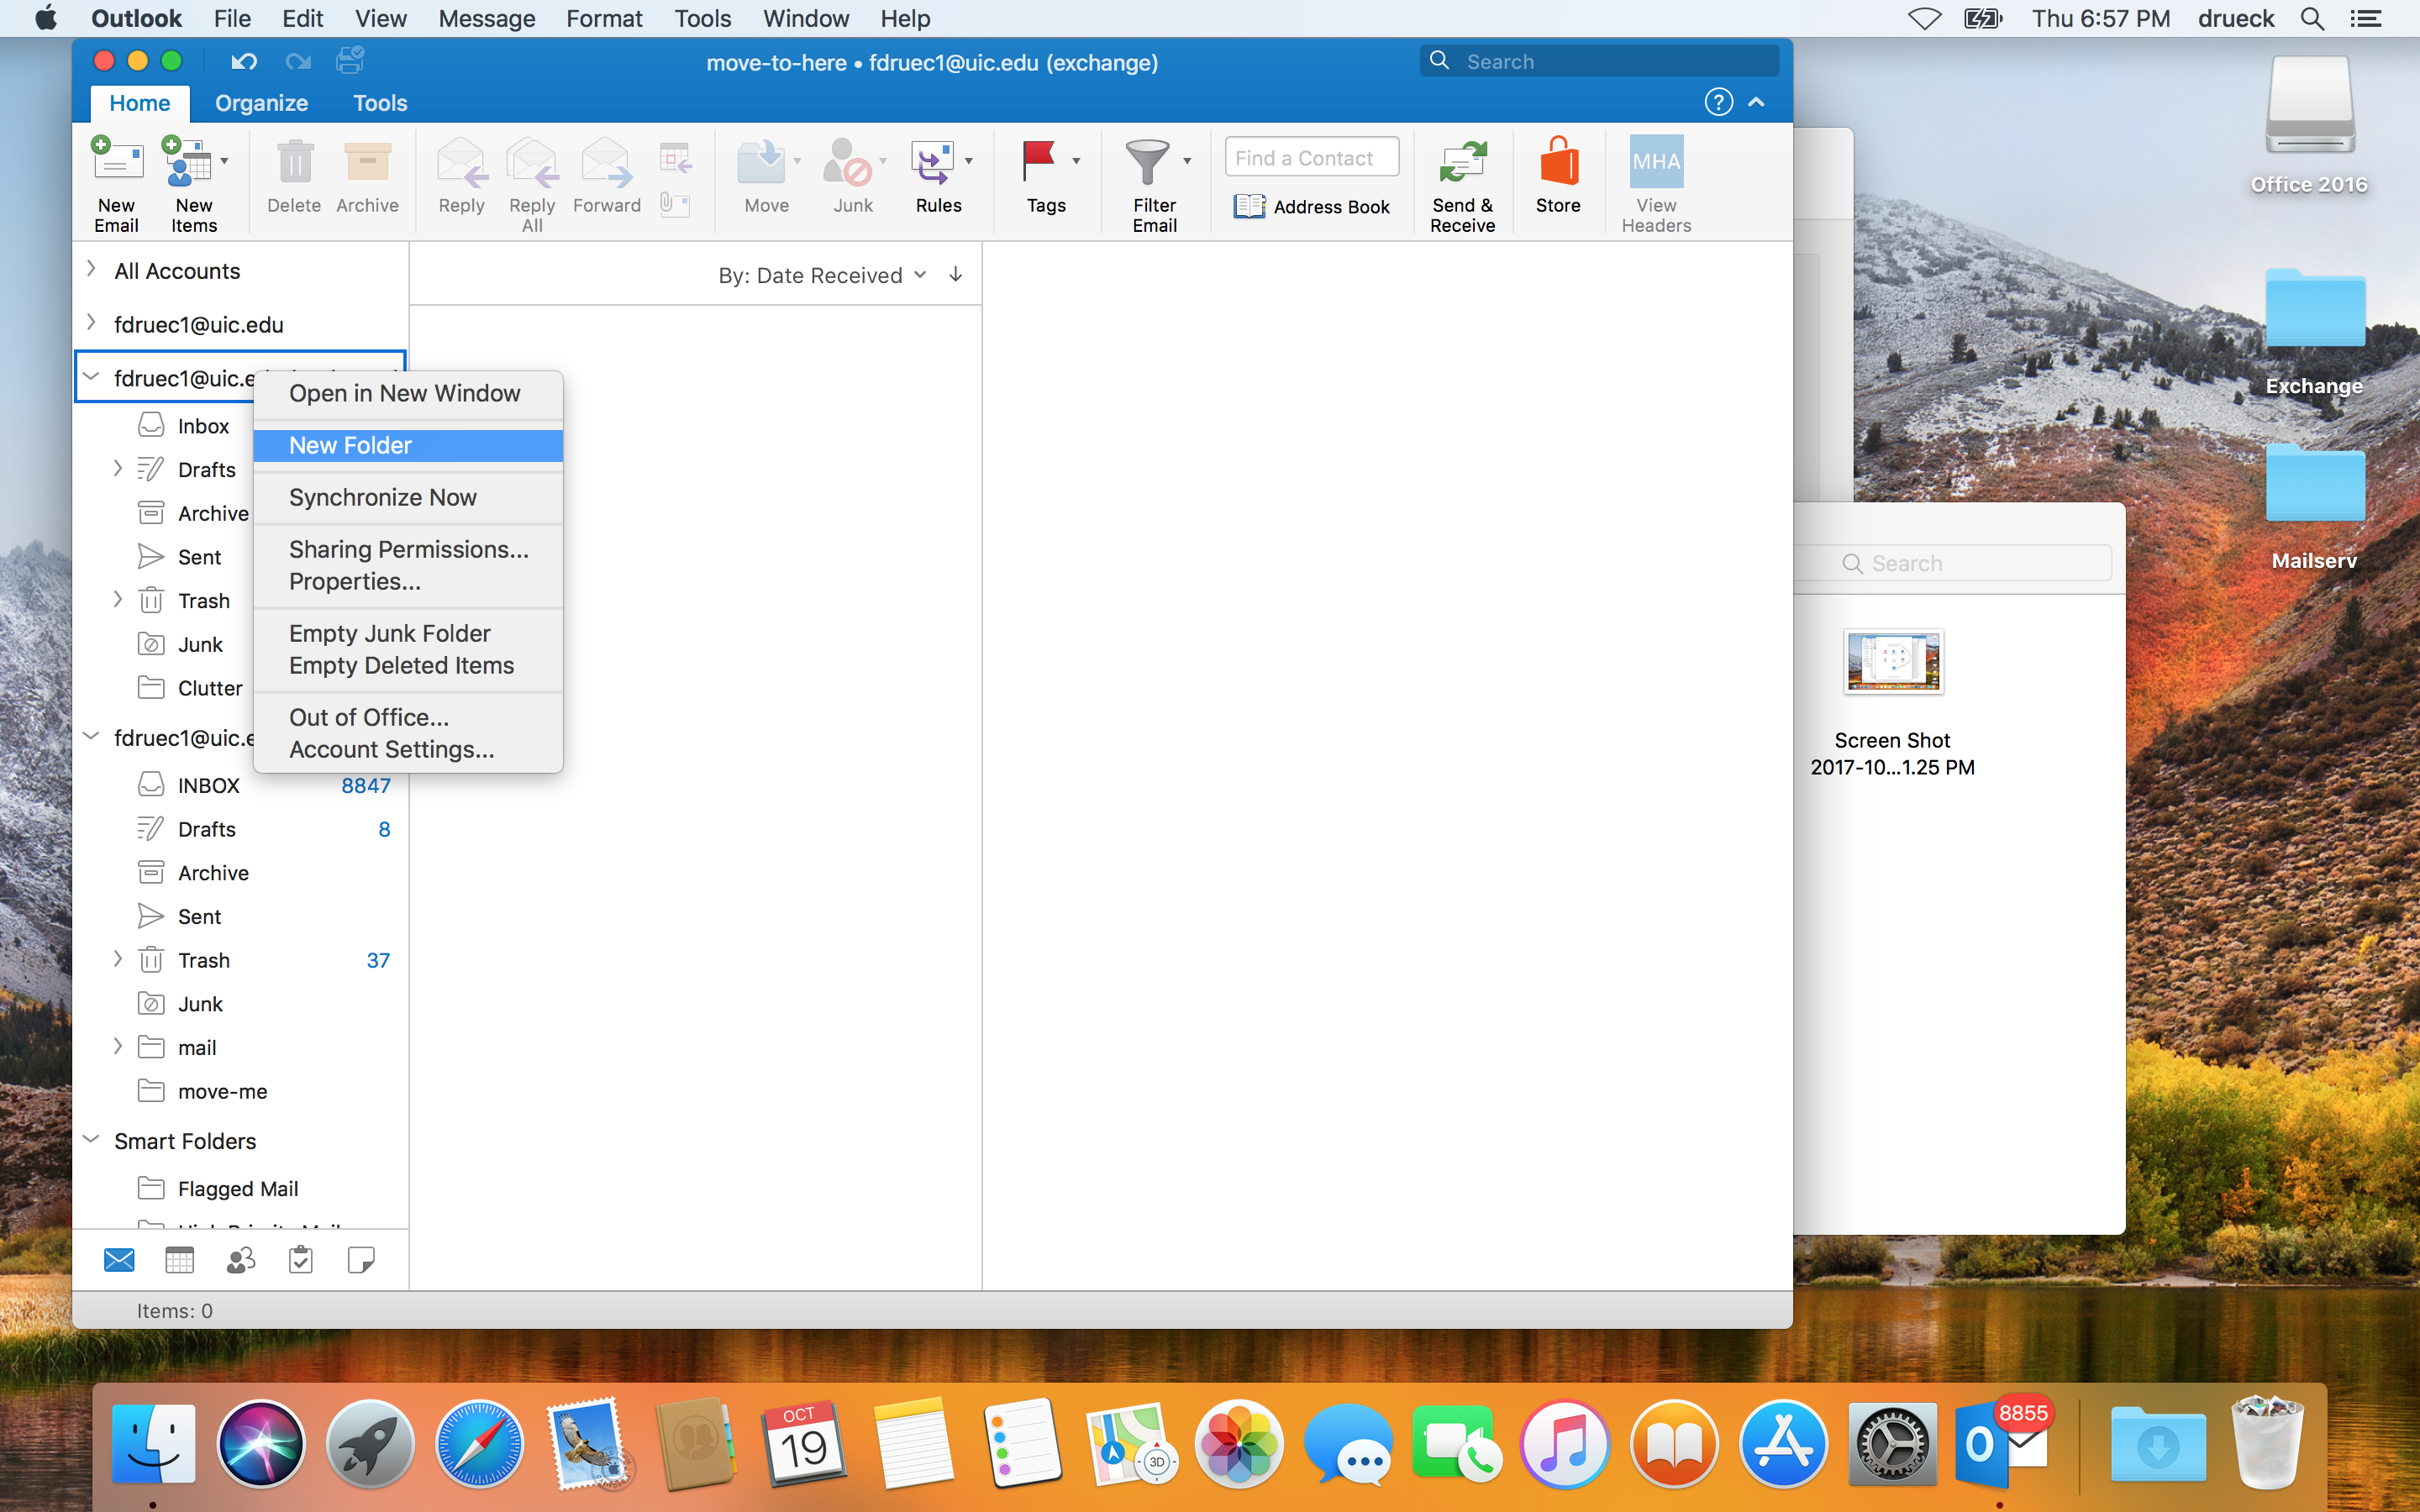
While you can directly move your mail into, e.g. your Exchange
account Inbox, you may want to create a folder to hold messages as
you move them into your exchange account. This will make it
easier to verify that you have copied all your messages into your
Exchange account. In this example, we create a folder
named move-to-here by right clicking
(control+click) on the exchange account and selecting
the New Folder option in the context menu.
-
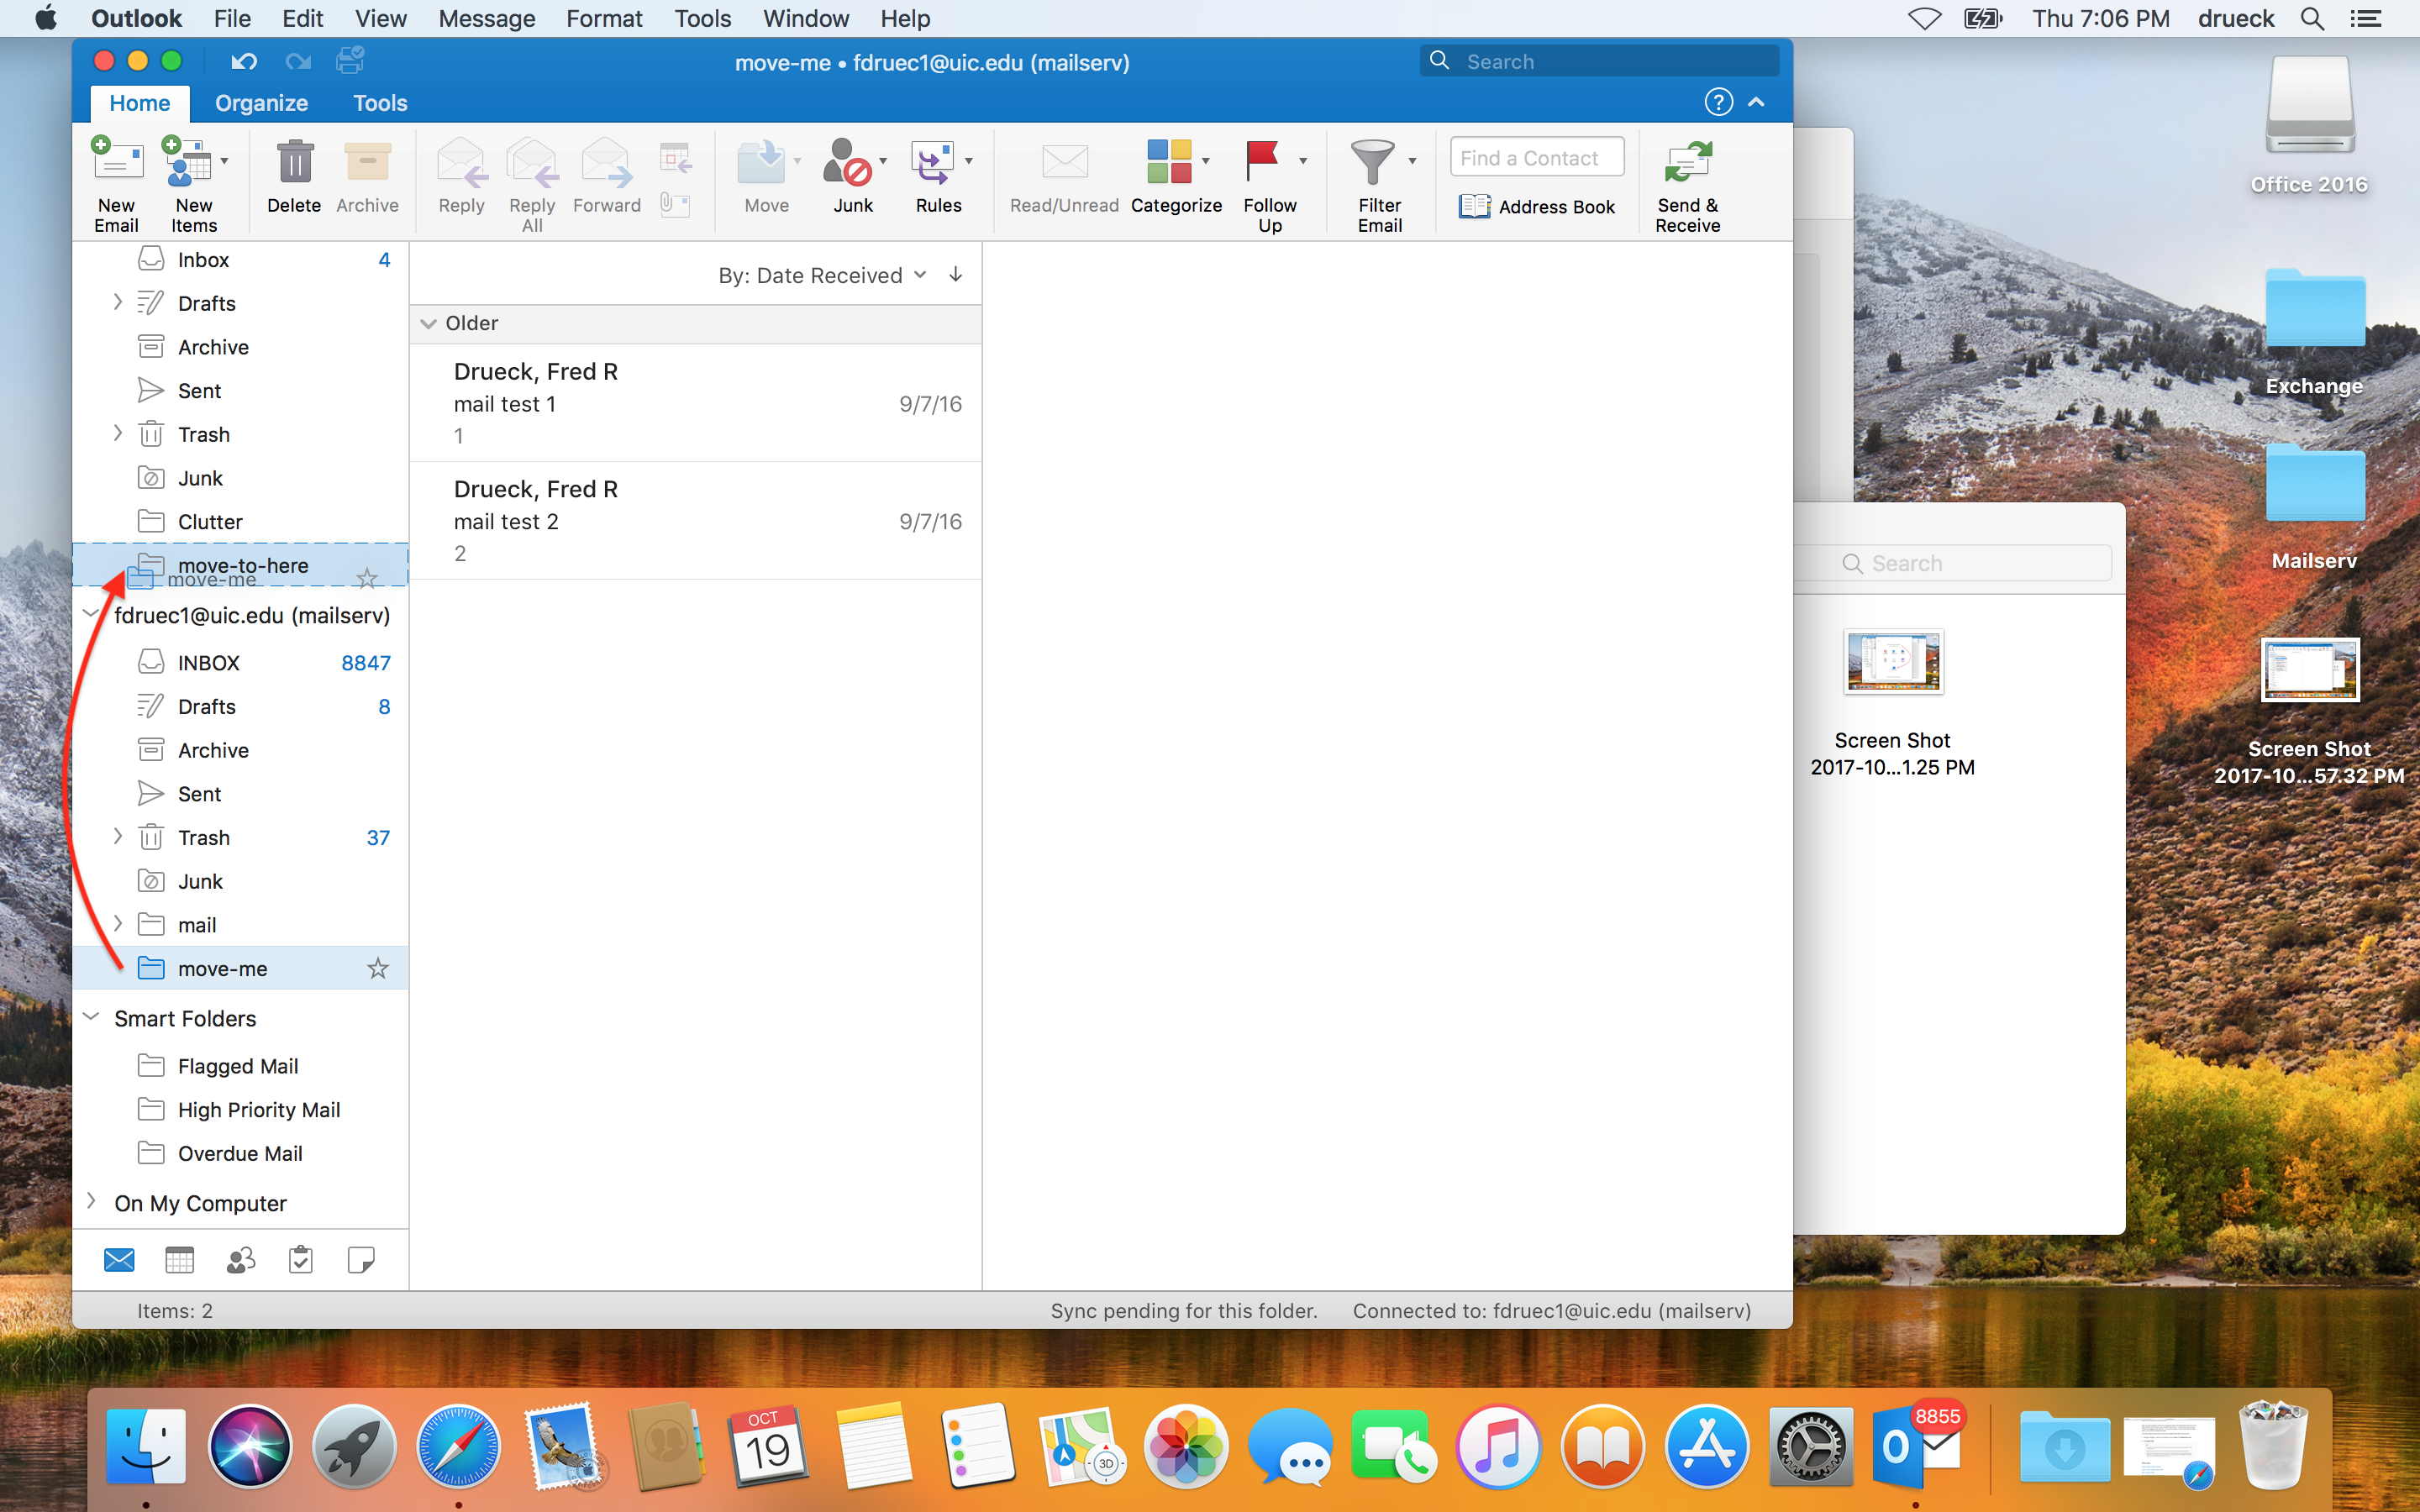
Now click & hold (don't release the mouse or trackpad button) the
Mailserv folder you want to move. Drag it to the destination
folder you want to put the mail folder in. In this example, we
move the Mailserv folder move-me into the
Exchange folder move-to-here.
-
After moving, there is a new move-me sub-folder
of the exchange folder move-to-here. If your
folder contains a lot of mail, it may take quite some time to
finish coping. After copying, check that the count of items in
the lower left corner of the exchange window is the same in your
new folder on the exchange server as the old folder on Mailserv.

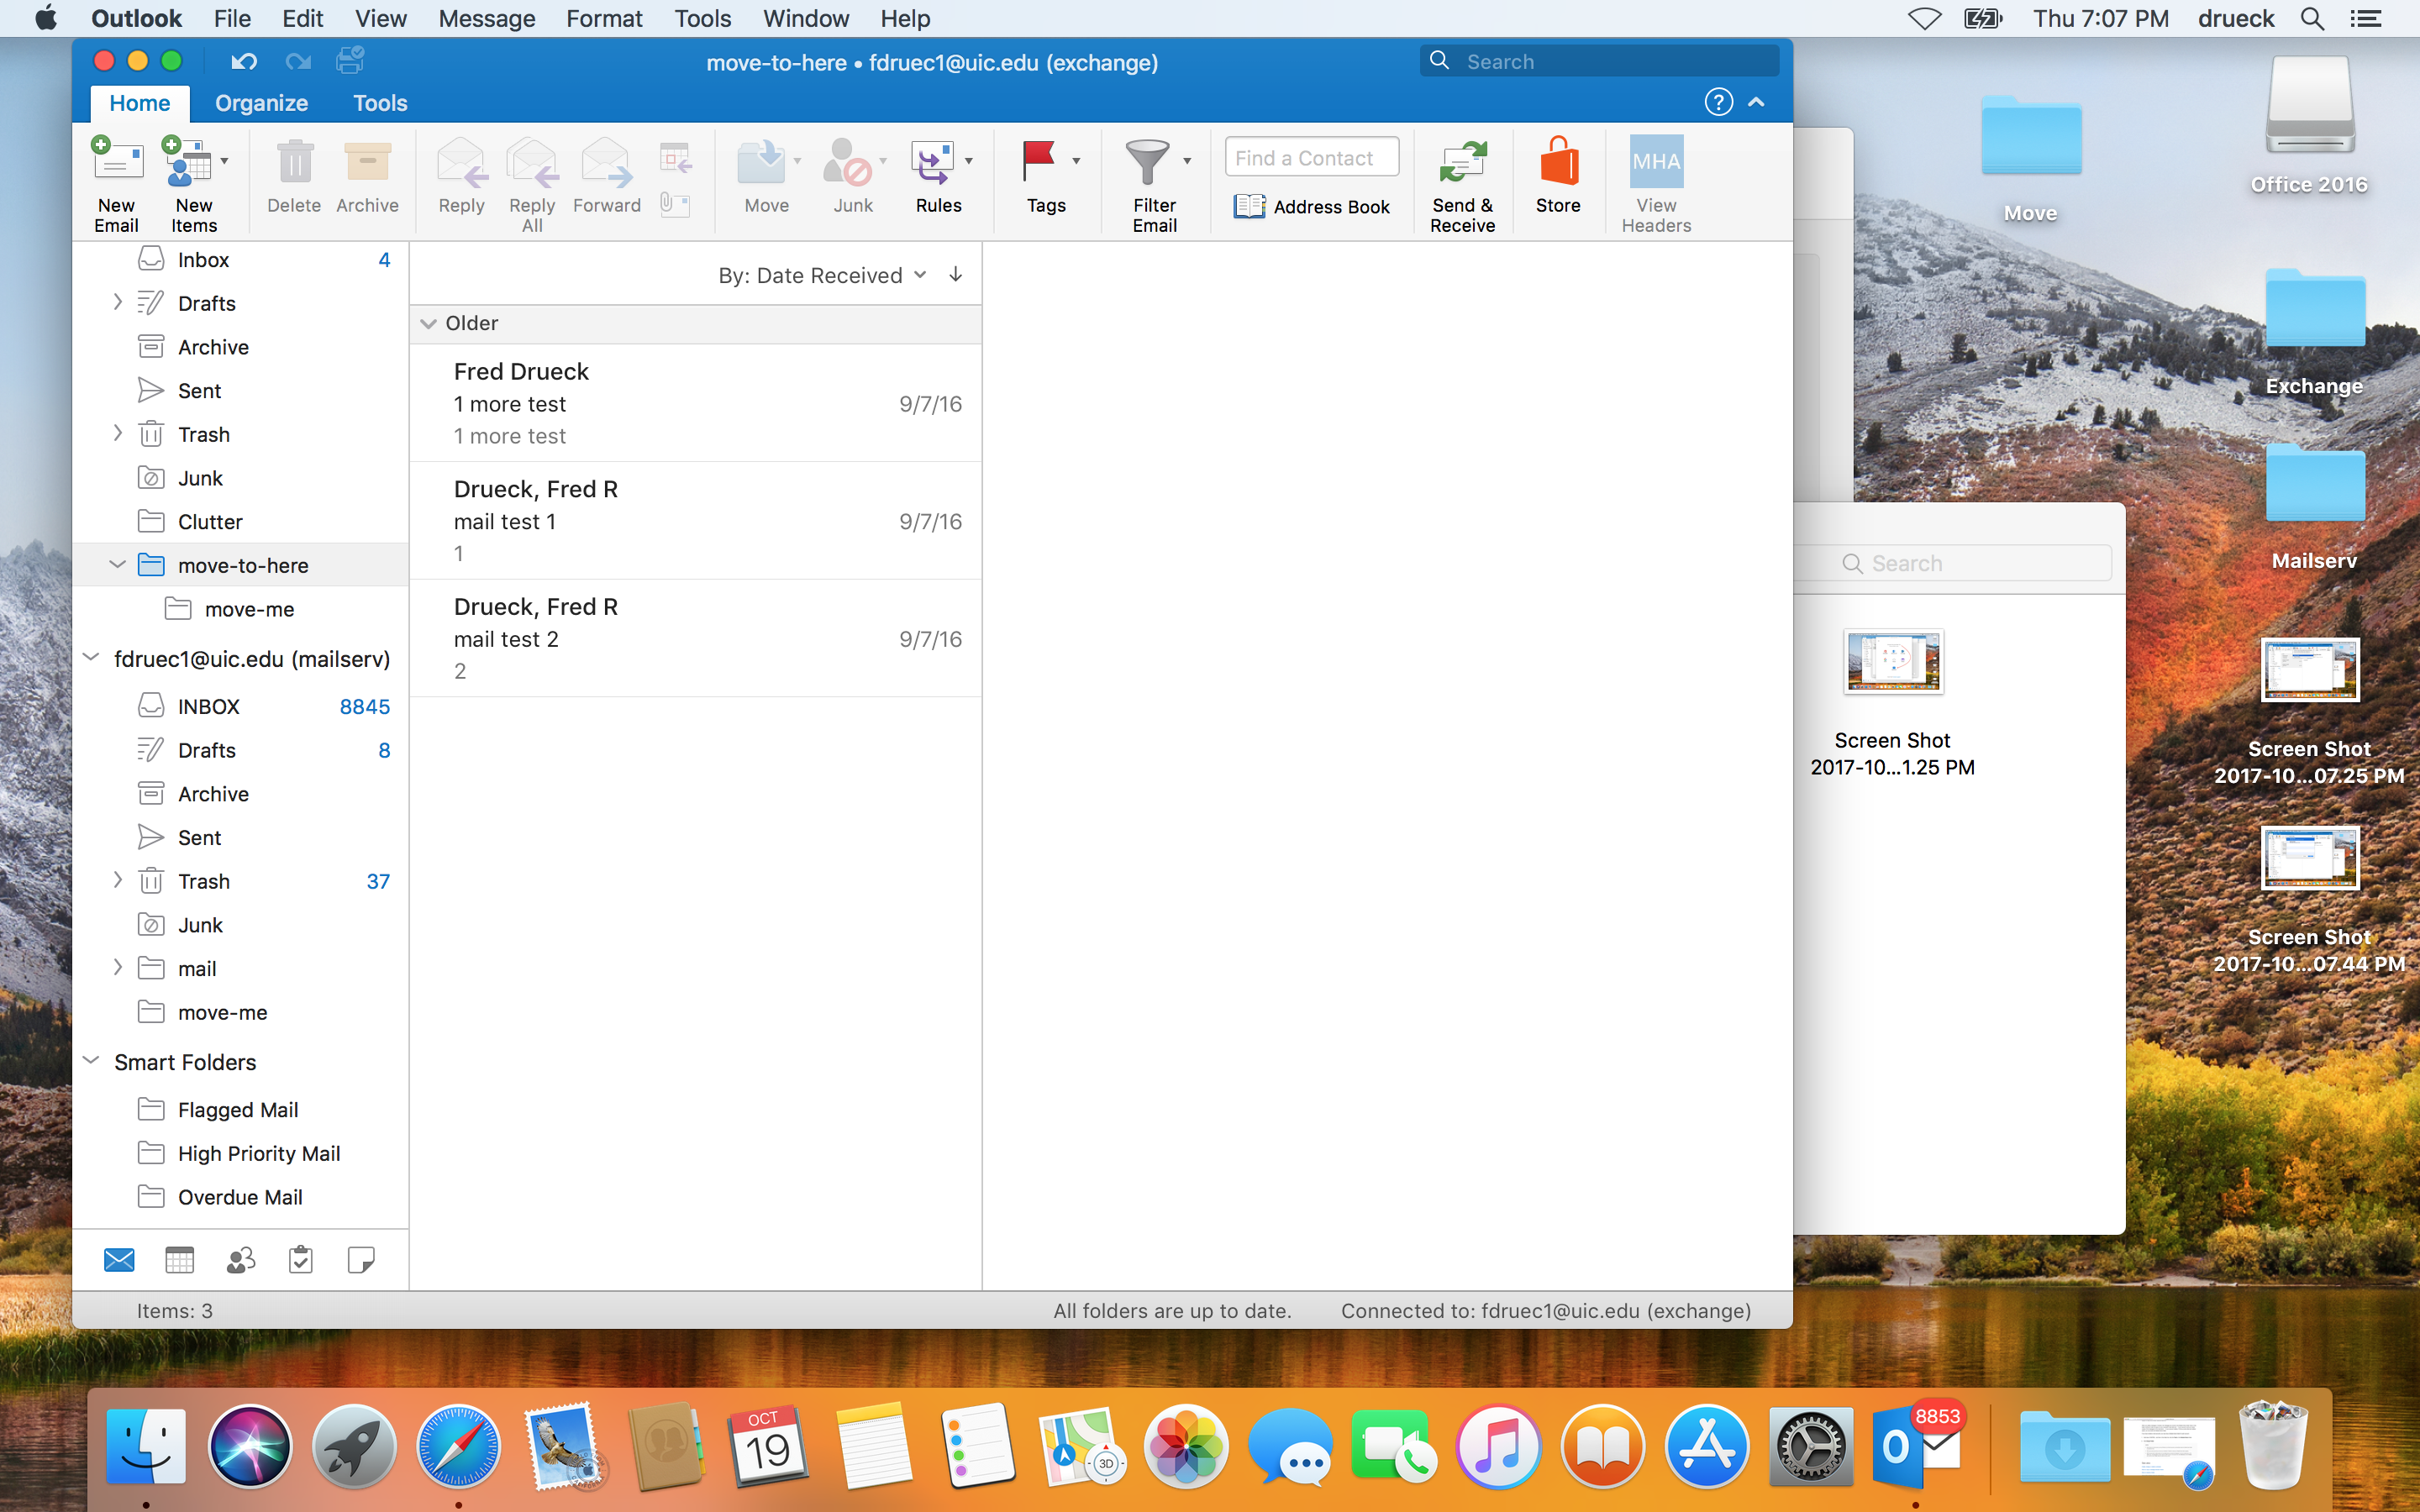
Move mail with the move button
It is also possible to select messages and move them using the move button in the ribbon interface.
-
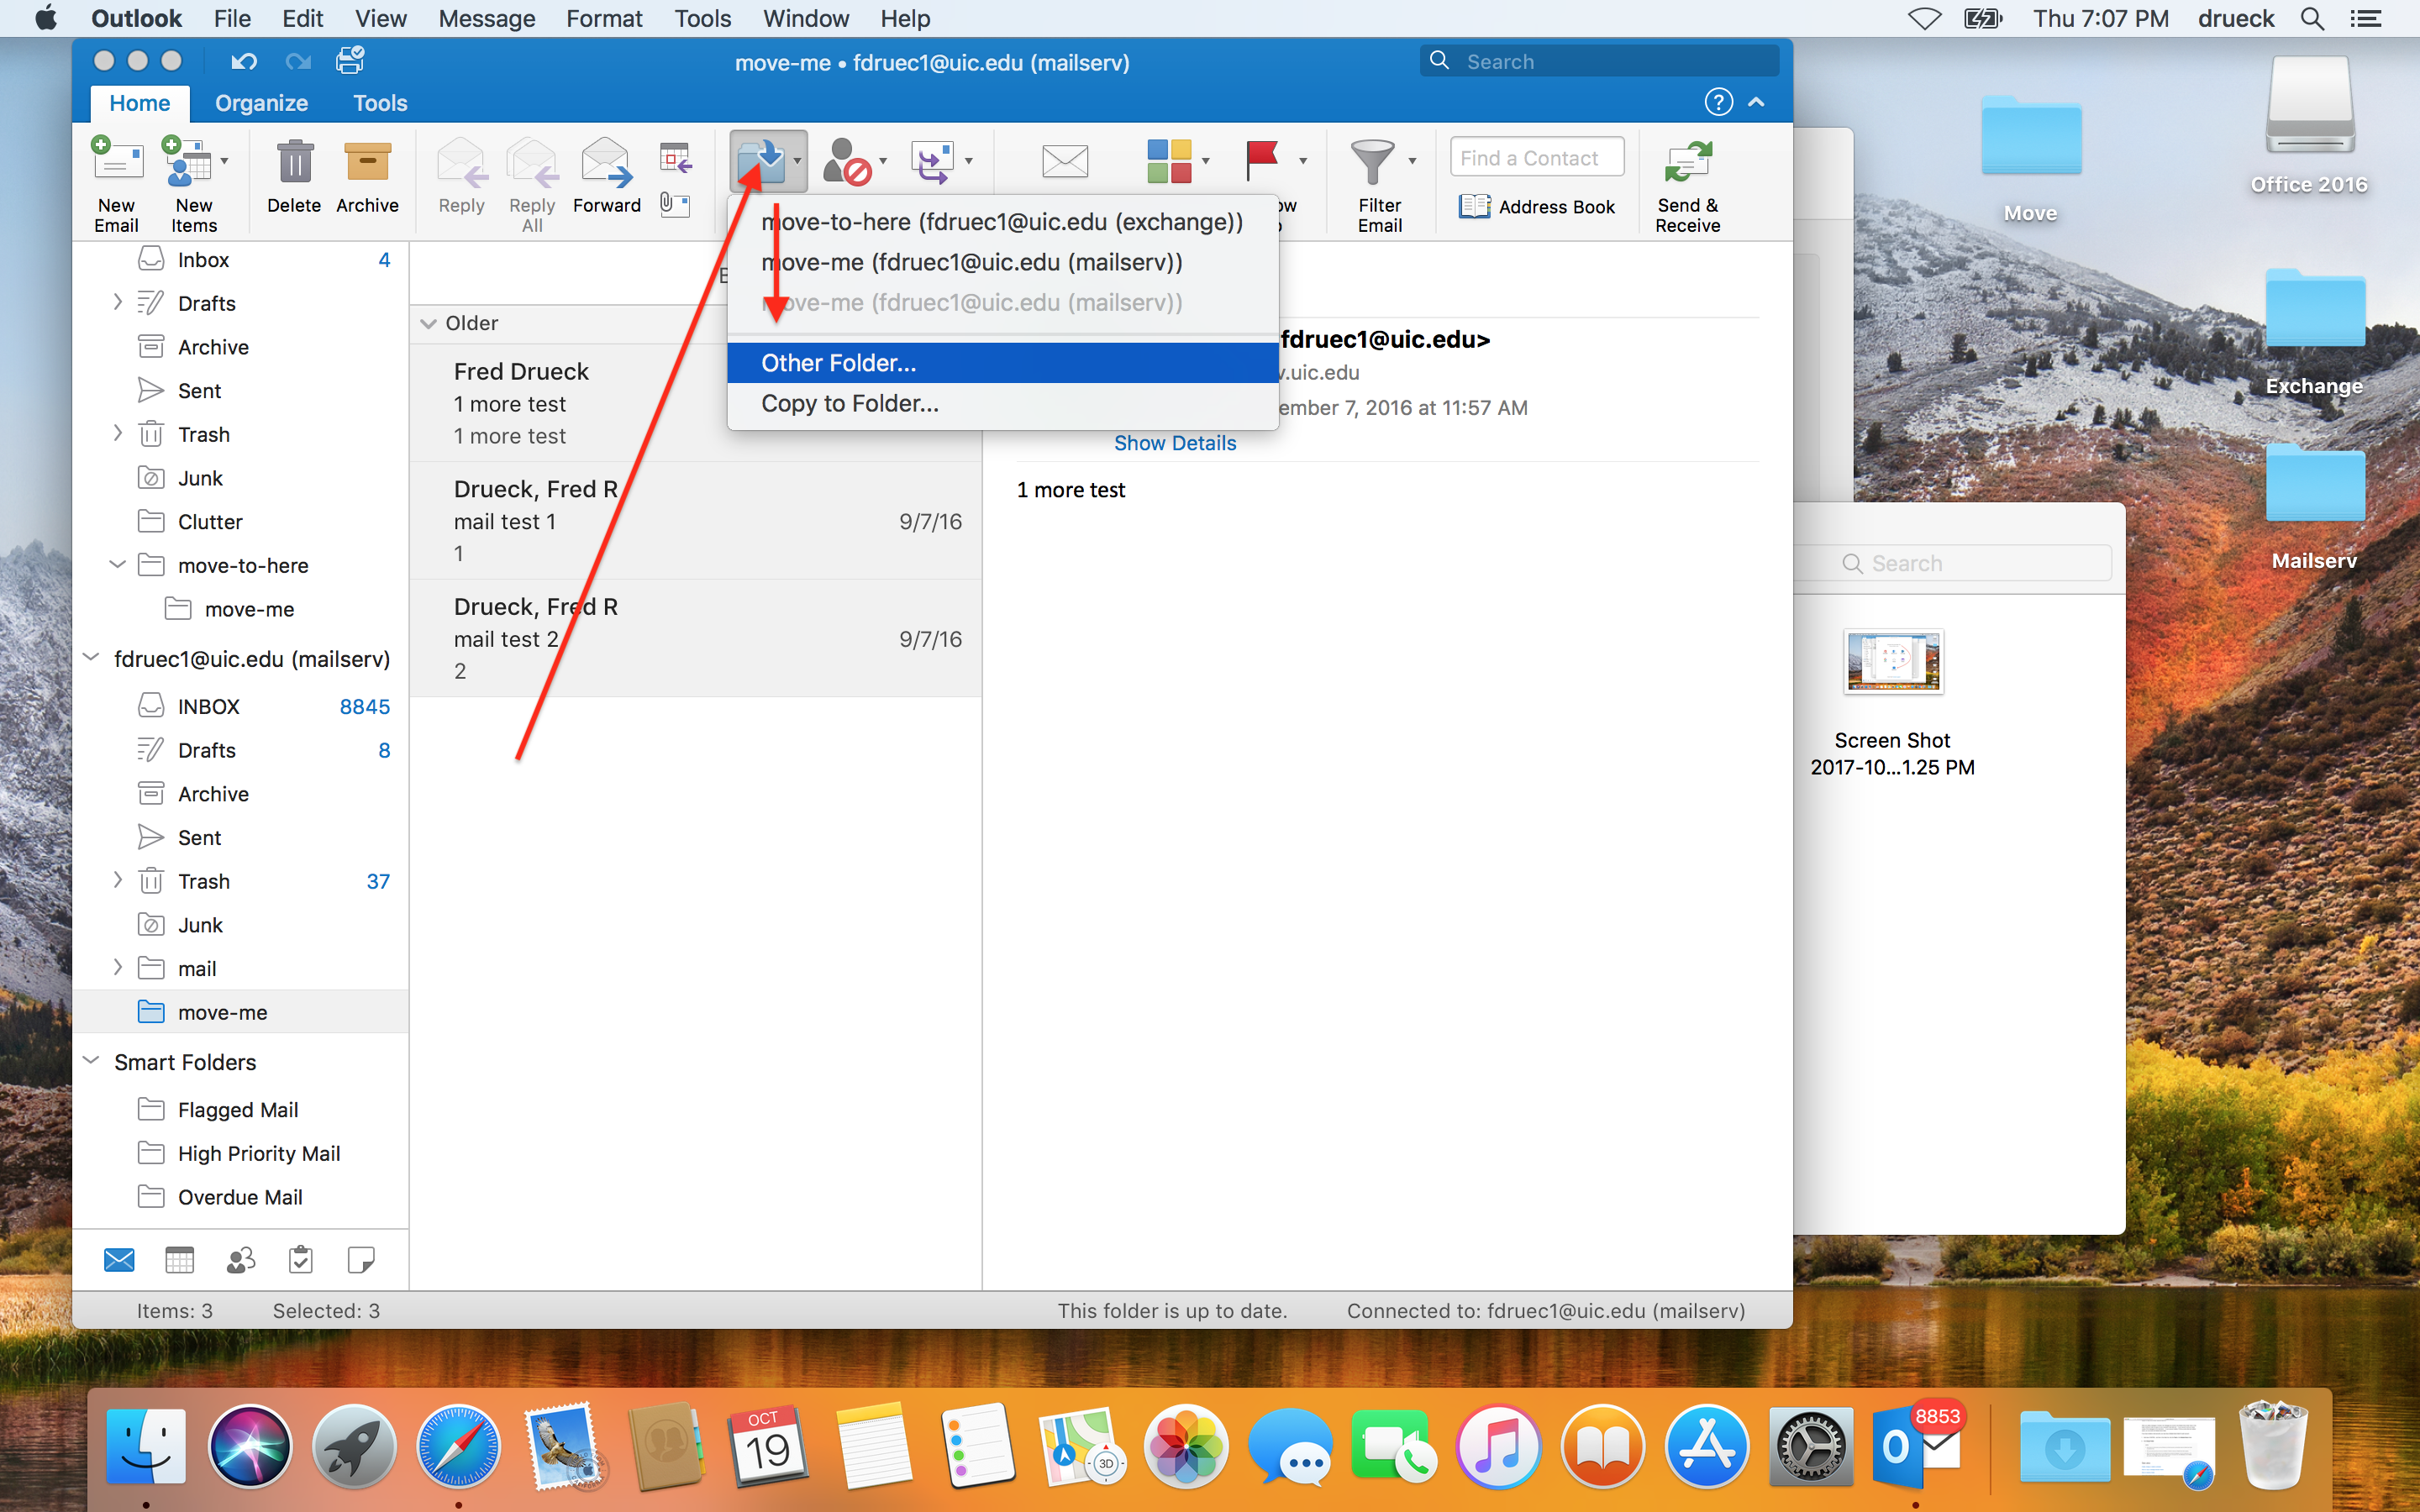
First select the messages you would like to move. The keyboard
shortcut ⌘+a for "select all" may be useful.
Next press the Move button in the ribbon
interface. A menu will drop down, if you do not already see the
folder you wish to move mail into, select other folder.
-
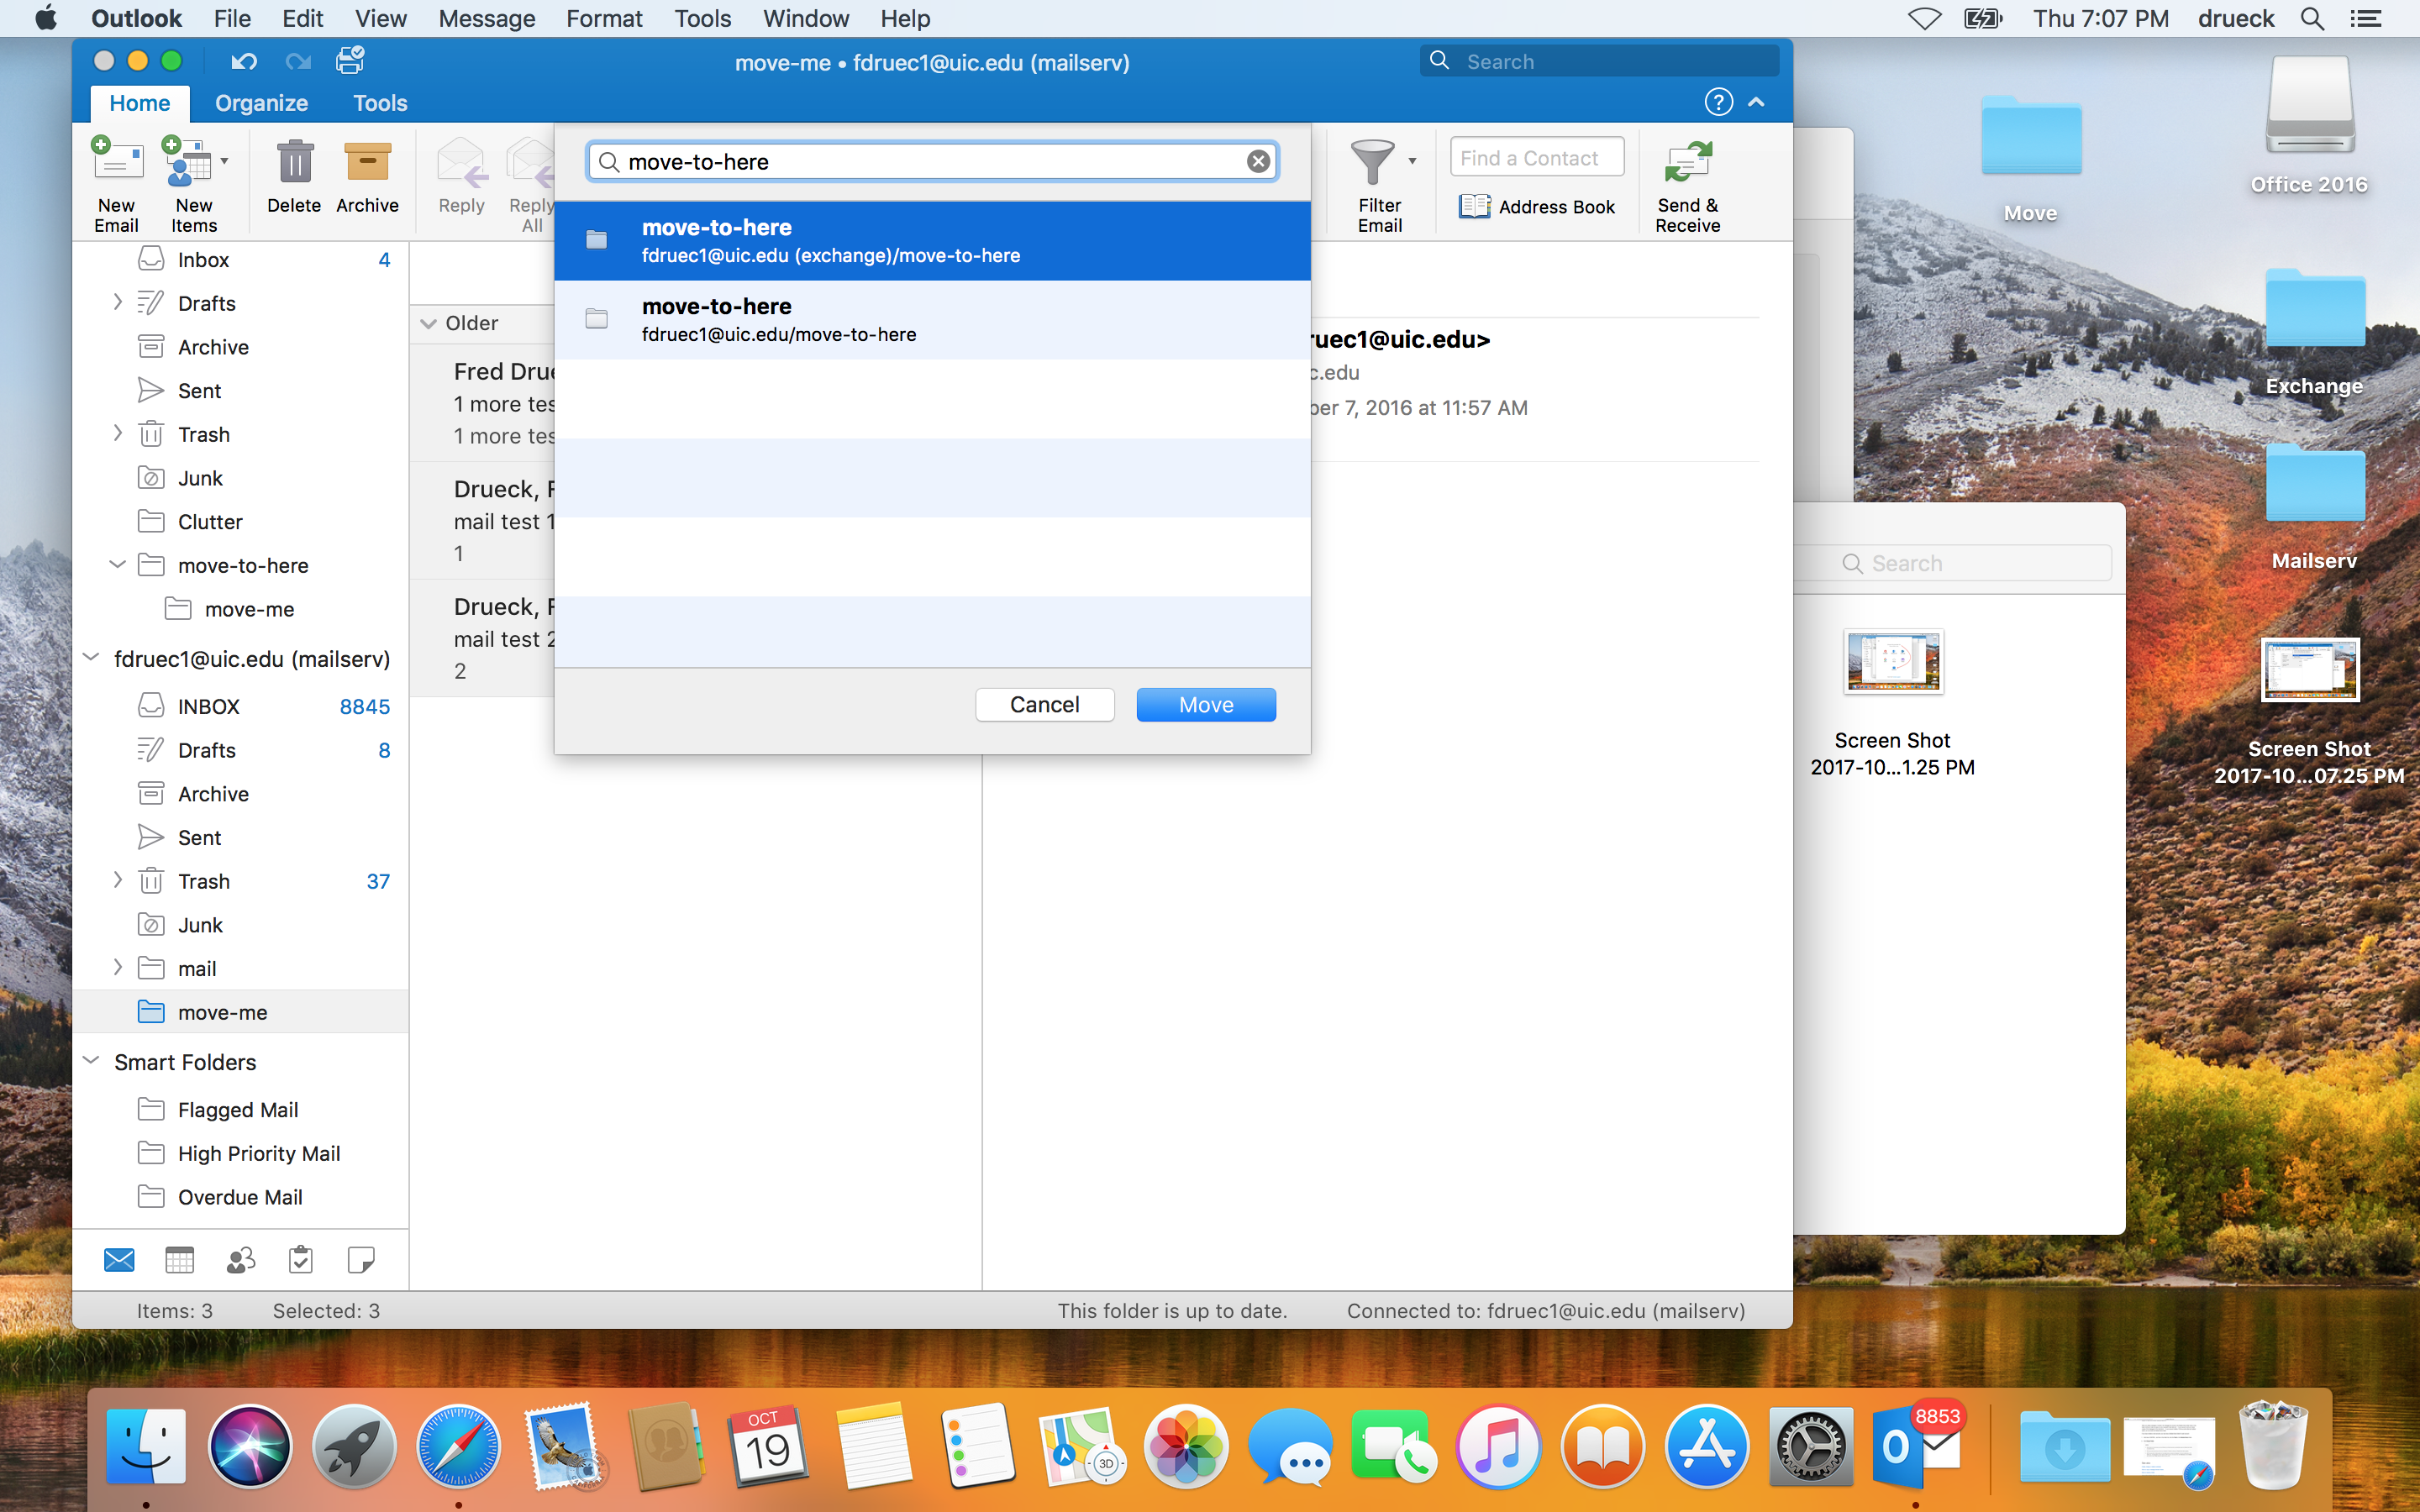
Search by text string for the name of the folder you would like to
move your mail into. As matching folders appear, you may select
your desired destination folder.
-
Moving mail using this method puts the messages directly into the
target folder, instead of a subfolder of the target folder. (You
can still see the subfolder from the previous example as well,
though, because I did not delete it before taking the screenshots
for the second example). As in the previous example, you should
check, after moving, that the items count in the lower left corner
of the Outlook window is the same in the destination folder as the
source folder.
Help for Thunderbird Users
It turns out the ACCC has not enabled the IMAP service functionality in Exchange and you cannot, therefore, connect clients like Thunderbird that do not support Microsoft's proprietary client/server protocol. If you are a Linux user and you want to use the campus Exchange service, then your best bet to migrate your mail would be to use the Evolution mail client which has reverse-engineered support for Microsoft's proprietary mail protocols. If you are happy Thunderbird user on any platform and want to continue using Thunderbird, I would recommend you migrate to Gmail instead, since Gmail does support IMAP or POP3 connections.
The ACCC provides basic instructions for connecting an IMAP client (such as Thunderbird) to UIC GoogleApps. There is an important omission in these instructions as of the time this how-to was written:
The proper authentication type to use to connect to Gmail is "OAuth2". As long as you use "OAuth2" authentication it is not necessary to "enable less secure applications".
Since the ACCC instructions are incomplete and fairly generic I will provide more detailed instructions below.
Important Note: Make sure thunderbird is updated to the latest version before you to m attempt to move your mail. Out-of-date versions of Thunderbird will not be able to connect to Gmail. You may need to update multiple times if your Thunderbird is sufficiently out of date. If you use a truly ancient version of Thunderbird, you will have to manually install the latest version of Thunderbird.
Important Note: Make sure you log into the Gmail web interface at least once before you begin migrating your mail.
-
Open the Account Settings, one path to this menu is
☰ > Preferences > Accounts Settings.
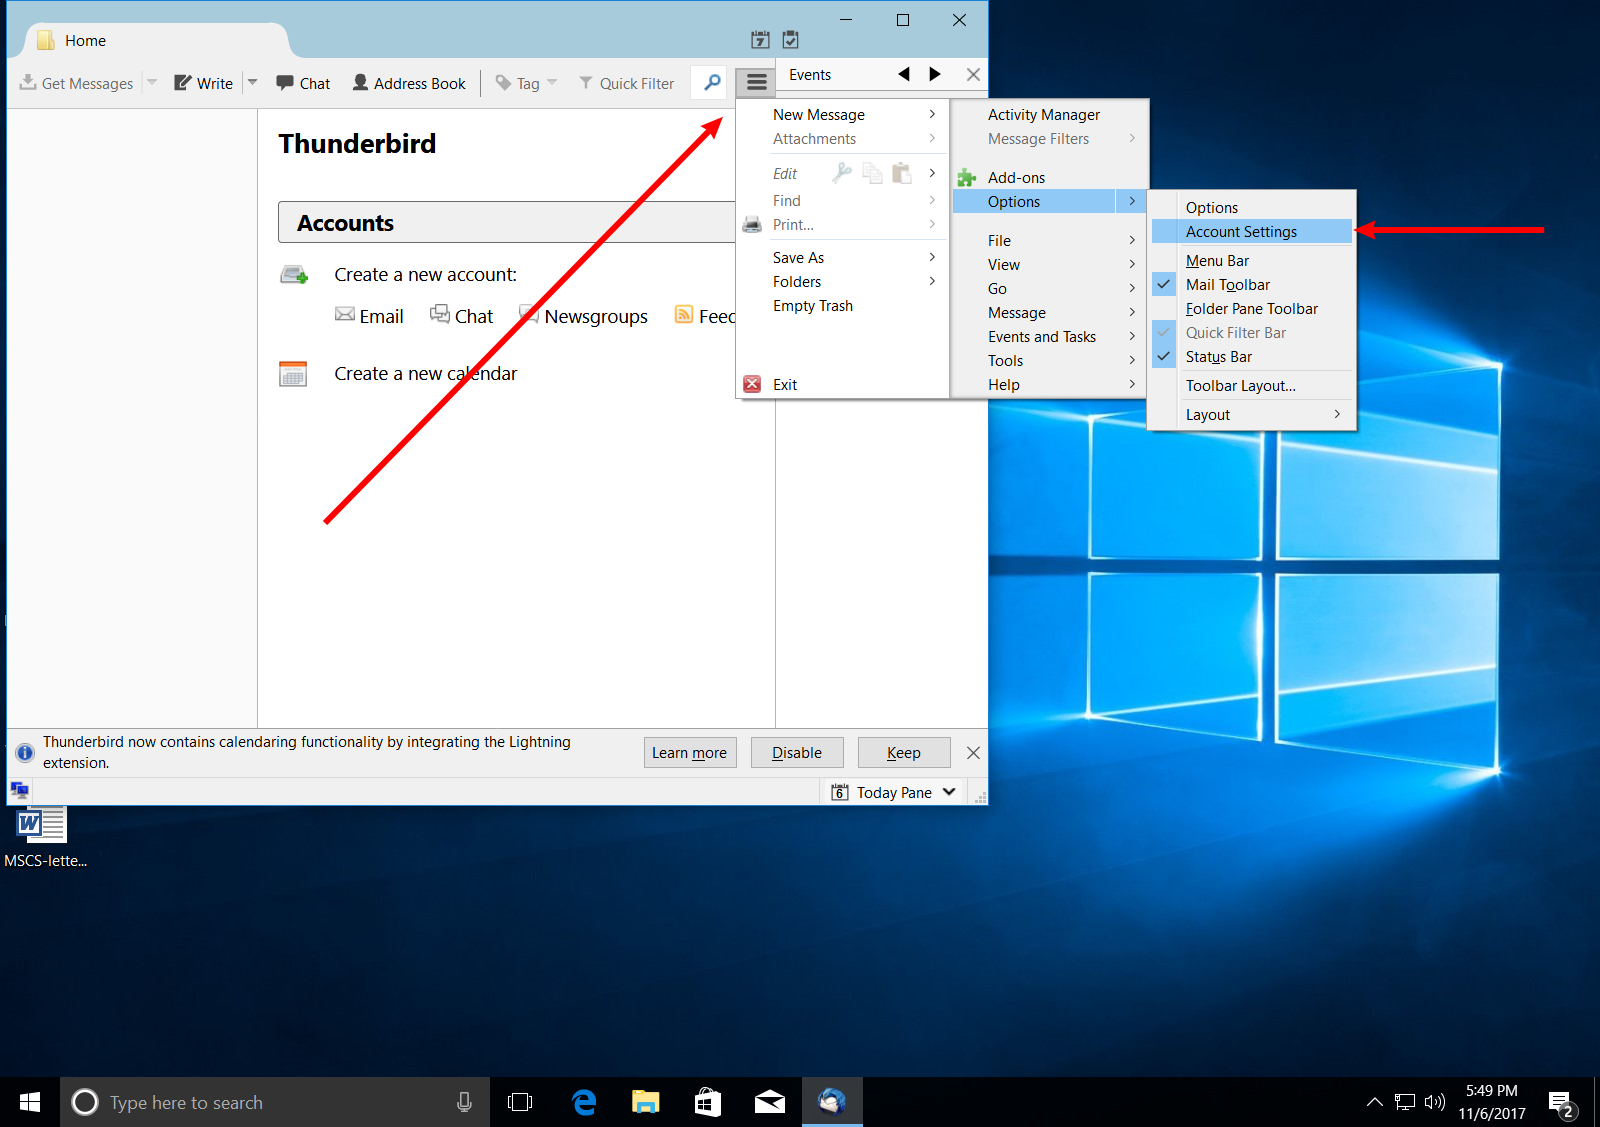
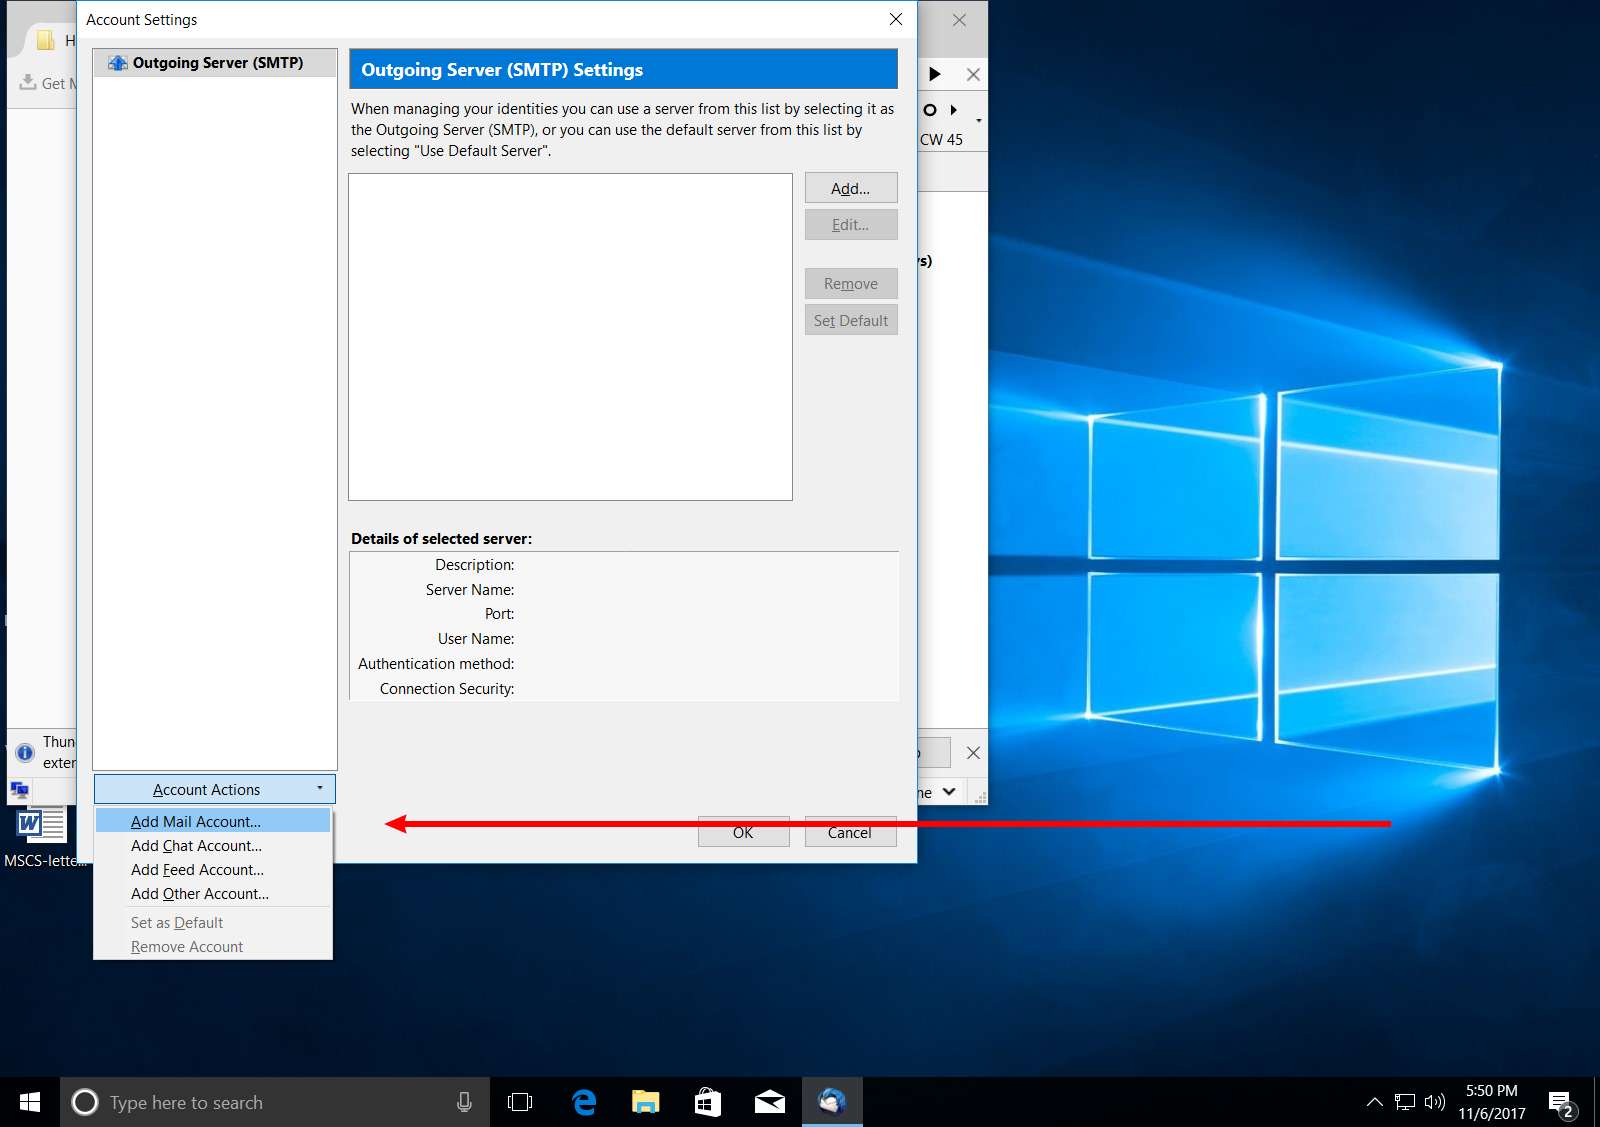
-
Click the Account Actions button and
select Add Mail Account.. from the drop-down
menu.
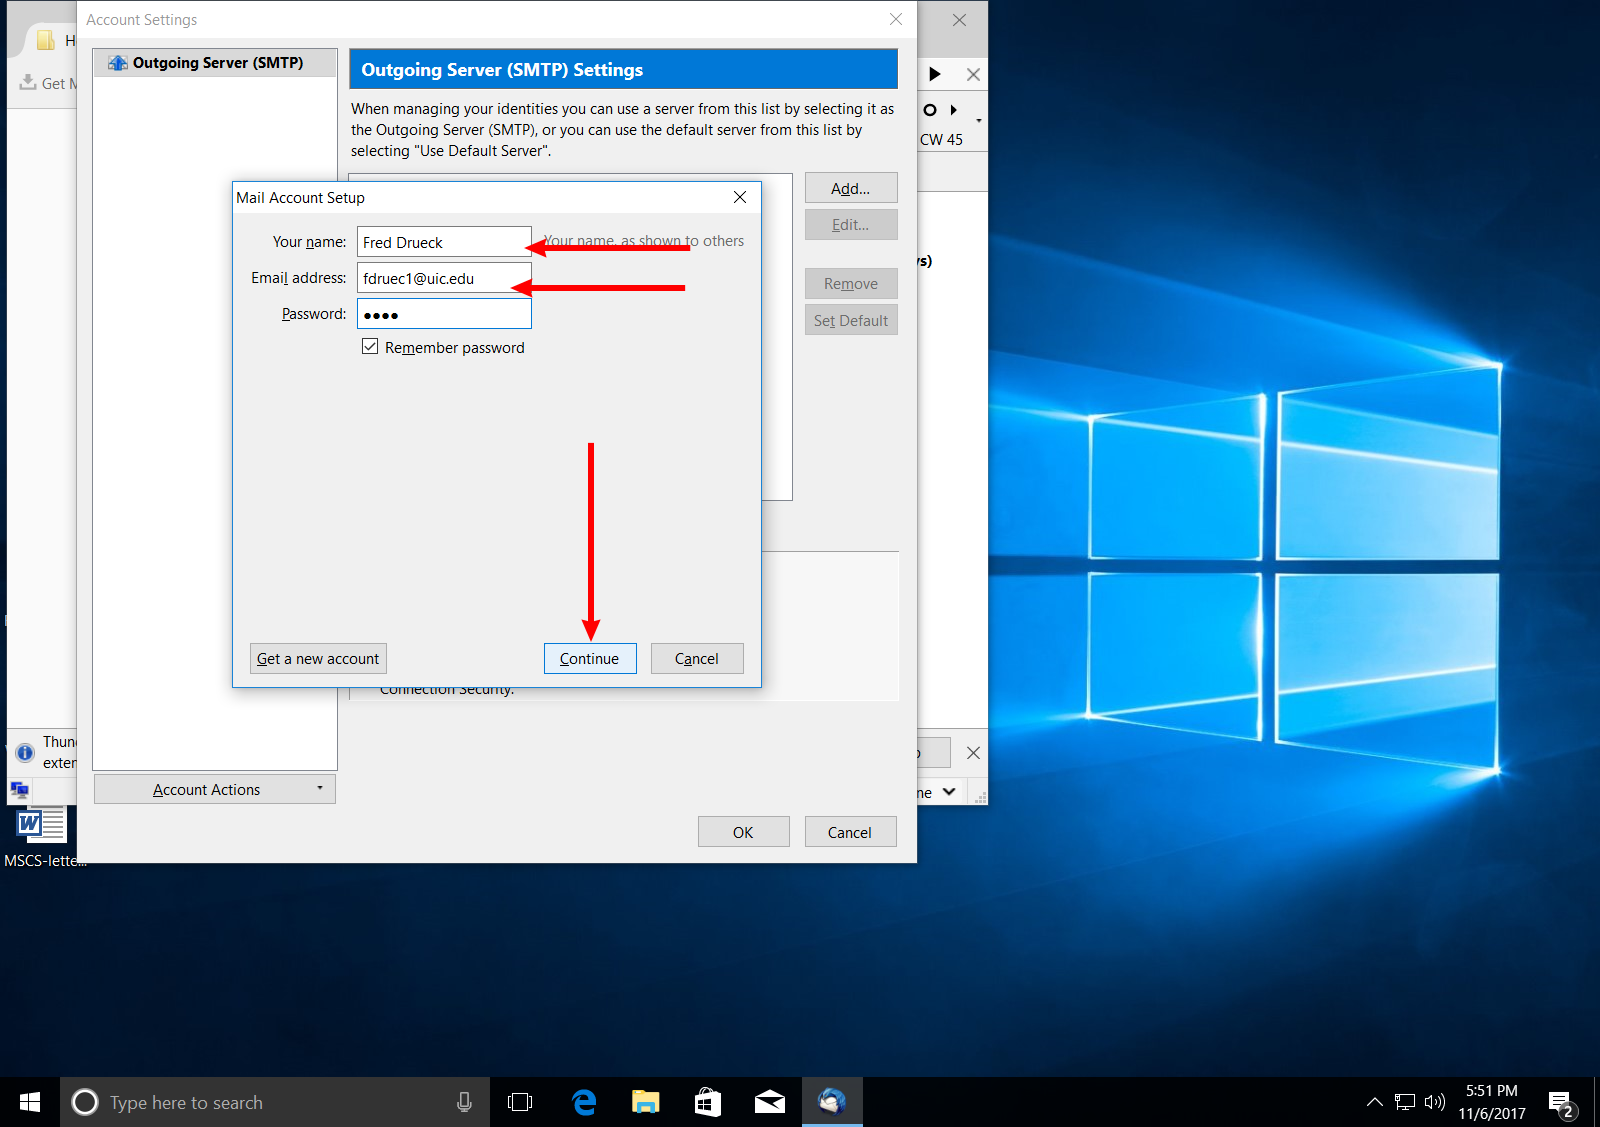
-
In the pop-up window type in your name (as you would like it to
appear to people you send email to from Thunderbird) and your
Email address (netid@uic.edu).
Click Continue. (It does not matter if you put
your correct password in or not, you will have to override the
password setting later anyway)
-
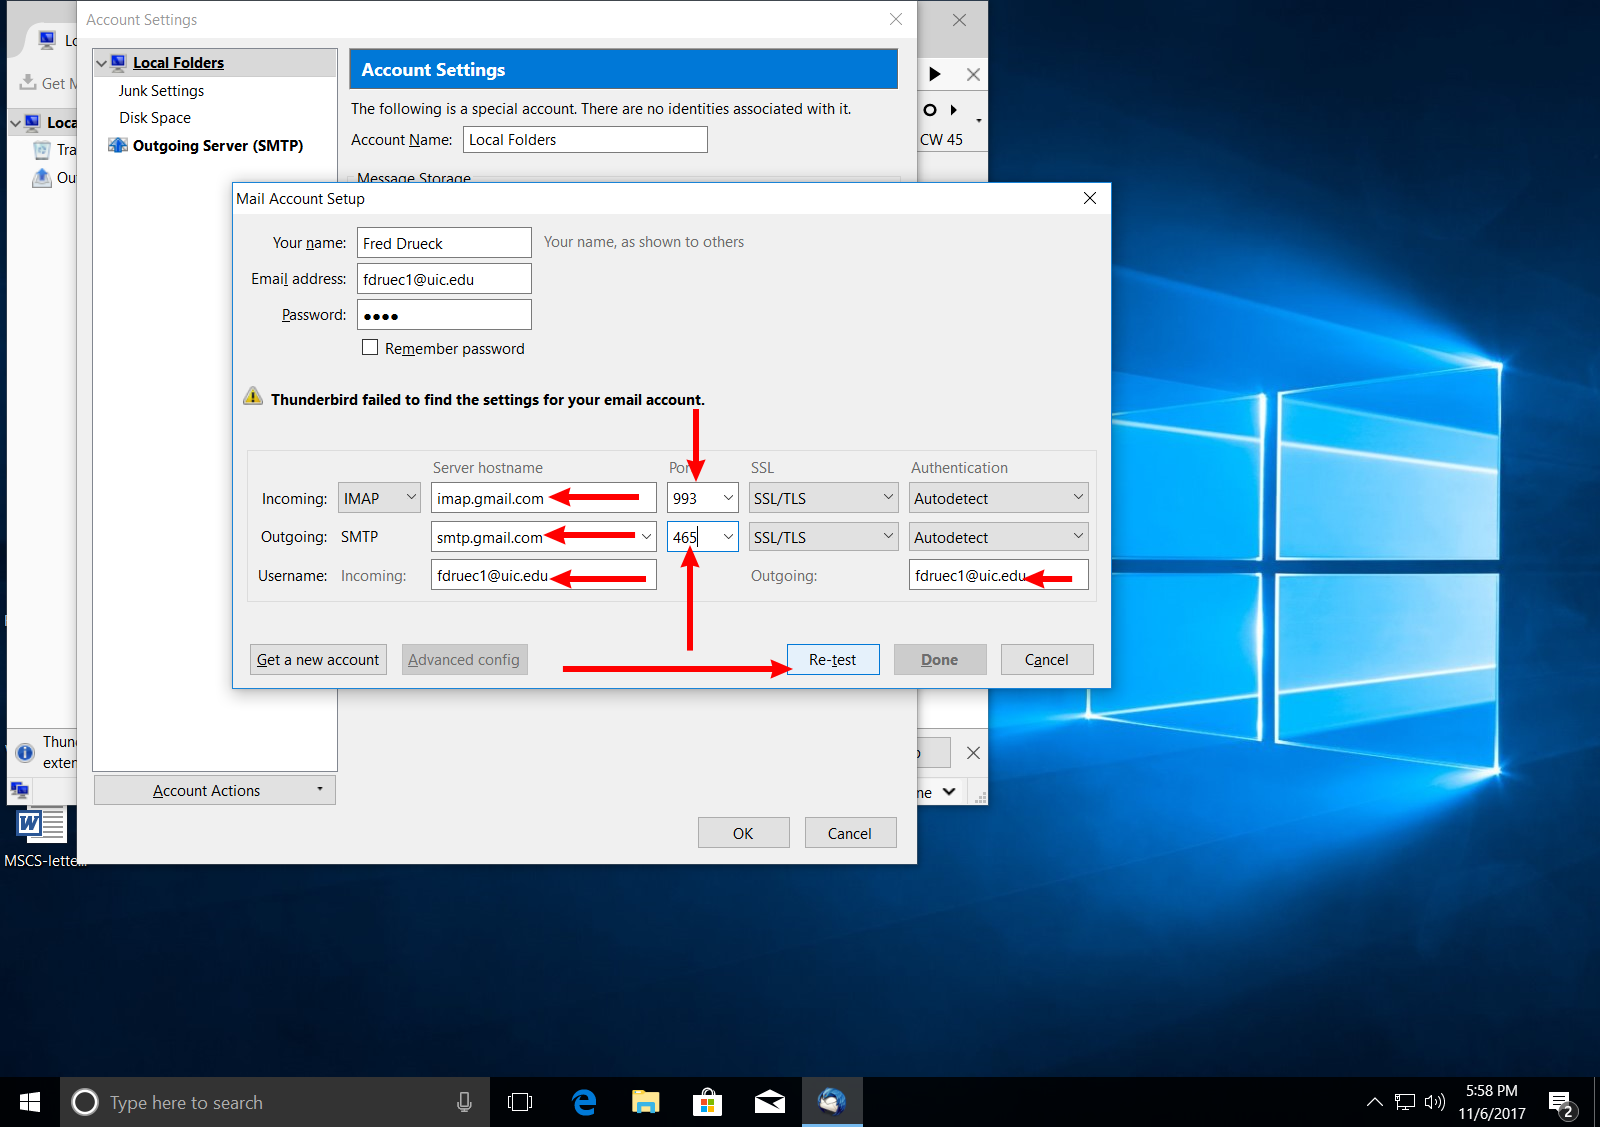
Thunderbird will try to auto-detect the proper configuration
settings and fail. (This is normal) You must manually specify the
following information:
Incoming Server hostname: imap.gmail.com Email Address: yournetid@uic.edu Outgoing Server hostname: smtp.gmail.com Incoming Port: 993 Outgoing Port: 465 Username (incoming & Outgoing): netid@uic.edu (not just the default netid without @uic.edu)
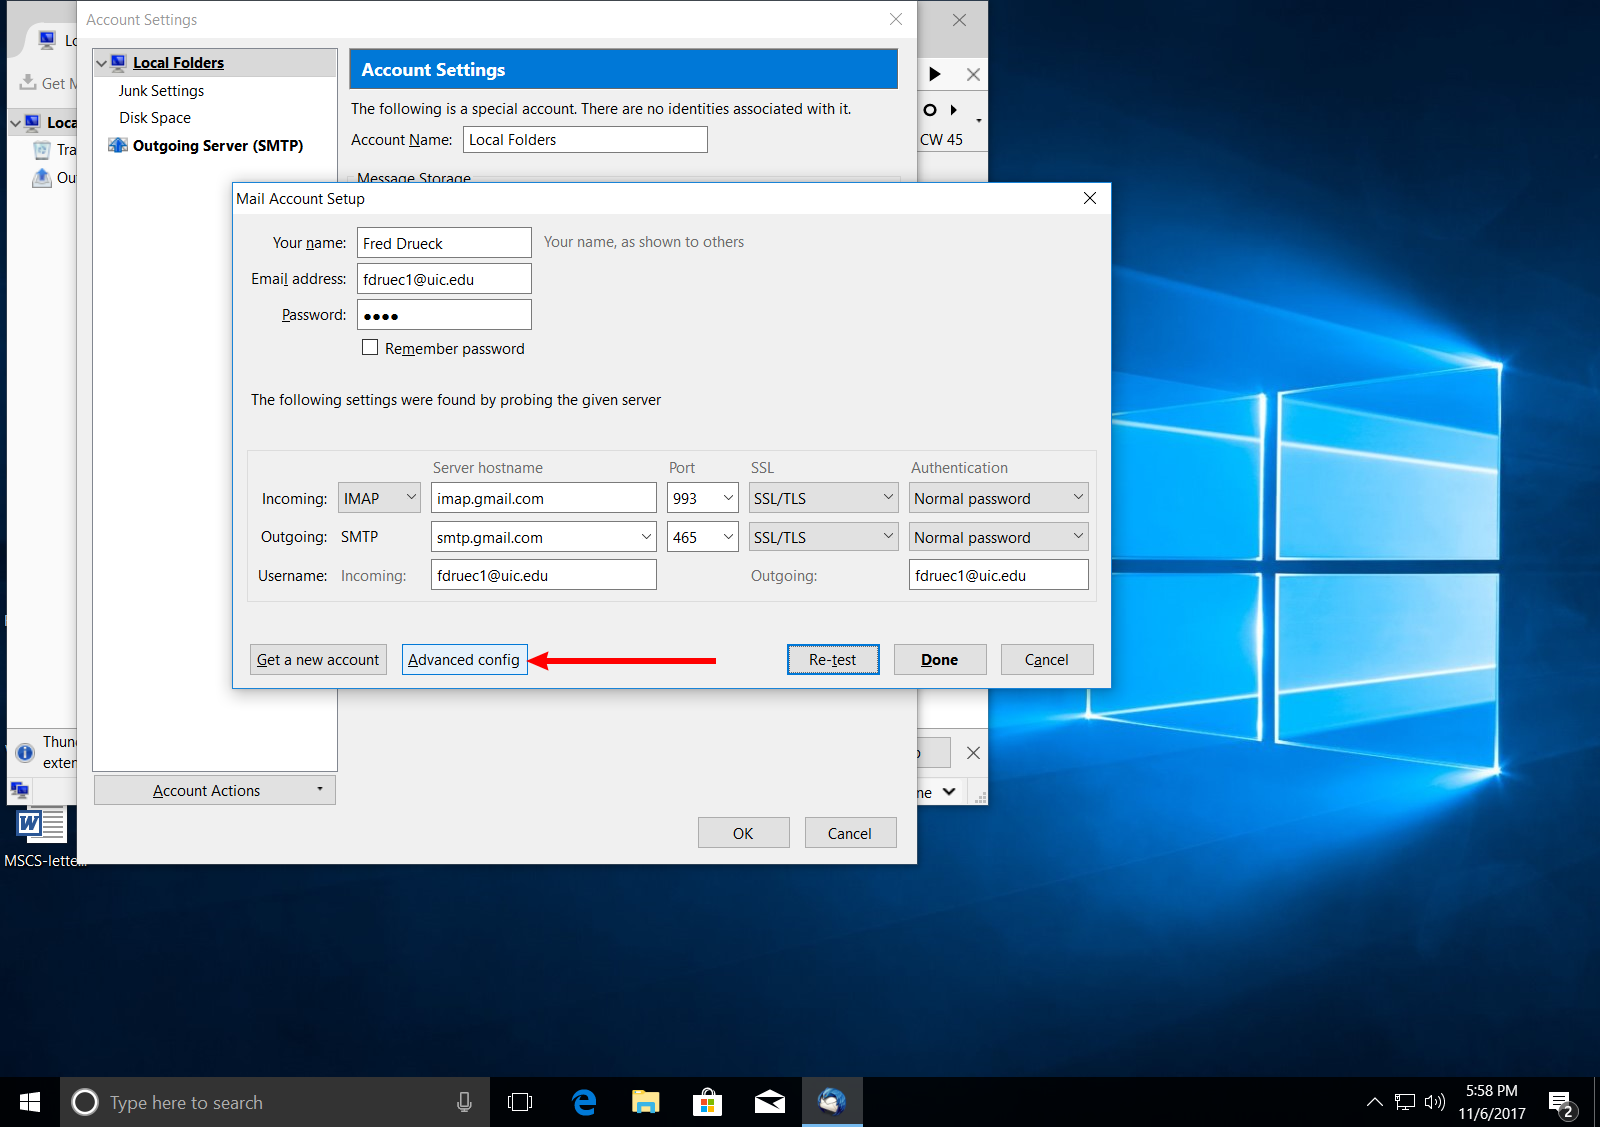
-
Advanced Config should no longer be grayed-out. Click it.
-
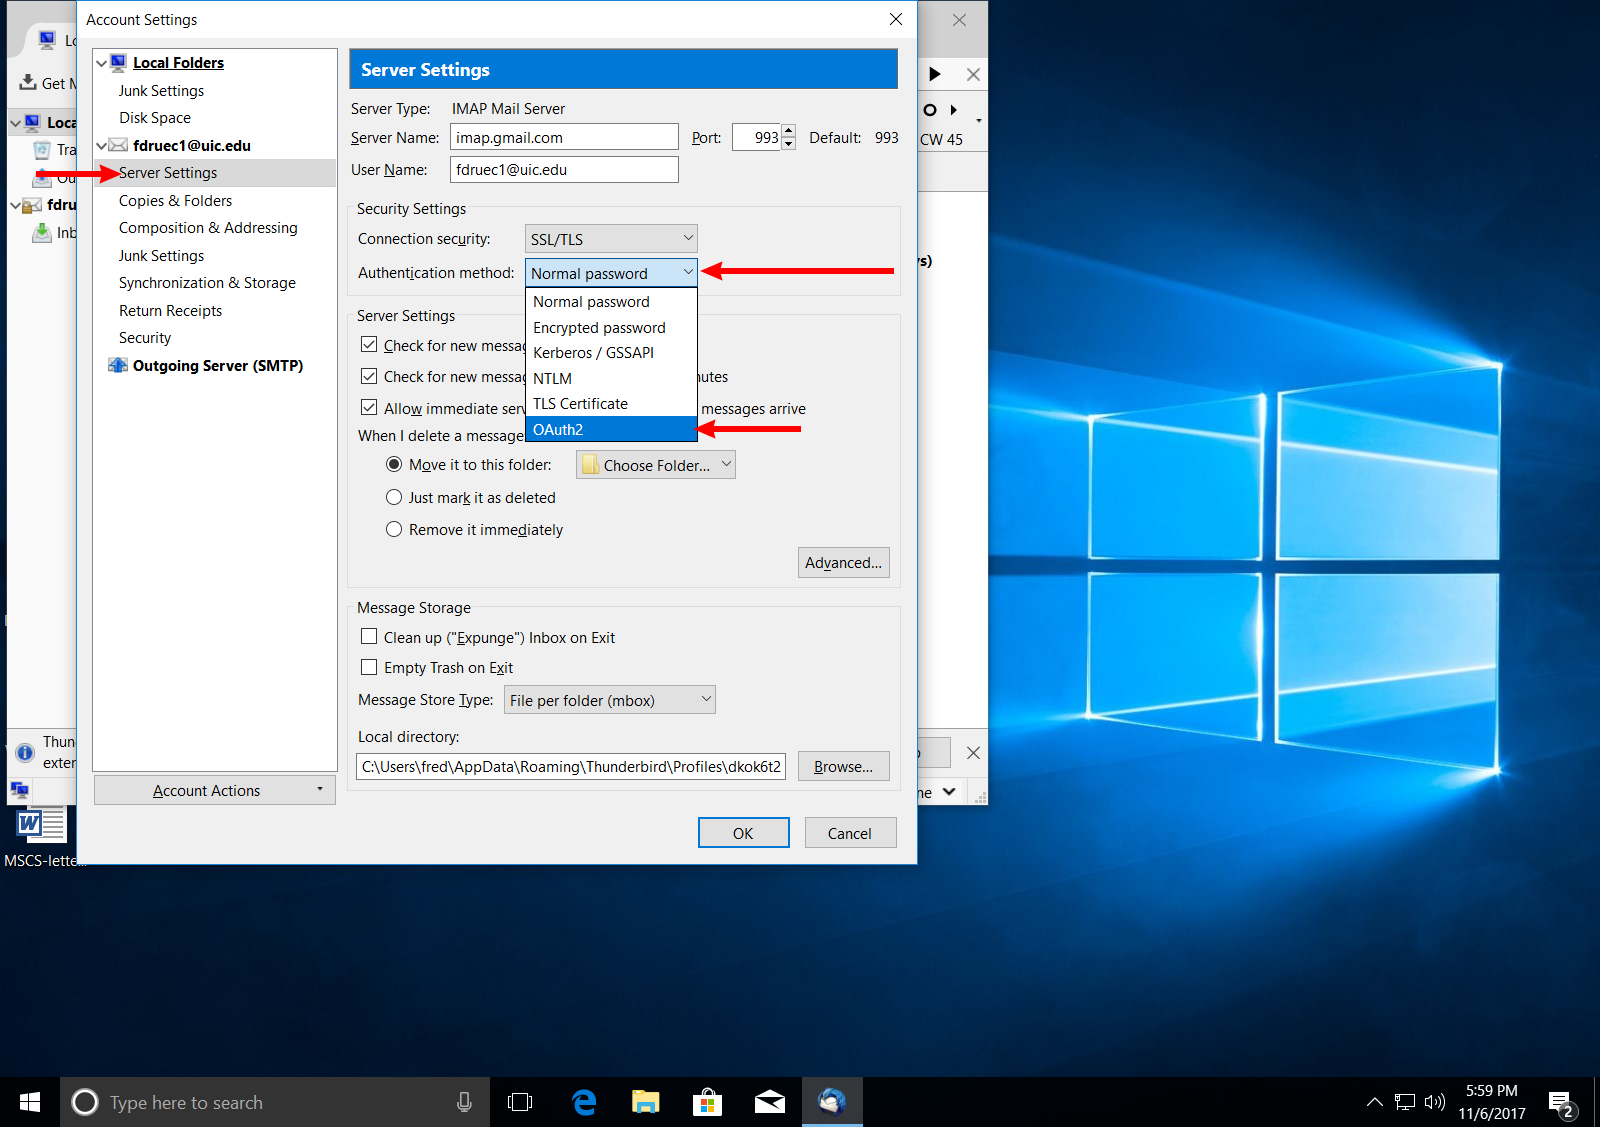
This should open up the Account Settings menu
with the Server Settings for the account you've
just added open. If not, select the account (it is probably
called something like your-netid@uic.edu or, if you
already used this name for your Mailserv/Tigger account you
something like your-netid@uic.edu-1). Under this
account choose Server Settings. Change the
Authentication method from Normal
Password to OAuth2.
-
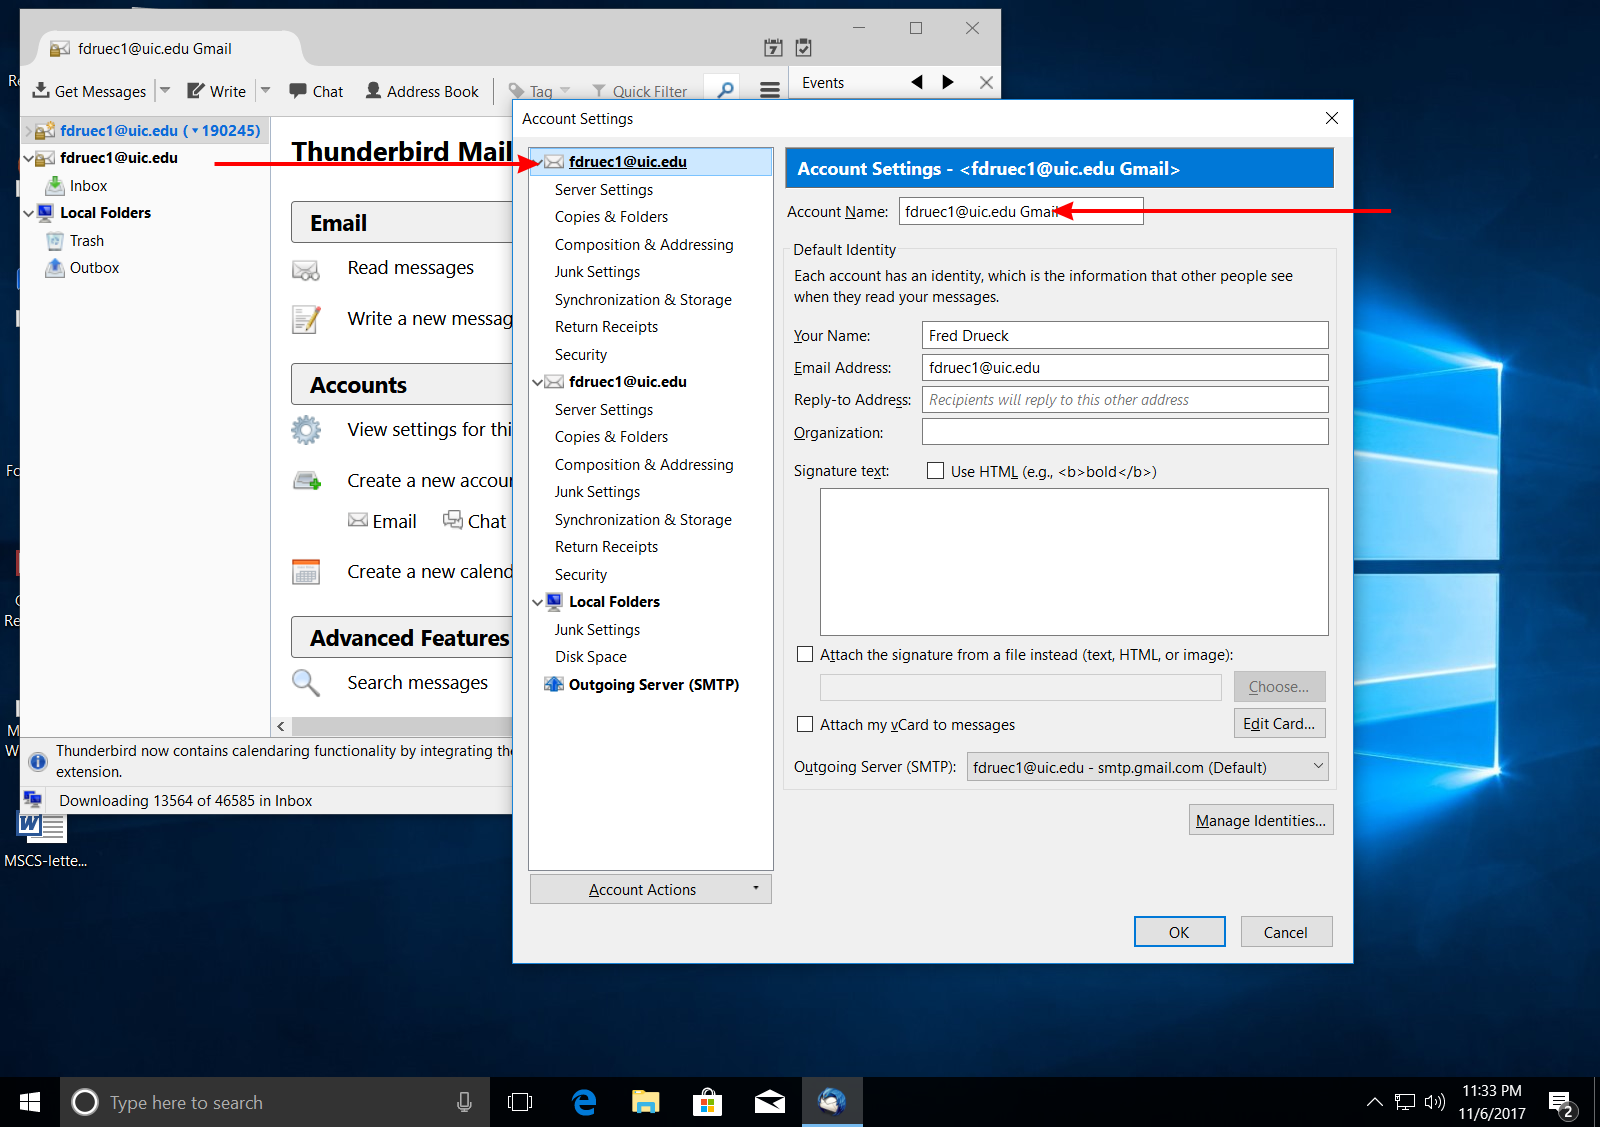
At this point in time Thunderbird may complain that "an account
already exists with that name" and take you to the
Account Name configuration dialog. Change the
value of Account Name from
your-netid@uic.edu to something like
your-netid@uic.edu Gmail. This setting effects only
what name Thunderbird use to display the account, not your
actual email address.
-
You need to make the same change for the outgoing server.
Select the Outgoing Server option in the
left-panel of Account Settings. Select the
account that includes smtp.gmail.com in its
description. Then press Edit.

-
Change the Authentication method from
Normal Password to OAuth2.

-
Press OK buttons until you leave the
Account Settings and return to the main
Thunderbird window. When you click the Inbox for the account you
just added a window will pop up with the standard bluestem login
screen. Enter your username and password.
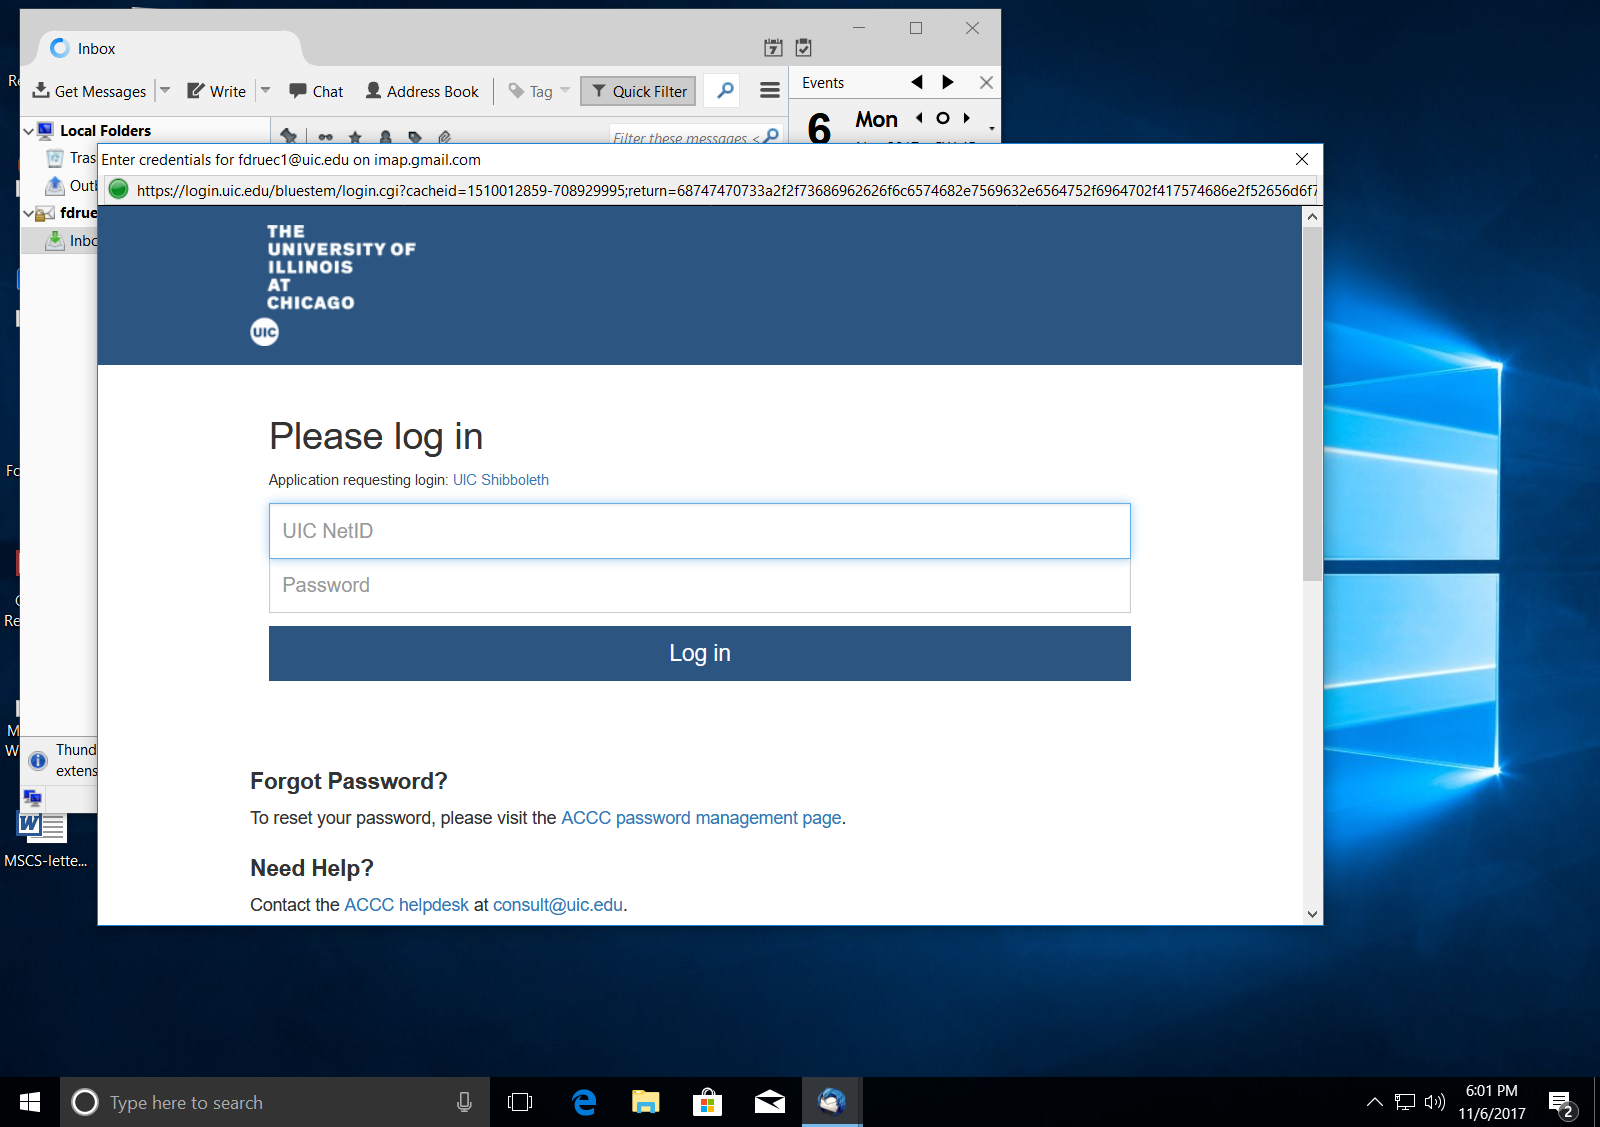
- After you authenticate you will be asked what account (choose the account associated with your-netid@uic.edu if there's more than one choice) you'd like to allow Thunderbird to access. Then you will be asked if you want to allow Thunderbird to read/send mail, which you should again allow. Now you are finished connecting Thunderbird to Gmail as an IMAP client.
Moving mail in Thunderbird
By default, Thunderbird downloads copies of all your messages on any incoming Mail server it's connected to. Thus, when Mailserv/Tigger are turned off you will still be able to open Thunderbird and read your old messages there. However, there are shortcomings to keeping your old email only in Thunderbird:
- You must have access to Thunderbird to read your mail. You cannot, e.g. use a computer at the UIC library read any of your mail sent from before you migrated to Gmail.
- If you get a new computer, you will have to copy your Thunderbird profile to the new computer to move your mail to the new machine. This is an operation I would describe as being of "intermediate difficulty".
To address the shortcomings above, you may want to upload mail from your old Mailserv/Tigger account into Gmail. Then you will be able to get at all your email through the Gmail web interface which will run on pretty much any computer anywhere ... except maybe China or Iran.
Identify Your Accounts
Before you start moving any mail, make sure you know which account is which. Since your email address for both accounts is the same, you have to avoid any potential confusion. I suggest name your accounts something like:
- your-netid@uic.edu Gmail
- your-netid@uic.edu Mailserv
to avoid confusion.
To identify which account is which open up the account settings.
One path to this menu is ☰ > Preferences > Accounts
Settings.
Under each incoming account check the setting Server Settings and look at Server Name. You can tell which accounts is which by consulting this table:
| Account | Server Name |
|---|---|
| Gmail | imap.gmail.com |
| Mailserv/Tigger | mail.uic.edu |
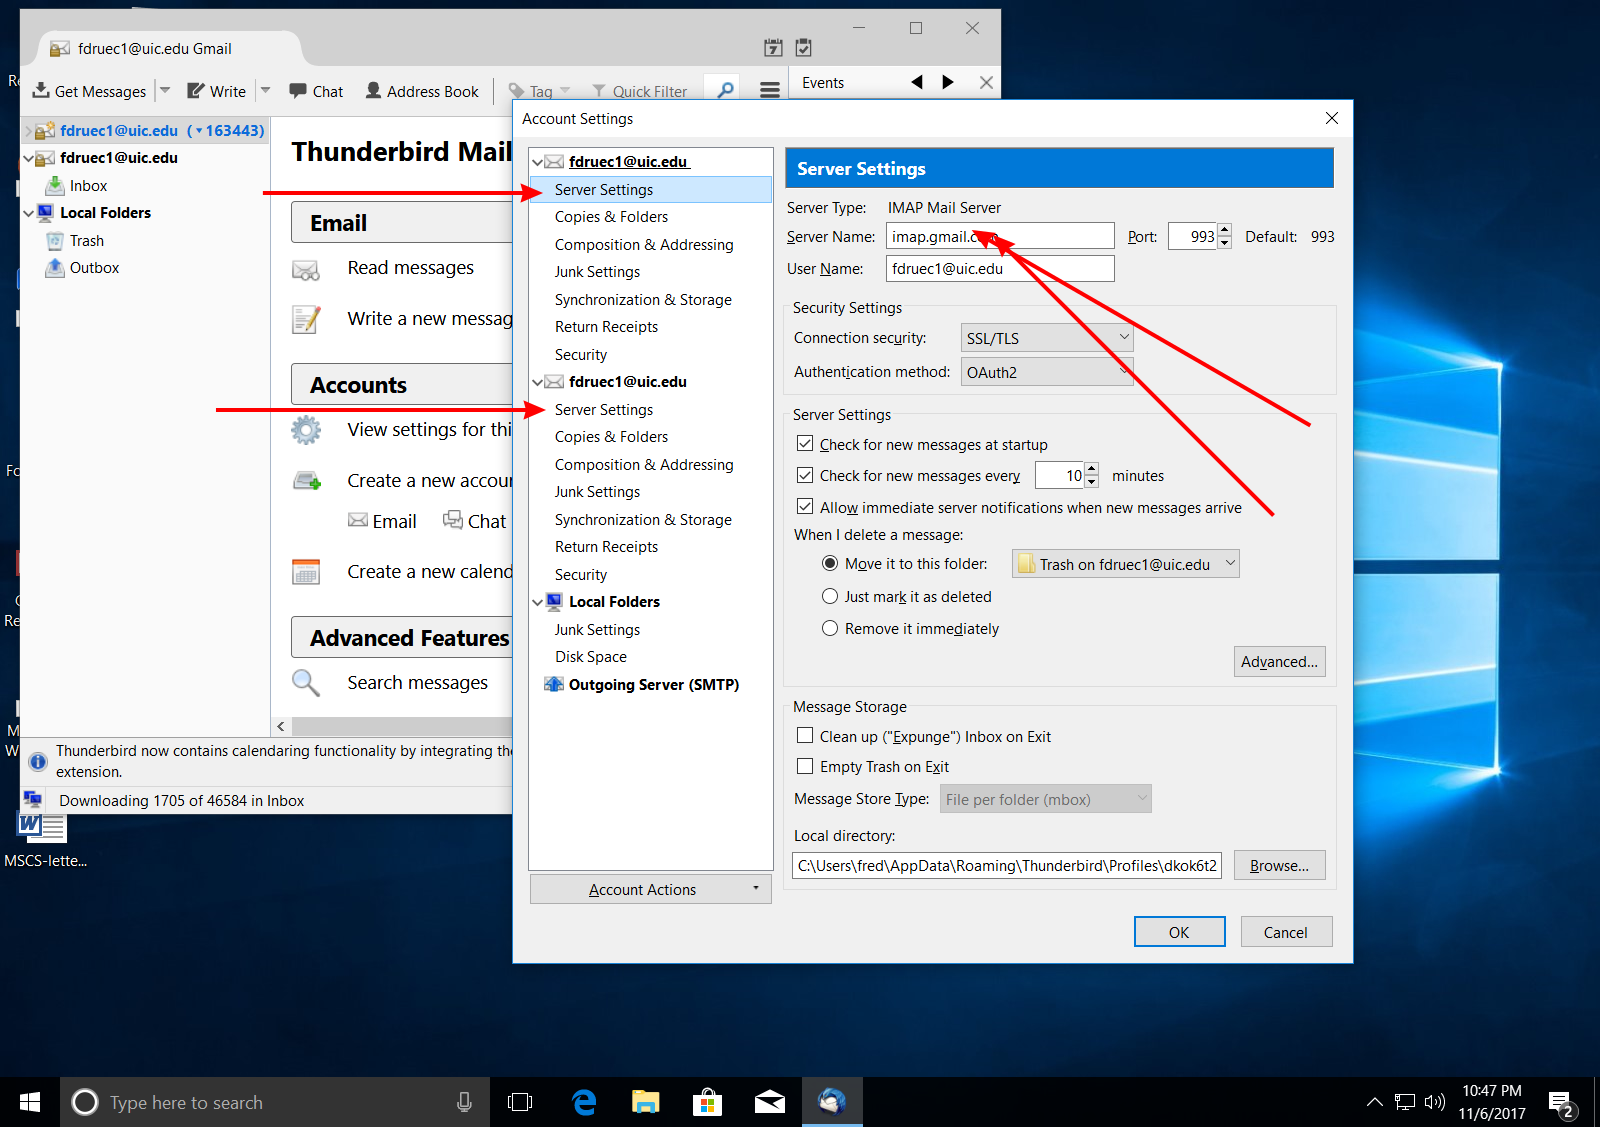
If you click the account name of the account you are inspecting
Server Settings for, you can set the
Account Name to something like
your-netid@uic.edu Gmail or your-netid@uic.edu
Mailserv to help you easily identify which account is which in
Thunderbird.
Move Mail
I recommend moving your mail one folder at a time. I think it makes it easier to check that all of your mail has successfully been copied between the two IMAP servers.
To completely move a folder that contains a lot of messages might take a long time. Before you start moving your mail, I recommend you wait for Thunderbird to finish downloading all of your mail from Mailserv/Tigger. I also recommend first changing your mail routing to Gmail so that more mail doesn't arrive in your Mailserv/Tigger mailbox while you are copying your folders to Gmail's IMAP server.
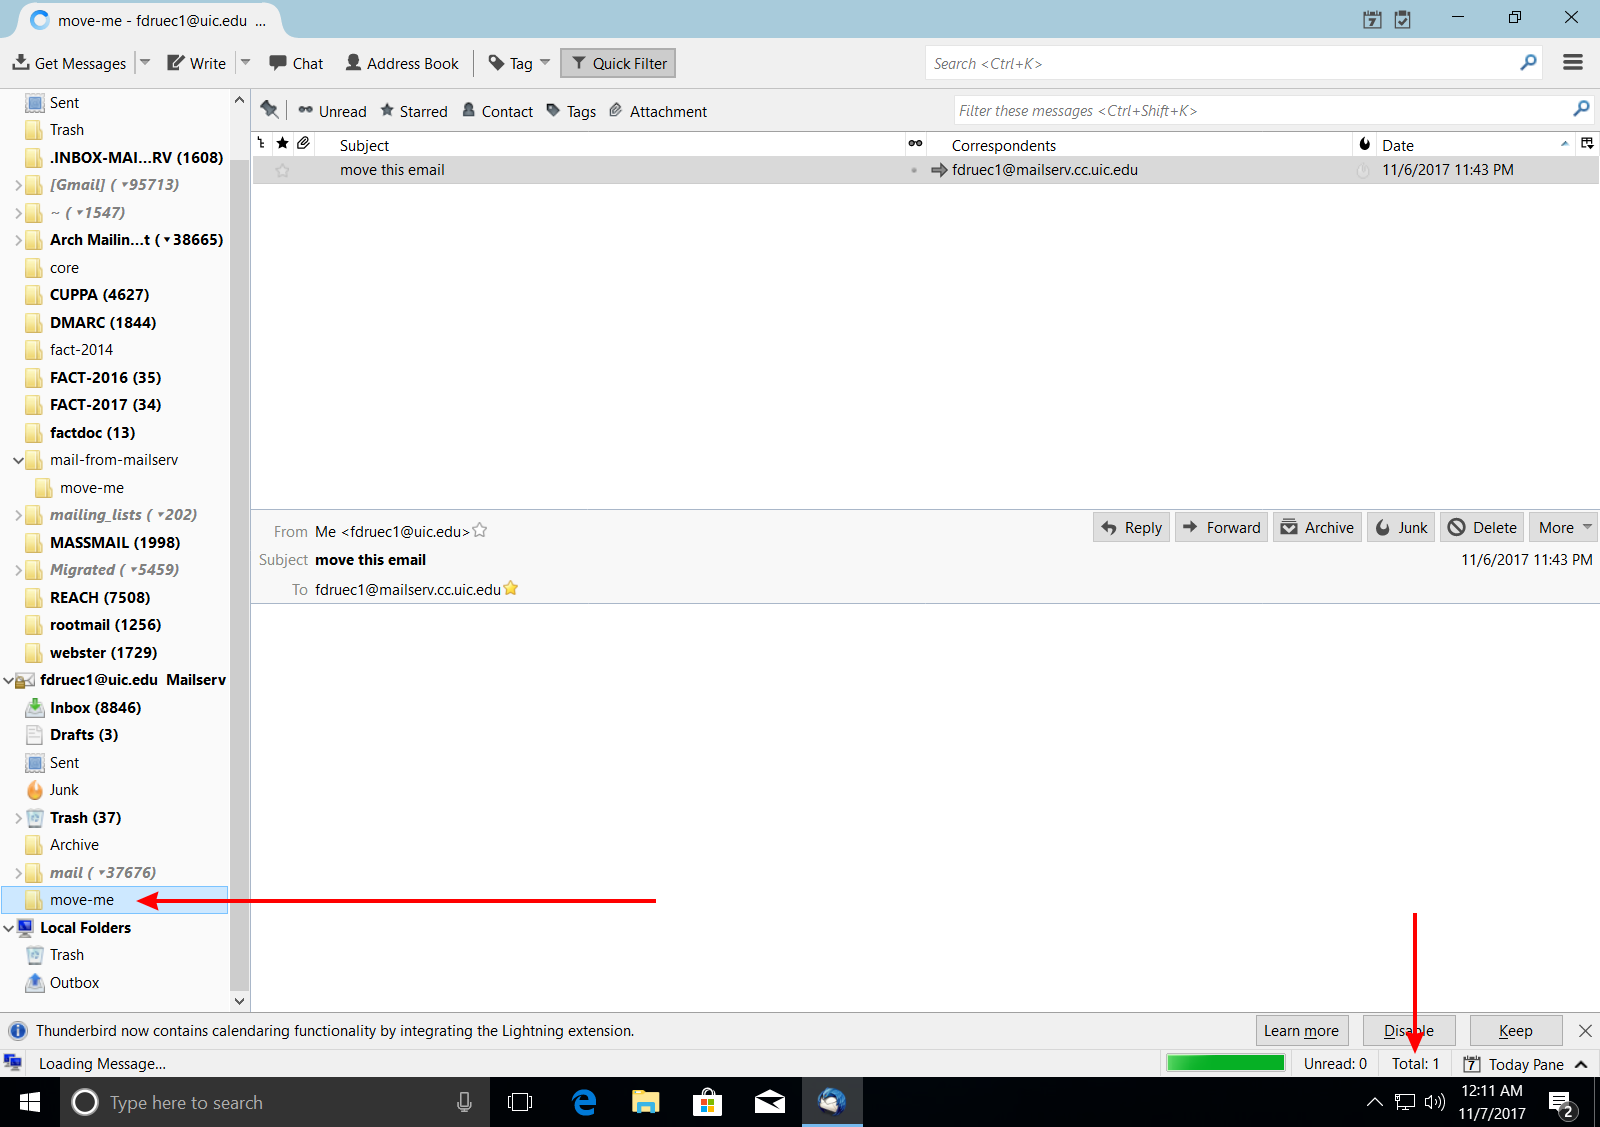
In the following example we will move the Mailserv folder move-me (and the messages it contains) into the Gmail folder mail-from-mailserv.
-
First create the folder you want to move mail to under your
Gmail account. Right click (or "control click" on MacOS) the
Gmail account. From the drop down menu select New
Folder.

-
Name the folder something. In this example we name the
destination folder mail-from-mailserv.

-
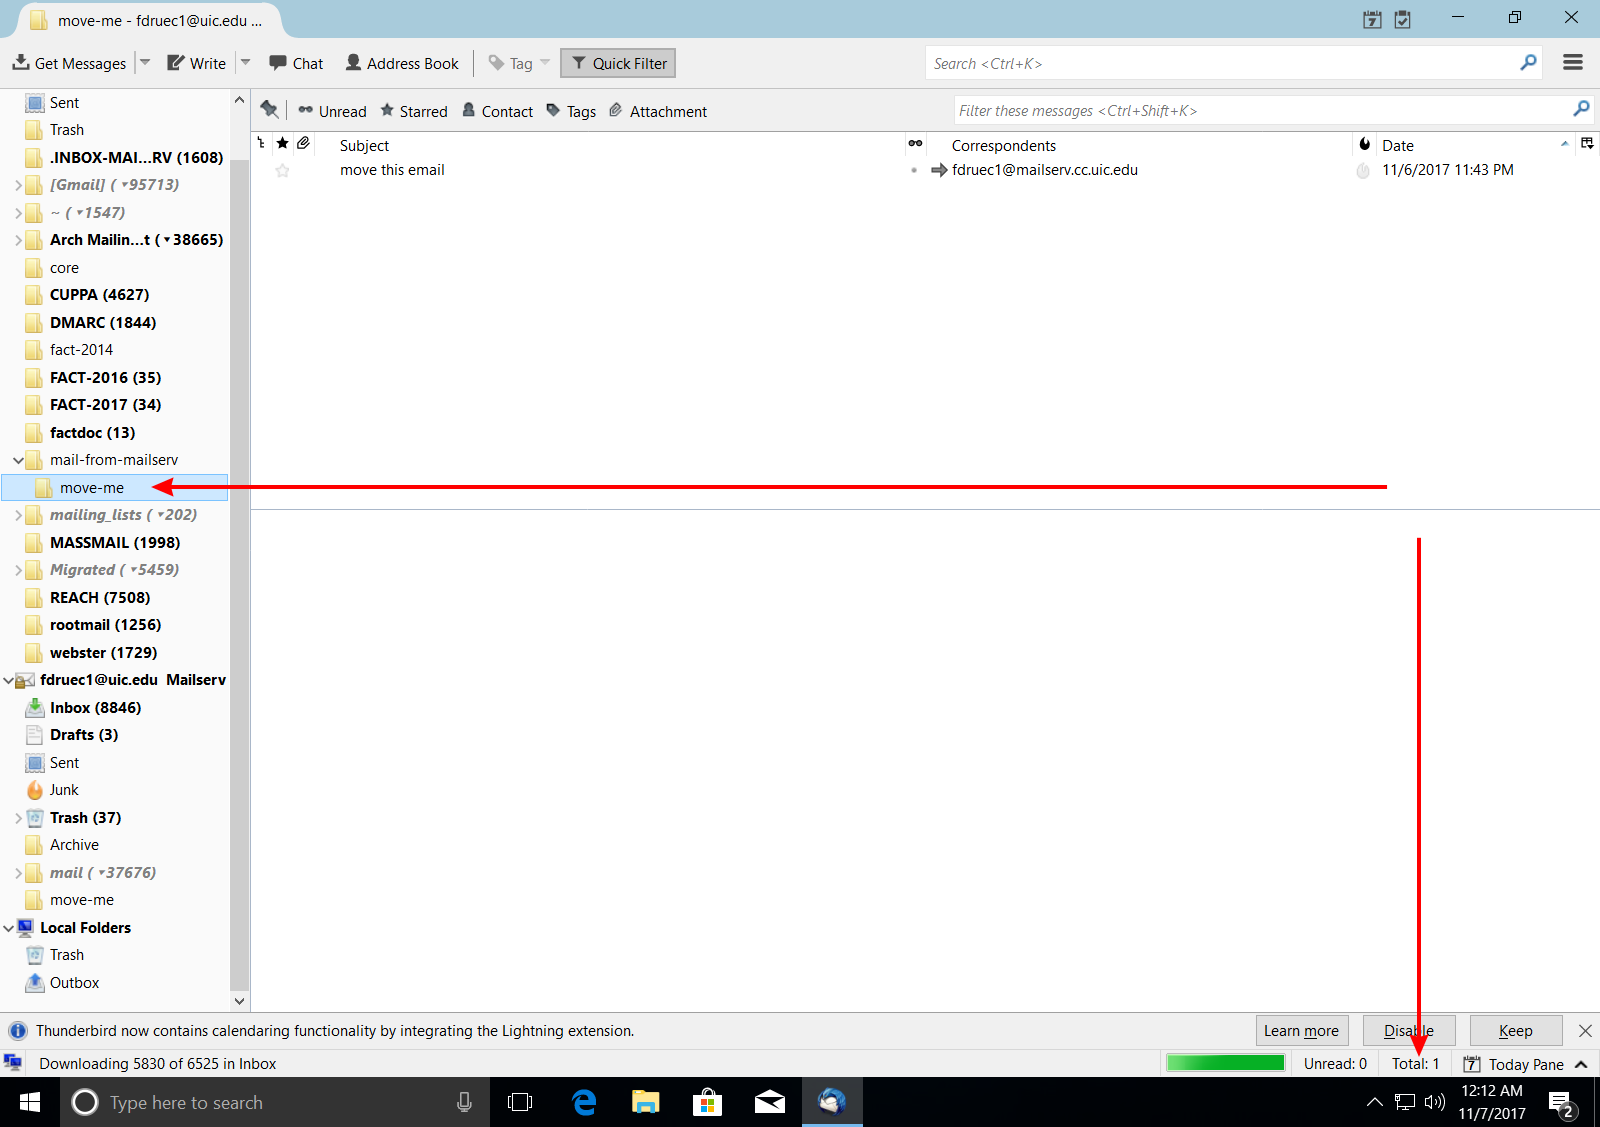
Before we move the mail it's good to check the total number
of messages in the source folder. Select the source folder
by clicking on it. If you look near the bottom right corner
of the Thunderbird window you can see a list of how many
messages are in the currently selected folder. Make a note
of how many messages (Total count) are in the source folder.
-
Click on the folder move-me and hold the mouse
button down (don't release).

-
Drag the folder move-me above the folder you want
to put it in. When you have the folder in the proper
location, the destination folder will be
highlighted. Release the mouse button now.

-
The folder move-me is now a sub-folder of
mail-from-mailserv.

-
You may have to wait sometime for folders containing lots of
messages to finish copying. After the Thunderbird finishes
copying messages check that the total messages in the
destination folder is the same as in the source folder.