Programming GPUs with Python: PyOpenCL and PyCUDA
High level GPU programming can be done in Python, either with PyOpenCL or PyCUDA.
PyOpenCL
OpenCL, the Open Computing Language, is the open standard for parallel programming of heterogeneous system. OpenCL is maintained by the Khronos Group, a not for profit industry consortium creating open standards for the authoring and acceleration of parallel computing, graphics, dynamic media, computer vision and sensor processing on a wide variety of platforms and devices, with home page at <http://www.khronos.org>.
Another related standard is OpenGL <http://www.opengl.org>, the open standard for high performance graphics.
The development of OpenCL was initiated by Apple. Many aspects of OpenCL are familiar to a CUDA programmer because of similarities with data parallelism and complex memory hierarchies. OpenCL offers a more complex platform and device management model to reflect its support for multiplatform and multivendor portability. OpenCL implementations exist for AMD ATI and NVIDIA GPUs as well as x86 CPUs. The code in this lecture runs on an Intel Iris Graphics 6100, the graphics card of a MacBook Pro.
We enjoy the same benefits of PyOpenCL as of PyCUDA:
- takes care of a lot of boiler plate code;
- focus on the kernel, with numpy typing.
Instead of a programming model tied to a single hardware vendor’s products, open standards enable portable software frameworks for heterogeneous platforms.
Installing can be done simplity with pip,
via sudo pip install pyopencl.
To check the installation in an interactive session:
>>> import pyopencl
>>> from pyopencl.tools import get_test_platforms_and_devices
>>> get_test_platforms_and_devices()
[(<pyopencl.Platform 'Apple' at 0x7fff0000>, \
[<pyopencl.Device 'Intel(R) Core(TM) i7-5557U CPU @ 3.10GHz' \
on 'Apple' at 0xffffffff>, \
<pyopencl.Device 'Intel(R) Iris(TM) Graphics 6100'
on 'Apple' at 0x1024500>])]
>>>
The multiplication of two matrices is an important application.
$ python matmatmulocl.py
matrix A:
[[ 0.  0.  1.  1.]
 [ 1.  1.  1.  1.]
 [ 1.  1.  1.  1.]]
matrix B:
[[ 1.  1.  0.  1.  1.]
 [ 1.  1.  1.  0.  1.]
 [ 0.  0.  1.  0.  1.]
 [ 1.  0.  1.  0.  1.]]
multiplied A*B:
[[ 1.  0.  2.  0.  2.]
 [ 3.  2.  3.  1.  4.]
 [ 3.  2.  3.  1.  4.]]
$
Code for the script matmatmulocl.py is below.
import pyopencl as cl
import numpy as np

import os
os.environ['PYOPENCL_COMPILER_OUTPUT'] = '1'
os.environ['PYOPENCL_CTX'] = '1'

(n, m, p) = (3, 4, 5)

# a = np.random.randn(n, m).astype(np.float32)
# b = np.random.randn(m, p).astype(np.float32)
a = np.random.randint(2, size=(n*m))
b = np.random.randint(2, size=(m*p))
c = np.zeros((n*p), dtype=np.float32)

a = a.astype(np.float32)
b = b.astype(np.float32)
The setup of the context, queue, and buffers happens by the code below:
ctx = cl.create_some_context()
queue = cl.CommandQueue(ctx)

mf = cl.mem_flags
a_buf = cl.Buffer\
   (ctx, mf.READ_ONLY | mf.COPY_HOST_PTR, hostbuf=a)
b_buf = cl.Buffer\
   (ctx, mf.READ_ONLY | mf.COPY_HOST_PTR, hostbuf=b)
c_buf = cl.Buffer(ctx, mf.WRITE_ONLY, c.nbytes)
The kernel is defined next.
prg = cl.Program(ctx, """
    __kernel void multiply(ushort n,
    ushort m, ushort p, __global float *a,
    __global float *b, __global float *c)
    {
      int gid = get_global_id(0);
      c[gid] = 0.0f;
      int rowC = gid/p;
      int colC = gid%p;
      __global float *pA = &a[rowC*m];
      __global float *pB = &b[colC];
      for(int k=0; k<m; k++)
      {
         pB = &b[colC+k*p];
         c[gid] += (*(pA++))*(*pB);
      }
    }
    """).build()
Below is the contents of the main function to execute the OpenCL code.
prg.multiply(queue, c.shape, None,
             np.uint16(n), np.uint16(m), np.uint16(p),
             a_buf, b_buf, c_buf)

a_mul_b = np.empty_like(c)
cl.enqueue_copy(queue, a_mul_b, c_buf)

print "matrix A:"
print a.reshape(n, m)
print "matrix B:"
print b.reshape(m, p)
print "multiplied A*B:"
print a_mul_b.reshape(n, p)
The NVIDIA OpenCL SDK contains also a matrix-matrix multiplication. It execution shows the following.
$ python matmatmulsdk.py
GPU push+compute+pull total [s]: 0.0844735622406
GPU push [s]: 0.000111818313599
GPU pull [s]: 0.0014328956604
GPU compute (host-timed) [s]: 0.0829288482666
GPU compute (event-timed) [s]:  0.08261928

GFlops/s: 24.6958693242

GPU==CPU: True

CPU time (s) 0.0495228767395

GPU speedup (with transfer):  0.586252969875
GPU speedup (without transfer):  0.59717309205
$
PyCUDA
Code for the GPU can be generated in Python, see Fig. 82, as described in the following paper by A. Kloeckner, N. Pinto, Y. Lee, B. Catanzaro, P. Ivanov, and A. Fasih: PyCUDA and PyOpenCL: A scripting-based approach to GPU run-time code generation. Parallel Computing, 38(3):157–174, 2012.
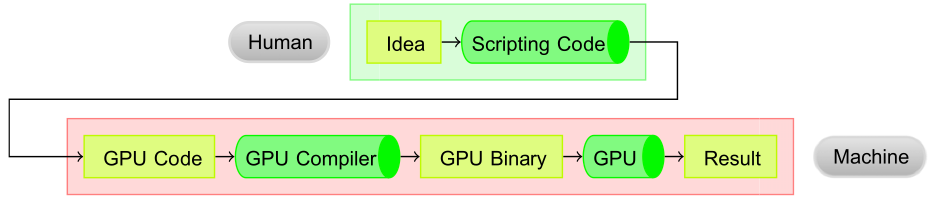
Fig. 82 The operating principle of GPU code generation.
To verify whether PyCUDA is correctly installed on our computer, we can run an interactive Python session as follows.
>>> import pycuda
>>> import pycuda.autoinit
>>> from pycuda.tools import make_default_context
>>> c = make_default_context()
>>> d = c.get_device()
>>> d.name()
'Tesla P100-PCIE-16GB'
We illustrate the matrix-matrix multiplication on the GPU with code generated in Python. We multipy an n-by-m matrix with an m-by-p matrix with a two dimensional grid of \(n \times p\) threads. For testing we use 0/1 matrices.
$ python matmatmul.py
matrix A:
[[ 0.  0.  1.  0.]
 [ 0.  0.  1.  1.]
 [ 0.  1.  1.  0.]]
matrix B:
[[ 1.  1.  0.  1.  1.]
 [ 1.  0.  1.  0.  0.]
 [ 0.  0.  1.  1.  0.]
 [ 0.  0.  1.  1.  0.]]
multiplied A*B:
[[ 0.  0.  1.  1.  0.]
 [ 0.  0.  2.  2.  0.]
 [ 1.  0.  2.  1.  0.]]
$
The script starts with the import of the modules and type declarations.
import pycuda.driver as cuda
import pycuda.autoinit
from pycuda.compiler import SourceModule
import numpy

(n, m, p) = (3, 4, 5)

n = numpy.int32(n)
m = numpy.int32(m)
p = numpy.int32(p)

a = numpy.random.randint(2, size=(n, m))
b = numpy.random.randint(2, size=(m, p))
c = numpy.zeros((n, p), dtype=numpy.float32)

a = a.astype(numpy.float32)
b = b.astype(numpy.float32)
The script then continues with the memory allocation and the copying from host to device.
a_gpu = cuda.mem_alloc(a.size * a.dtype.itemsize)
b_gpu = cuda.mem_alloc(b.size * b.dtype.itemsize)
c_gpu = cuda.mem_alloc(c.size * c.dtype.itemsize)

cuda.memcpy_htod(a_gpu, a)
cuda.memcpy_htod(b_gpu, b)
The definition of the kernel follows:
mod = SourceModule("""
    __global__ void multiply
      ( int n, int m, int p,
        float *a, float *b, float *c )
    {
        int idx = p*threadIdx.x + threadIdx.y;

        c[idx] = 0.0;
        for(int k=0; k<m; k++)
           c[idx] += a[m*threadIdx.x+k]
                    *b[threadIdx.y+k*p];
    }
    """)
The launching of the kernel and printing the result is the last stage.
func = mod.get_function("multiply")
func(n, m, p, a_gpu, b_gpu, c_gpu, \
     block=(numpy.int(n), numpy.int(p), 1), \
     grid=(1, 1), shared=0)

cuda.memcpy_dtoh(c, c_gpu)

print "matrix A:"
print a
print "matrix B:"
print b
print "multiplied A*B:"
print c
Data Parallelism Model
In this section we construct dictionaries between OpenCL and CUDA, summarized in Table 23.
After launching a kernel, OpenCL code is executed by work items. Work items form work groups, which correspond to CUDA blocks. An index space defines how data are mapped to work items.
| OpenCL concept | CUDA equivalent |
|---|---|
| kernel | kernel |
| host program | host program |
| NDRange (index space) | grid |
| work group | block |
| work item | thread |
Like CUDA, OpenCL exposes a hierarchy of memory types. The mapping of OpenCL memory types to CUDA is in Table 24.
| OpenCL memory type | CUDA equivalent |
|---|---|
| global memory | global memory |
| constant memory | constant memory |
| local memory | shared memory |
| private memory | local memory |
Local memory in OpenCL and shared memory in CUDA are accessible respectively to a work group and thread block. Private memory in OpenCL and local memory in CUDA is memory accessible only to individual threads.
Threads in CUDA and work items in OpenCL have their own unique global index values. A dictionary between dimensions and indices is in Table 25.
| OpenCL API call | CUDA equivalent |
|---|---|
| get_global_id(0) | blockIdx.x \(\times\) blockDim.x + threadIdx.x |
| get_local_id(0)} | threadIdx.x |
| get_global_size(0) | gridDim.x \(\times\) blockDim.x |
| get_local_size(0)} | blockDim.x |
Replacing 0 in get_global_id(0) by 1 and 2
gives the values for the \(y\) and \(z\) dimensions respectively.
The OpenCL parallel execution model is introduced in Fig. 83 and in Fig. 84, both copied from NVIDIA: OpenCL and other interesting stuff by Chris Lamb.
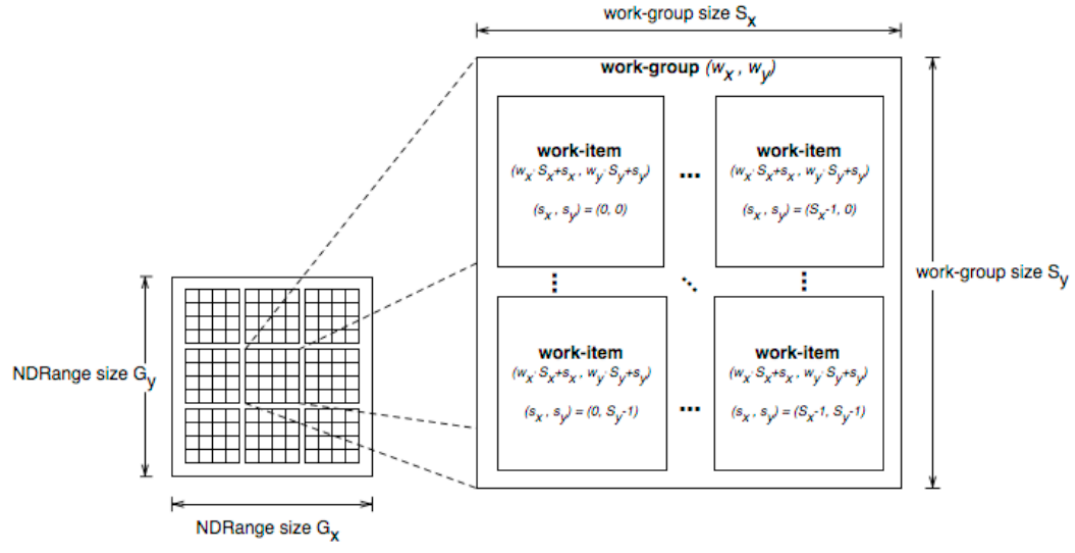
Fig. 83 Overview of the OpenCL parallel execution model
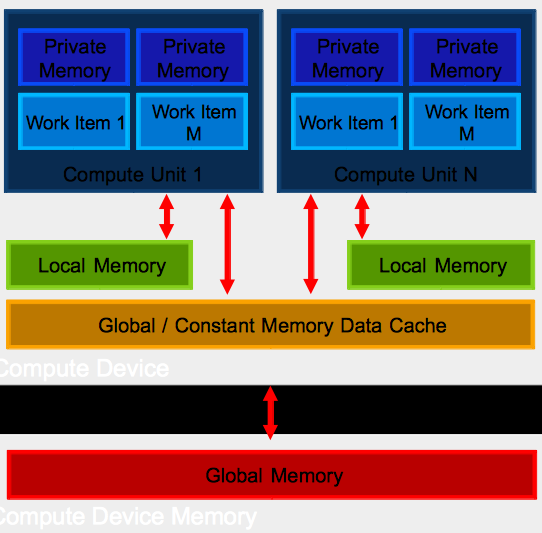
Fig. 84 The OpenCL device architecture
The structure of an OpenCL program is sketched in Fig. 85.
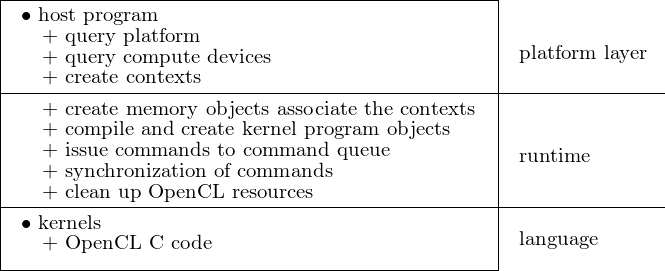
Fig. 85 Basic OpenCL program structure
Writing OpenCL Programs
A simple program uses OpenCL to compute the square for a buffer of floating point values. Compiling and running goes as follows.
gcc -o /tmp/hello hello_opencl.c -framework OpenCL

/tmp/hello
Computed '1024/1024' correct values!
The kernel is listed below.
const char *KernelSource = "\n" \
"__kernel void square(                      \n" \
"   __global float* input,                  \n" \
"   __global float* output,                 \n" \
"   const unsigned int count)               \n" \
"{                                          \n" \
"   int i = get_global_id(0);               \n" \
"   if(i < count)                           \n" \
"       output[i] = input[i] * input[i];    \n" \
"}                                          \n" \
"\n";
The program starts as follows:
#include <fcntl.h>
#include <stdio.h>
#include <stdlib.h>
#include <string.h>
#include <math.h>
#include <unistd.h>
#include <sys/types.h>
#include <sys/stat.h>
#include <OpenCL/opencl.h>

int main(int argc, char** argv)
{
    int err;           // error code returned from api calls
    float data[DATA_SIZE];  // original data given to device
    float results[DATA_SIZE];// results returned from device
    unsigned int correct;       // number of correct results
    size_t global; // global domain size for our calculation
    size_t local;   // local domain size for our calculation
Then we declare the OpenCL types.
cl_device_id device_id;      // compute device id
cl_context context;          // compute context
cl_command_queue commands;   // compute command queue
cl_program program;          // compute program
cl_kernel kernel;            // compute kernel
cl_mem input;   // device memory used for the input
cl_mem output;  // device memory used for the output

// Fill our data set with random float values

int i = 0;
unsigned int count = DATA_SIZE;
for(i = 0; i < count; i++)
    data[i] = rand() / (float)RAND_MAX;
To connect to the device and create the context, we use the code below.
// Connect to a compute device

int gpu = 1;
err = clGetDeviceIDs(NULL, gpu ?
   CL_DEVICE_TYPE_GPU : CL_DEVICE_TYPE_CPU,
   1, &device_id, NULL);
if(err != CL_SUCCESS)
{
   printf("Error: Failed to create a device group!\n");
   return EXIT_FAILURE;
}

// Create a compute context

context = clCreateContext(0, 1, &device_id, NULL, NULL, &err);
if (!context)
{
   printf("Error: Failed to create a compute context!\n");
   return EXIT_FAILURE;
}
The creation of a command and the program happens by the code below.
// Create a command commands

commands = clCreateCommandQueue(context, device_id, 0, &err);
if (!commands)
{
   printf("Error: Failed to create a command commands!\n");
   return EXIT_FAILURE;
}

// Create the compute program from the source buffer

program = clCreateProgramWithSource(context, 1,
   (const char **) & KernelSource, NULL, &err);
if (!program)
{
   printf("Error: Failed to create compute program!\n");
   return EXIT_FAILURE;
}
Then we build the executable.
// Build the program executable

err = clBuildProgram(program, 0, NULL, NULL, NULL, NULL);
if (err != CL_SUCCESS)
{
   size_t len;
   char buffer[2048];

   printf("Error: Failed to build program executable!\n");
   clGetProgramBuildInfo(program, device_id,
      CL_PROGRAM_BUILD_LOG, sizeof(buffer), buffer, &len);
   printf("%s\n", buffer);
   exit(1);
}
Then we create the kernel and define the input and output data.
// Create the compute kernel in the program we wish to run

kernel = clCreateKernel(program, "square", &err);
if (!kernel || err != CL_SUCCESS)
{
   printf("Error: Failed to create compute kernel!\n");
   exit(1);
}

// Create the input and output arrays in device memory

input = clCreateBuffer(context,  CL_MEM_READ_ONLY,
   sizeof(float) * count, NULL, NULL);
output = clCreateBuffer(context, CL_MEM_WRITE_ONLY,
   sizeof(float) * count, NULL, NULL);
if (!input || !output)
{
   printf("Error: Failed to allocate device memory!\n");
   exit(1);
}
The next stage is the writing of the data and kernel arguments.
// Write our data set into the input array in device memory

err = clEnqueueWriteBuffer(commands, input, CL_TRUE,
   0, sizeof(float) * count, data, 0, NULL, NULL);
if (err != CL_SUCCESS)
{
   printf("Error: Failed to write to source array!\n");
   exit(1);
}

// Set the arguments to our compute kernel

err = 0;
err  = clSetKernelArg(kernel, 0, sizeof(cl_mem), &input);
err |= clSetKernelArg(kernel, 1, sizeof(cl_mem), &output);
err |= clSetKernelArg(kernel, 2, sizeof(unsigned int), &count);
if (err != CL_SUCCESS)
{
    printf("Error: Failed to set kernel arguments! %d\n", err);
    exit(1);
}
We configure the execution with the code below:
// Get the maximum work group size for executing the kernel

err = clGetKernelWorkGroupInfo(kernel, device_id,
    CL_KERNEL_WORK_GROUP_SIZE, sizeof(local), &local, NULL);
if (err != CL_SUCCESS)
{
    printf("Error: Failed to retrieve kernel work group info! %d\n", err);
    exit(1);
}

// Execute the kernel over the entire range of
// our 1d input data set // using the maximum number
// of work group items for this device

global = count;
err = clEnqueueNDRangeKernel(commands, kernel, 1, NULL,
    &global, &local, 0, NULL, NULL);
if (err)
{
    printf("Error: Failed to execute kernel!\n");
    return EXIT_FAILURE;
}
At last, we finish and read the results.
// Wait for the command commands to get serviced
// before reading back results

clFinish(commands);

// Read back the results from the device for verification

err = clEnqueueReadBuffer( commands, output, CL_TRUE,
    0, sizeof(float) * count, results, 0, NULL, NULL );
if (err != CL_SUCCESS)
{
    printf("Error: Failed to read output array! %d\n", err);
    exit(1);
}
Before the cleanup, the results are validated.
    correct = 0;
    for(i = 0; i < count; i++)
    {
        if(results[i] == data[i] * data[i])
            correct++;
    }

    printf("Computed '%d/%d' correct values!\n",
        correct, count);

    clReleaseMemObject(input);
    clReleaseMemObject(output);
    clReleaseProgram(program);
    clReleaseKernel(kernel);
    clReleaseCommandQueue(commands);
    clReleaseContext(context);

    return 0;
}
Bibliography
- B.R. Gaster, L. Howes, D.R. Kaeli, P. Mistry, D. Schaa. Heterogeneous Computing with OpenCL. Revised OpenCL 1.2 Edition. Elsevier 2013.
- A. Kloeckner, N. Pinto, Y. Lee, B. Catanzaro, P. Ivanov, and A. Fasih. PyCUDA and PyOpenCL: A scripting-based approach to GPU run-time code generation. Parallel Computing, 38(3):157–174, 2012.
- Chapter 14 of the second edition of the book of Kirk and Hwu.
Programming Guides
- Apple Developer: OpenCL Programming Guide for Mac OS X. 2009-06-10, 55 pages.
- NVIDIA: OpenCL Programming Guide for the CUDA Architecture. Version 4.1 1/3/2012, 63 pages.
- AMD Accelerated Parallel Processing OpenCL Programming Guide. December 2011, 232 pages.