Graphical User Interfaces
Interfaces define the dialogue with the user, which concerns mainly input and output. Compared to prompting and printing of command line interfaces, graphical user interfaces offer
- a friendly face of the program,
- control to the user of the actions via buttons to press, GUIs are event driven,
- one picture says more than one thousand words.
In a good design, the interface is separate from the software that does the calculations or the transactions.
Tkinter
The Tkinter (= Tk interface) library provides
an object-oriented interface to the Tk GUI toolkit,
the graphical interface development tool for Tcl.
Tk is short for Tool Kit
and Tcl stands for Tool Command Language.
One benefit of prototyping with Tkinter is
that the GUI development is platform independent.
Tkinter is a toolkit available to Python as a module:
>>> import tkinter
Sometimes it needs to be installed separately. There are alternative toolkits to build GUIs in Python. The principles of GUI programming transfer to other toolkits.
We will develop our GUIs in an object oriented manner. The constructor of our class defines
- the data attributes of the GUI;
- the graphical appearance:
- which widgets we will use; and
- the position of the widgets in the window.
The actions triggered by buttons are coded in separate methods of the class.
Mixing Colors
As a first example, consider the mixing of the basis colors, red, green, and blue. The intensity of each basis color in the mix is set by three scales, one scale for each basis color. The layout of the GUI is shown in Fig. 4.
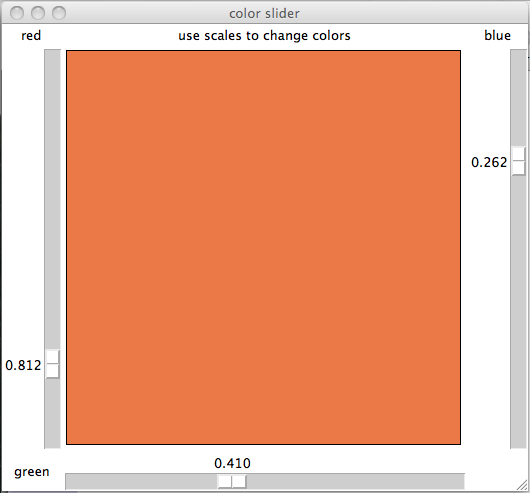
Fig. 4 Mixing red, green, and blue with scales.
The class definition below defines the layout.
from tkinter import Tk, Label, Canvas, Scale, DoubleVar

class ColorGUI(object):
    """
    Manipulate rgb color parameters with scale widgets.
    """
    def __init__(self, wdw, dim):
        """
        Defines a canvas and three scales.
        """
        wdw.title('color slider')
        self.dim = dim
        self.lab = Label(wdw, text='use scales to change colors')
        self.lab.grid(row=0, column=1)
        self.cnv = Canvas(wdw, width=self.dim, height=self.dim)
        self.cnv.grid(row=1, column=1)
        self.redscale(wdw)
        self.bluescale(wdw)
        self.greenscale(wdw)
The widget Scale is good for
- setting default values for numerical input; and
- restricting the range of the values.
In our application of mixing colors,
the variable set by the scale is a double,
ranging from 0 to 1 with resolution 1.0/256.
After every change in the variable,
the method show_colors is executed.
When the GUI starts up, the scale has value 0.5.
To make the definition of __init__ shorter,
we define the scales in separate methods.
def redscale(self, wdw):
    """
    Defines the scale to set the red intensity,
    stored in the DoubleVar red, a data attribute.
    """
    self.labred = Label(wdw, text='red')
    self.labred.grid(row=0, column=0)
    self.red = DoubleVar() # red intensity
    self.scared = Scale(wdw, orient='vertical', \
        length=self.dim, from_=0.0, to=1.0, \
        resolution=1.0/256, variable=self.red, \
        command=self.show_colors)
    self.scared.set(0.5)   # initial value of red scale
    self.scared.grid(row=1, column=0)
The callback function show_colors is listed below.
def show_colors(self, val):
    """
    Displays a rectangle on canvas, filled with rgb colors.
    """
    xmd = self.dim/2+1
    ymd = self.dim/2+1
    mid = self.dim/2-3
    red = self.scared.get()
    green = self.scagrn.get()
    blue = self.scablu.get()
    print('r = %f, g = %f, r = %f' % (red, green, blue))
    hxr = '%.2x' % int(255*red)
    hxg = '%.2x' % int(255*green)
    hxb = '%.2x' % int(255*blue)
    color = '#' + hxr + hxg + hxb
    self.cnv.delete('box')
    self.cnv.create_rectangle(xmd-mid, ymd-mid, xmd+mid, ymd+mid, \
        width=1, outline='black', fill=color, tags='box')
Next we explain how show_colors works.
The key aspects of this method are:
- The argument
valofshow_colorsis the value of the scale, but we need the values of all three intensities. - With
self.scared.get()we get the red intensity. Green and blue intensities are set by the scales with namesscagrnandscablurespectively. - The
printwrites to the terminal, (mainly for debugging purposes). hxr = '\%.2x' \% int(255*red)converts the intensity as a float in \([0,1]\) to a two-digit hexadecimal integer.- The large rectangle written to canvas has tag {tt box} and with this name we can wipe out the previous color.
In a GUI, there is not really a main program in the classical sense.
But there is still a function, called main to define the GUI object
and to launch then the main event loop.
This is defined by the code below:
def main():
    """
    Makes the GUI and launches
    the main event loop.
    """
    top = Tk()
    ColorGUI(top, 400)
    top.mainloop()

if __name__ == '__main__':
    main()
Simulating a Bouncing Ball
Consider a billiard ball rolling over a pool table, bouncing against the edges of the table. We will develop first a very basic GUI and then later add extra features.
The basic elements of the GUI are threefold:
- drawing on canvas,
- buttons call for action,
- animation of the rolling ball.
The layout of a basic GUI is displayed in Fig. 5.
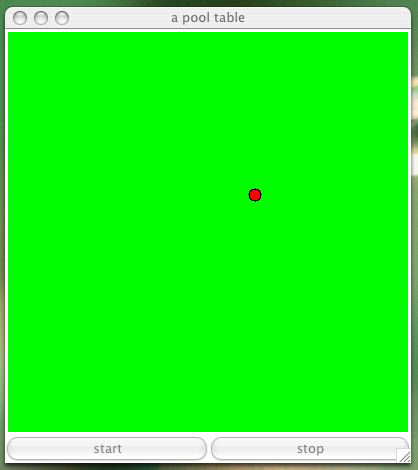
Fig. 5 Simulation of a bouncing billiard ball.
Let us make the specifications of the GUI precise. A GUI consists of several components (called widgets). Our first basic layout uses three widgets:
- a canvas to draw a ball;
- a button to start the animation; and
- a button to stop the animation.
The actions triggered by the buttons are the following:
- start: The initial position of the ball is random and the ball start rolling in a random direction, bouncing off against the edges of the table.
- stop: The animation stops. After a stop, the balls rolls from the previous position, but in a different random direction.
The object oriented design of the GUI follows the following pattern:
class BilliardBall(object):
    """
    GUI to simulate billiard ball movement.
    """
    def __init__(self, wdw, dimension, increment, delay):
        """
        Determines the layout of the GUI.
        """
    def animate(self):
        """
        Performs the animation.
        """
    def start(self):
        """
        Starts the animation.
        """
    def stop(self):
        """
        Stops the animation.
        """
The code for the main function is below.
def main():
    """
    Defines the dimensions of the canvas
    and launches the main event loop.
    """
    top = Tk()
    dimension = 400 # dimension of pool table
    increment = 10  # increment for coordinates
    delay = 60      # how much sleep before update
    BilliardBall(top, dimension, increment, delay)
    top.mainloop()

if __name__ == "__main__":
    main()
The code for the class is considered as a module. The last line allows to run the module directly as a script.
The constructor __init__ defines the data attributes.
The object data attributes are
- Three constants:
dimension,increment, anddelayare the parameters of the GUI:dimension: size of the square canvas;increment: step size of one billiard ball move; anddelay: time between canvas updates.
- Three variables:
togo: state of the animation, is on or off;xpt: the x coordinate of the ball;ypt: they coordinate of the ball.
- Three widgets:
- canvas spans two columns, in row 0;
- start button on row 1, column 0; and
- stop button on row 1, column 1.
THe code for __init__ formalizes the design of the GUI.
def __init__(self, wdw, dimension, increment, delay):
    """
    Determines the layout of the GUI.
    wdw : top level widget, the main window,
    dimension : determines the size of the canvas,
    increment : step size for a billiard move,
    delay : time between updates of canvas.
    """
    wdw.title('a pool table')
    self.dim = dimension # dimension of the canvas
    self.inc = increment
    self.dly = delay
    self.togo = False # state of animation
    # initial coordinates of the ball
    self.xpt = random.randint(10, self.dim-10)
    self.ypt = random.randint(10, self.dim-10)
    # canvas and button widgets
    self.cnv = Canvas(wdw, width=self.dim,\
        height=self.dim, bg='green')
    self.cnv.grid(row=0, column=0, columnspan=2)
    self.bt0 = Button(wdw, text='start',\
        command=self.start)
    self.bt0.grid(row=1, column=0, sticky=W+E)
    self.bt1 = Button(wdw, text='stop',\
        command=self.stop)
    self.bt1.grid(row=1, column=1, sticky=W+E)
The buttons trigger actions start() and stop()
which are methods of the BilliardBall class.
The methods stop and start has short definitions:
def start(self):
    """
    Starts the animation.
    """
    self.togo = True
    self.animate()

def stop(self):
    """
    Stops the animation.
    """
    self.togo = False
The start calls the animate method which
- draws the ball on canvas;
- generates a random direction;
- moves the ball in the direction using increment,
as long as
togo == True; and - updates the canvas after a delay.
Code for the method animate() is below
def animate(self):
    """
    Performs the animation.
    """
    self.drawball()
    angle = random.uniform(0, 2*pi)
    vcx = cos(angle)
    vsy = sin(angle)
    while self.togo:
        (xpt, ypt) = (self.xpt, self.ypt)
        self.xpt = xpt + vcx*self.inc
        self.ypt = ypt + vsy*self.inc
        self.cnv.after(self.dly)
        self.drawball()
        self.cnv.update()
In this top down development of the animate
the representation of the ball on canvas is
delegated to the method drawball()
and the computation of the coordinates of the ball
is performed by the method map2table().
The ball is represented as a red circle,
with a radius of 6 pixels:
def drawball(self):
    """
    Draws the ball on the pool table.
    """
    xpt = self.map2table(self.xpt)
    ypt = self.map2table(self.ypt)
    self.cnv.delete('dot')
    self.cnv.create_oval(xpt-6, ypt-6, xpt+6, ypt+6,\
        width=1, outline='black', fill='red', tags='dot')
As the ball moves, the values of the coordinates
may exceed the canvas dimensions.
With map2table() we get the bouncing effect.
Note that on canvas: (0,0) is at the topleft corner.
Recall that self.dim stores the number of pixel
rows and columns on canvas.
def map2table(self, pnt):
    """
    Keeps the ball on the pool table.
    """
    if pnt < 0:
        (quo, rest) = divmod(-pnt, self.dim)
    else:
        (quo, rest) = divmod(pnt, self.dim)
    if quo % 2 == 1:
        rest = self.dim - rest
    return rest
Imagine a succession of pool tables next to each other.
When the quotient quo is odd, we reflect,
otherwise we copy remainder rest.
Exercises
Adjust the GUI to simulate the movement of a billiard ball to work for rectangular pool tables.
Modify the GUI to simulate the movement of a billiard ball to use Entry widgets to allow the user to enter the initial position of the ball.
Add an extra row to the GUI, displaying in two Entry widgets the coordinates of the direction vector.
Add an Entry widget that will display the distance the ball has traveled. The value displayed in this Entry widget should change as the ball rolls.
Add a Checkbutton widget to the GUI at the top write corner with the label
draw path. When checked the path of the billiard ball is drawn on screen, as in Fig. 6.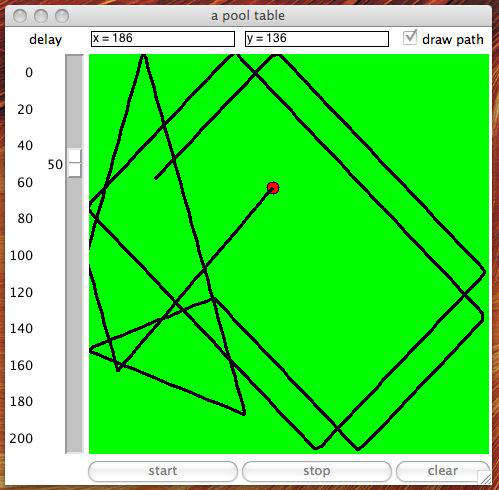
Fig. 6 The path of the billiard ball is drawn on screen.